
Eines professionals per a organitzadors que gestionen esdeveniments a gran escala — verificació d'entrada per QR a la porta, plànols de sala interactius, formularis d'inscripció personalitzats, exportació de dades de les persones assistents i anàlisi de disponibilitat. Els formularis d'inscripció personalitzats (fins a cinc preguntes; il·limitades amb Club) i l'exportació de dades de les persones assistents són gratuïts en tots els plans; la resta està disponible als plans premium Club i Business.
Verificació d'entrada amb QR (pla Business)
Registra la gent a la porta escanejant un codi QR. Ludoya confirma que és a la llista, i un toc a Registrar marca que s'ha presentat —amb els seus acompanyants—, així el teu registre d'assistència es construeix sol mentre la gent arriba. Sense llibreta i sense quadrar res després.
Tornar a escanejar el mateix codi és inofensiu: l'app indica "Ja registrat" en lloc de comptar-lo dues vegades.
Dues coses a configurar abans d'obrir portes:
- Activa l'assistència amb QR per a l'esdeveniment. Està desactivada per defecte — habilita Verificar l'assistència amb codi QR a la configuració de l'esdeveniment. L'opció només està disponible en esdeveniments organitzats per un grup, no en els personals.
- A la porta serveix qualsevol dispositiu amb càmera: l'app de Ludoya, o el web en un navegador, en un mòbil, una tauleta o un portàtil. Els assistents tampoc no necessiten l'app: el seu codi QR es veu bé en un navegador.
El registre d'entrada va amb una porta. Activar-lo per a un festival arriba a les seves activitats, però una partida programada no registra mai l'entrada pel seu compte, ni tampoc res que un convidat afegeixi al teu esdeveniment: qui seu a una taula també és a la llista de l'esdeveniment, així que el codi del mateix esdeveniment el deixa passar.
Qui no hagi vingut es pot marcar igualment amb Marcar com a absent a la llista d'assistents després.
Com funciona
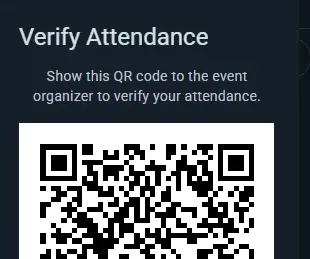
- Els assistents obren la pàgina de l'esdeveniment, a l'app o al web, i toquen el botó de confirmar assistència
- El botó RSVP mostra un menú desplegable amb opcions per canviar el seu RSVP, sortir de l'esdeveniment, editar el seu propi horari d'assistència i mostrar el seu codi QR quan se'ls demani
- El codi QR únic se'ls envia per correu quan s'apunten (i a cada convidat amb nom que va donar un correu), i sempre és a Mostrar el codi QR: res a imprimir
- A la porta, escaneja el codi: Ludoya el comprova contra la llista d'inscrits i mostra si la persona pot passar; Registrar l'apunta
Codis QR
- El codi de cada assistent és únic per a l'esdeveniment concret, i és al seu correu i al menú desplegable del botó RSVP de la pàgina de l'esdeveniment
- Si s'hi apunta la càmera d'un mòbil, s'obre la pàgina de registre d'entrada del mateix assistent a Ludoya; a la porta, escaneja'l amb l'escàner de Ludoya
- L'escaneig és instantani
Beneficis
- Controls a la porta ràpids i sense friccions, sense porta-retalls ni llistes en paper
- Verificació instantània de l'RSVP — aquesta persona pot entrar o no?
- Res a imprimir: perdre el correu no és cap problema, el codi també és a la pàgina de l'esdeveniment
- Evita que persones sense RSVP s'hi colin
Llocs amb nom (Organitzacions)
Defineix llocs amb nom dins de la teva ubicació i assigna-hi esdeveniments i partides programades.
Ubicacions i llocs
Ubicacions (la teva ubicació o qualsevol lloc físic que utilitzi l'organització) poden contenir llocs amb nom que corresponen a les àrees reals a dins:
- Un cafè pot tenir un lloc per a cada taula ("Taula 1", "Taula 2", "Taula vora la finestra")
- Un centre de convencions es pot dividir en sales ("Sala principal", "Sala de rol", "Zona de demostracions")
- Un recinte de diversos pisos pot etiquetar els llocs per planta ("A dalt — Taula A", "A baix — Sala del fons")
Configurar els llocs
- Obre la ubicació: des de la consola del teu club, Ubicacions (o Configuració → Ubicacions per als teus propis llocs)
- Crea i posa nom als llocs per a aquella ubicació (p. ex., "Taula 1", "Sala del fons", "Sala principal")
Utilitzar els llocs en els esdeveniments
Qualsevol esdeveniment en aquella ubicació pot reservar llocs — i en pot reservar diversos alhora, no només un. Una nit de club que ocupa la sala del fons i dues taules de davant tria tots tres.
Com sol funcionar:
- Un esdeveniment de tota la ubicació (una convenció, una nit de club que pren tot el lloc) sovint omet els llocs per complet i simplement s'assigna a la ubicació. Està bé — els llocs són opcionals.
- Subesdeveniments trien les sales o àrees que ocupa el seu itinerari, perquè els assistents sàpiguen on han d'anar: "Itinerari per a principiants → Sala principal", "Itinerari avançat → Sala del fons".
- Partides programades trien la taula on es juguen.
Una regla que val la pena conèixer: quan un esdeveniment pare ja ha reservat llocs, els seus fills deixen d'oferir el selector de llocs — l'elecció del pare ja descriu on passa tot. Deixa el pare sense llocs si vols que cada subesdeveniment i cada taula assignin el seu propi lloc.
Així, els assistents veuen exactament on és el seu itinerari o la seva taula, i dues coses que passen alhora no poden acabar reservant la mateixa taula.
Una partida per taula
Un espai marcat com a taula acull una sola partida alhora. Quan tries taula per a una partida, el selector marca qualsevol taula que una altra partida tingui a aquella hora ("ocupada 20:00–22:00"), i una taula ocupada no es pot desar. Les partides seguides no xoquen, una sala acull diverses partides alhora i mai no es comprova, i una partida dins d'un esdeveniment que va reservar la taula la comparteix amb aquell esdeveniment.
Un club que vol que cada partida al seu local digui on es juga activa Les partides aquí trien taula a Sales i taules de la ubicació (consola del club → Ubicacions). A partir d'aleshores, una partida nova no es pot desar sense taula; les partides ja programades es queden com estan.
Plànols interactius del recinte (pla Business)
Afegeix una capa de mapa visual sobre els teus llocs amb nom. Puja una imatge del plànol i col·loca-hi cada lloc — les persones assistents exploraran el teu recinte en un mapa desplaçable i amb zoom, amb cada taula, sala o zona de joc marcada.
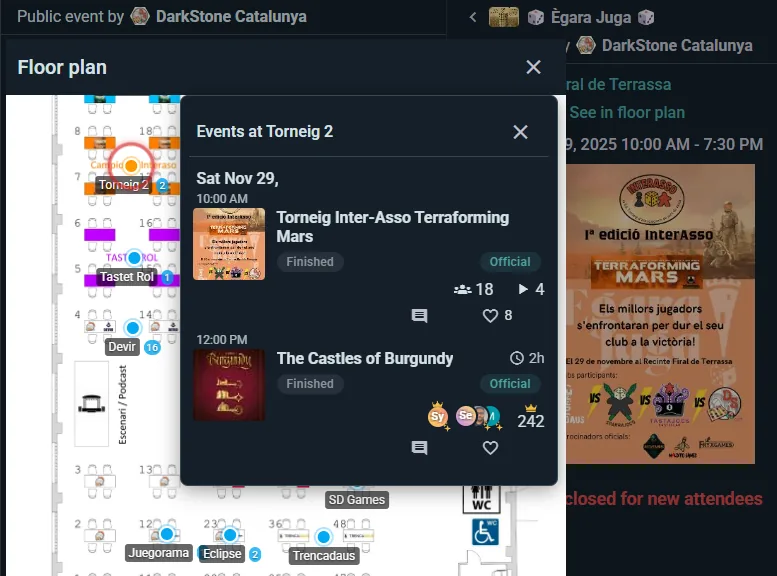
Configurar un plànol
- Obre una ubicació que ja tingui llocs (Ubicacions, a la consola) i activa'n el plànol
- Puja una imatge del plànol (una foto, un diagrama o un plànol arquitectònic)
- Fes clic en qualsevol lloc per arrossegar-lo a la zona correcta de la imatge
Sense un plànol, els llocs continuen funcionant com a etiquetes de text simples ("ets a la taula 3"). El plànol visual destaca en recintes grans on la navegació és important.
Un poble, una plaça o un parc: un mapa real
Un festival repartit per un poble, una fira de carpes en una sola plaça, una gimcana per un parc: no hi ha cap plànol per dibuixar. Els seus llocs van en un mapa real (Google Maps), marcats on són.
- A Ubicacions, a la consola, obre el recinte. Un poble triat entre els suggeriments (o un parc o una plaça que Google coneix com a tal) ja és un recinte amb mapa; per a qualsevol altre (un recinte firal, una plaça que Google tracta com un carrer) activa Mostrar-lo en un mapa real. L'adreça ha de sortir dels suggeriments perquè el mapa sàpiga on és. Fer servir una imatge en lloc del mapa torna a una imatge del plànol.
- Marcar llocs al mapa l'obre. Toca un dels llocs que són fora del mapa i després toca on és; o toca un tros buit del mapa per afegir-hi un lloc nou (Desfer anul·la un toc que era per moure el mapa). Arrossega un marcador per moure'l; Treure'l del mapa el desmarca.
- Un lloc pot continuar tenint un plànol propi (un pavelló amb les seves taules): afegeix-ne la imatge als detalls del lloc, i les seves taules es dibuixen sobre aquesta imatge com sempre. Els visitants hi arriben amb Veure per dins.
Els assistents tenen el mapa real al mapa del recinte de l'esdeveniment: cada lloc amb el nom al seu marcador i quantes activitats hi ha (els llocs sense res a l'hora mostrada s'esvaeixen), una Llista de llocs per trobar-ne un pel nom, una Vista de satèl·lit per distingir una carpa de la del costat, i Mostrar on soc, que demana la ubicació del mòbil només quan el toquen. Tocar un lloc manté el mapa i en mostra la fitxa: què hi ha, com trobar-lo un cop allà, Veure per dins per a un pavelló amb plànol propi, i Com arribar-hi; una activitat en un lloc marcat també mostra Com arribar-hi, i la pàgina de l'esdeveniment mostra una imatge petita del mapa. Una imatge del plànol pujada més tard substitueix el mapa; els llocs marcats al mapa conserven el marcador fins que se'ls dibuixa una forma a la imatge.
El mapa del recinte el dia de l'esdeveniment
Un esdeveniment que se celebra en un local amb plànol té la seva pròpia vista de mapa del recinte. Cada taula i cada sala mostren què hi ha: toca'n una i les seves activitats s'obren en un panell, amb horaris, places i una manera d'apuntar-s'hi. Els noms de les taules s'encongeixen per cabre a la seva taula al mòbil, així que el mapa es continua llegint amb el braç estirat.
Un local i cadascun dels seus llocs poden portar un text curt propi: per quina porta s'entra, per a què és la sala, "demana la clau a la barra". Els llocs també surten per la API pública, així que el teu propi web els pot mostrar.
Ideal per a
- Recintes grans amb diverses sales o zones
- Convencions amb desenes de taules
- Cafeteries de jocs de taula on els habituals volen triar el seu lloc preferit
- Qualsevol recinte on "On és el meu joc?" sigui una pregunta habitual
Formularis d'assistència personalitzats (gratuïts en tots els plans — fins a cinc preguntes, il·limitades amb Club)
Fes preguntes als assistents quan confirmin l'assistència (RSVP) — recull la informació que necessites per organitzar un esdeveniment millor, tot sense sortir de Ludoya per fer servir un creador de formularis extern.
Crear preguntes personalitzades
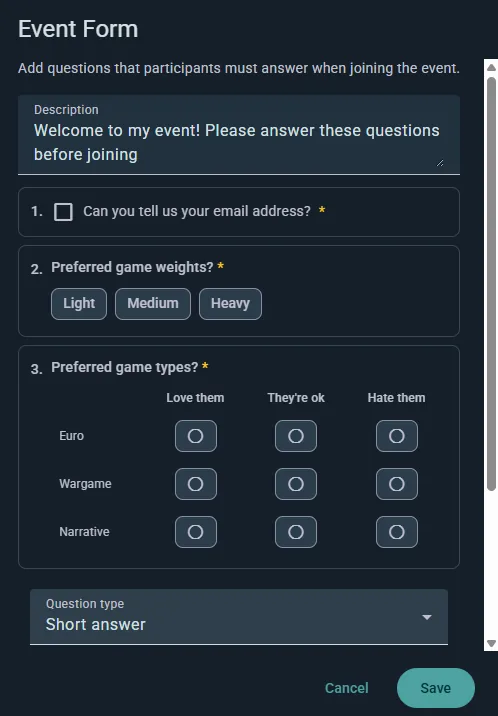
- Obre la configuració de l'esdeveniment i tria la secció Formulari
- Afegeix les teves preguntes, arrossegant-les fins a l'ordre que vulguis (o duplicant-ne una que ja hagis configurat)
- Marca qualsevol pregunta com a obligatòria
- Desa — les preguntes apareixeran quan la gent s'inscrigui
Tingues en compte que l'esdeveniment ha de pertànyer a un grup, i que afegir un formulari desactiva els convidats anònims: si fas preguntes, Ludoya necessita saber qui respon.
Tipus de preguntes
- Resposta curta — una línia de text lliure
- Paràgraf — una resposta escrita més llarga
- Opció única — tria una de la llista
- Selecció múltiple — tria totes les que s'apliquin
- Escala lineal — valora en un rang, amb etiquetes a cada extrem
- Quadrícula de selecció múltiple — diverses preguntes que comparteixen un mateix conjunt de respostes, en files i columnes
- Informació personal — sol·licita un correu electrònic, número de telèfon, data de naixement o gènere, validats correctament en lloc de recollir-los com a text lliure
Exemples de preguntes:
- "Tens alguna restricció alimentària?"
- "Fins a quin punt coneixes els jocs euro pesats?"
- "Necessites transport?"
- "És la primera vegada que hi assisteixes?"
Preguntar per convidat
Qualsevol pregunta de resposta curta, d'elecció o d'informació personal es pot marcar com a Preguntar per convidat. Aleshores es respon per separat per a cada persona addicional que un assistent porti — tant amics reservats com convidats amb nom —, amb l'assistent omplint-la en el seu nom; i, si són obligatòries, bloquejaran la reserva fins que estiguin completades. Així és com reculls quatre conjunts de requisits dietètics d'una sola persona que reserva una taula per a quatre.
Experiència de l'assistent
La gent respon mentre s'inscriu, i les preguntes obligatòries s'han d'emplenar abans de poder confirmar. Les respostes es desen amb la seva inscripció, són visibles a la gestió d'assistents i s'exporten juntament amb la llista d'assistents.
Casos d'ús
- Esdeveniments amb càtering — necessitats dietètiques i al·lèrgies
- Nits per a principiants — mesurar l'experiència per equilibrar taules
- Esdeveniments corporatius — recopilar informació de departament o equip
- Nits temàtiques — preferències de vestuari, assignacions d'equip
Veure quin formulari demana cada esdeveniment
No cal obrir la configuració d'un esdeveniment per saber què demana en apuntar-s'hi:
- A la consola del club, Esdeveniments té una columna Formulari tan bon punt algun esdeveniment fa preguntes: el nom de la plantilla que segueix, o Preguntes pròpies.
- Formularis indica, per a cada plantilla, els esdeveniments que la demanen a Utilitzat per. Obre les Respostes d'una plantilla i Demanat per els llista tots, i cadascun obre el seu esdeveniment.
- A la consola d'un esdeveniment, la targeta Formulari del seu resum, i la de cada part d'un programa, diu què es demana en apuntar-s'hi: les preguntes d'una plantilla, les seves pròpies, les de l'esdeveniment principal o cap, amb les preguntes llistades. Canvia-ho allà mateix amb el mateix selector que a la configuració de l'esdeveniment; en una data d'un esdeveniment que es repeteix, pregunta fins on arriba el canvi. Editar preguntes canvia les seves pròpies preguntes, i Veure totes les respostes obre les respostes d'una plantilla aplegades de tots els esdeveniments.
- Al Programa d'un festival, cada activitat que demana un formulari propi mostra el nom d'aquest formulari, i el xip Formulari redueix la llista a les activitats que demanen un mateix formulari.
Canviar una opció quan ja hi ha respostes
El mateix editor dona forma al formulari d'inscripció d'un club i a les seves plantilles de formulari desades, i la regla és la mateixa a tot arreu. Per corregir o reformular una opció, edita'n el text on és: totes les persones que la van triar conserven la resposta amb la nova redacció, així que la taula de membres, el seu filtre per resposta i l'exportació les compten de seguida. Les diferències només de majúscules o accents s'aparellen soles.
Per oferir una altra cosa, esborra l'opció i afegeix-ne una de nova. Les respostes a l'opció esborrada es queden com estaven i mai no passen a la nova, així que ningú no acaba havent triat una cosa que no va triar.
Corregir adreces mal escrites i inscripcions dobles
Una adreça de correu mal escrita falla sense fer soroll: la confirmació i el seu QR d'entrada no arriben enlloc, i sovint la persona es torna a apuntar, de manera que acaba ocupant dues places. Quan això passa en qualsevol part del teu esdeveniment, apareix una targeta Per revisar a sobre de la llista als Assistents de la consola de l'esdeveniment, i una línia a Requereix atenció del seu resum t'hi porta.
- Adreces que semblen mal escrites mostra cada adreça que no pot funcionar (gmail.con, gmai.com, hotmial.com, gmail.es…) al costat de la que es volia escriure. Corregir obre Editar el correu amb aquesta suggerència ja posada.
- Apuntats dues vegades? mostra dues places d'una mateixa llista que semblen la mateixa persona: la Mateixa adreça (sense comptar una errada ni els punts de Gmail), o el Mateix nom, quan un nom és l'altre amb més paraules al darrere. Veus l'adreça de cada banda, qui els va apuntar, els acompanyants que porten i quan es van apuntar. Conservar aquesta allibera l'altra plaça sense avisar ningú, ja que la persona continua venint, i els acompanyants que portava passen a la que conserves. Són dues persones diferents deixa de mostrar la parella.
- Editar el correu també és al menú de cada fila de la llista. Pots corregir l'adreça d'un acompanyant (el que el teu formulari li va demanar) i la d'un compte que va crear la teva integració i que encara no ha activat ningú. L'adreça d'un usuari de Ludoya és només seva.
- Enviar la seva confirmació i el seu QR a aquesta adreça està activat per defecte. L'envia Ludoya, tret que apuntis la gent a través de l'API pública i els escriguis tu: aleshores espera a la teva cua de correu perquè l'enviïs des de la teva pròpia adreça, com la resta del seu correu.
- Si l'adreça corregida pertany a un compte de Ludoya, la plaça passa a ser d'aquest compte, a la seva app. Si aquest compte ja s'hi ha apuntat, és la mateixa persona dues vegades, i la targeta t'ofereix conservar-ne una de les dues.
Exportació de dades de les persones assistents (gratuïta en tots els plans)
Descarrega les llistes d'inscrits i les respostes dels formularis com a full de càlcul d'Excel o com a CSV.
Què pots exportar
Una fila per assistent, amb aquestes columnes:
- name (nom) i username (nom d'usuari)
- where (on): en un esdeveniment amb programa, l'activitat a la qual es van apuntar, amb les seccions que té per sobre ("Dissabte: taules lliures › Azul")
- attendance — el seu estat de RSVP
- guests — quants convidats anònims porten
- una columna per pregunta dels teus formularis d'inscripció personalitzats, amb les seves respostes
En un esdeveniment amb programa, el primer full llista tothom, cada persona un cop per cada lloc on es va apuntar, i cada activitat que penja directament de l'esdeveniment té el seu propi full amb tothom qui hi ha a dins.
Dues coses que val la pena saber si hi construeixes un full de càlcul a sobre:
- Cada pregunta de qualsevol formulari de l'esdeveniment té la seva columna, tant si s'ha respost com si no, perquè dues exportacions del mateix esdeveniment quadrin. Les respostes a una pregunta que ja has tret s'exporten igualment, en columnes després de les altres anomenades
removed-1,removed-2… - Les respostes d'opció múltiple arriben en una sola cel·la, separades per un
|, de manera que "Vegetarià|Sense fruits secs" és un únic camp i no pas dues columnes.
Les marques de registre d'entrada i de no presentació no són a l'exportació — el CSV reflecteix qui es va inscriure i què et va dir, no qui va travessar la porta.
Casos d'ús
- Seguiments per correu electrònic o seguiment de programes de fidelització
- La teva pròpia anàlisi de qui es va apuntar a què
- Planificació d'esdeveniments futurs a partir de dades d'assistència passades
Per a l'esdeveniment en xifres, a punt per donar-lo a un patrocinador, consulta l'Informe de l'esdeveniment més avall.
Informe de l'esdeveniment (gratis en tots els plans)
Tan bon punt comença el teu esdeveniment, l'Informe de la seva consola el mostra en xifres, comptat sobre tot el que conté: cada activitat, estand, torneig, mercat i ludoteca. S'omple mentre l'esdeveniment és en marxa i s'hi queda per sempre quan s'acaba. Només el veu qui organitza l'esdeveniment sencer, des de la consola del mateix esdeveniment; un club que porta un estand veu la consola d'aquell estand.
A dalt de tot
Persones apuntades (totes les que es van apuntar a l'esdeveniment o a qualsevol cosa de dins, cadascuna comptada un cop, acompanyants inclosos: el que el Resum anomena Gent que ve), activitats fetes, places ocupades (quantes de les places oferides es van ocupar) i jocs de segona mà venuts. Cada activitat compta fins a les seves places, així que la gent encabida en una taula plena no compensa una taula buida en un altre lloc; es mostra a part, com a persones afegides a activitats ja plenes.
Què va funcionar i què revisar la propera vegada
Dues llistes curtes assenyalen què repetir i què canviar, cadascuna amb el seu número: activitats que van omplir totes les places o van tenir llista d'espera (ofereix-ne més), l'hora de més activitat, la gent que ja havia vingut als teus esdeveniments anteriors, un joc que es va prestar tant que en cal un segon exemplar, activitats on ningú no es va apuntar o que van quedar gairebé buides, persones esperades al registre que no es van presentar. Una línia només apareix quan els números són prou grans per voler dir alguna cosa.
Gràfics i xifres
- Activitats més populars i menys ocupades, i places ocupades per secció del programa (tot el rol, tots els tornejos)
- Places ocupades per hora d'inici: les sessions d'un estand de joc compten a la seva hora
- Els jocs més jugats i els més prestats de la ludoteca
- Opinions dels estands: els resultats de cada estand de joc a les seves pròpies preguntes de després de la sessió: quants dels seus jugadors van respondre, la mitjana de cada escala i el percentatge de jugadors que van triar cada resposta d'una pregunta d'opcions. En una pregunta que deixa triar-ne diverses, els percentatges sumen més del 100 %; una llista llarga en mostra les tres més triades. Obre un estand des del seu nom per llegir-ne els comentaris
- En xifres: persones (acompanyants, qui es va apuntar al mateix esdeveniment, qui també va venir als teus esdeveniments anteriors, comptes nous de Ludoya, registres a l'entrada, llistes d'espera), el programa (activitats que es van omplir, respostes a les preguntes d'opinió dels estands), el mercat de segona mà (venuts a la parada del mercat i amb anuncis en línia per a l'esdeveniment, i per quant), la ludoteca, els missatges als xats de l'esdeveniment i els anuncis que vas enviar, la gimcana i les entrades quan l'esdeveniment en va tenir
Totes les activitats
Cada activitat amb la seva secció, hora d'inici, places ocupades i com de plena va estar, ordenable i descarregable com a full de càlcul. Una activitat que ningú no reserva (una taula de demostració, joc lliure) mostra Oberta, sense inscripció en lloc d'un zero. Un estand de joc compta com una activitat, amb les sessions sumades; un torneig compta un cop, amb les rondes a dins.
Comparat amb els teus altres esdeveniments
L'informe posa l'esdeveniment al costat dels esdeveniments anteriors del teu club on va venir gent, del més recent al més antic: persones apuntades, activitats, places ocupades, com de plens van estar, partides i jocs venuts. Un festival es compara amb els teus altres esdeveniments que tenen programa propi, mai amb una nit de jocs setmanal, i només amb esdeveniments que també organitzes tu.
Descarrega'l en PDF
Descarrega el PDF desa l'informe sencer per enviar-lo a un patrocinador, a un ajuntament o al teu equip. Només totals: no hi surt el nom de ningú que va venir. Els comentaris que deixen els jugadors es queden a la targeta Opinions de cada estand.
Quan un esdeveniment d'un club acaba amb 10 persones o més, els seus administradors també troben Duu un altre club a l'informe: quanta gent va reunir i Compartir per a l'enllaç d'invitació del club (consulta la consola del club).
Mapa de calor de disponibilitat (pla Club)
Un mapa de calor per esdeveniment que mostra quan els assistents seran realment presents durant l'esdeveniment, perquè els organitzadors puguin planificar partides programades al voltant de les hores en què hi hagi més gent.
Com contribueixen els assistents
En unir-se a un esdeveniment, cada assistent marca en quines franges horàries dins de l'horari propi de l'esdeveniment hi serà. En una convenció de cap de setmana que va del divendres al vespre fins al diumenge, un assistent podria dir "divendres 18:00–22:00 i dissabte tot el dia", un altre potser només podrà venir dissabte a la tarda. El menú desplegable del botó RSVP els permet editar aquest horari personal d'assistència en qualsevol moment.
Què mostra
- Una franja de densitat visual disposada al llarg del propi horari de l'esdeveniment (no per setmanes ni mesos)
- Pics on la majoria d'assistents seran presents
- Valls on pocs assistents podran acudir
- S'actualitza en temps real a mesura que els assistents ajusten la seva disponibilitat
Com ho fan servir els organitzadors
- Obre la llista d'assistents de l'esdeveniment
- Toca Veure horaris
- Llegeix la franja de densitat del Resum de disponibilitat per identificar les franges on hi haurà més gent
- Posa les teves partides programades, xerrades o tornejos més importants en aquells pics perquè hi pugui assistir el públic més nombrós
- A sota, Horaris individuals enumera cada assistent pel seu nom amb les seves barres franja a franja — útil quan necessites coordinar persones concretes, com un demostrador per a un joc pesat o els jugadors per a una taula preacordada
Qui pot veure què
Ambdues seccions apareixen juntes en el mateix diàleg: la franja agregada i els horaris individuals amb nom. En un esdeveniment el grup amfitrió del qual tingui el pla Club, qualsevol que pugui obrir la llista d'assistents els pot veure — no només els organitzadors.
Explica-ho als teus assistents, ja que les hores que marquin seran visibles per a la resta d'assistents de l'esdeveniment amb el seu nom. Si això no és el que vols per a un esdeveniment concret, no demanis a la gent que ompli un horari personal.
Anuncis a tothom de l'esdeveniment (gratuït a tots els plans)
Explica una cosa a tothom del teu esdeveniment d'un sol cop: el torneig comença tard, una activitat canvia de sala, aquest és el pla del dia. Obre la consola de l'esdeveniment i tria Anuncis.
Qui el rep
Tothom qui participa a l'esdeveniment: no només qui es va inscriure a l'esdeveniment en si, sinó també tothom qui:
- es va inscriure a qualsevol activitat, partida o torneig de dins l'esdeveniment
- ven al seu mercat de segona mà, o hi té una caixa reservada
- va agafar un joc en préstec de la seva ludoteca
També el pots enviar a una sola part: una activitat (només la gent de la gimcana) o una secció sencera del programa amb totes les seves activitats (totes les taules de rol alhora). Inclou-hi la llista d'espera quan l'activitat en tingui. Abans d'enviar-lo, la pàgina et diu a quantes persones arriba i com: amb l'app, o per correu per a qui no té l'app. Els acompanyants que algú va inscriure amb ell el reben a través d'aquesta persona.
Com arriba
- Com a notificació a l'app, i per correu per a qui no té l'app: decideixen les preferències de notificacions de cada persona, com per a tota la resta
- Arriba de part del teu club (o de tu, en un esdeveniment personal), amb el títol de l'esdeveniment
- Fes servir Enviar-me una prova primer per veure exactament què rebrà la gent
El tauler de l'esdeveniment
Cada missatge que envies també queda a la pàgina de l'esdeveniment, del més recent al més antic, de manera que qualsevol que l'obri més tard, o que arribi el mateix dia, llegeix el que s'ha anunciat. La pàgina d'una activitat també mostra els missatges de tot el festival i els de la seva secció. Quan un missatge quedi desfasat, treu-lo de la pàgina de l'esdeveniment des de El que has enviat: qui ja l'ha rebut el conserva.
Límits
Fins a 5 missatges al dia per esdeveniment, inclosos els que van a una sola activitat o secció, perquè els que enviïs es llegeixin.
Aparellament de playtest (pla Business)
Per a un dia en què els autors porten prototips i els jugadors els proven. En lloc d'una rotació planificada a mà, Ludoya asseu tothom a taules, franja a franja.
Activar-lo
Al formulari d'un esdeveniment (un esdeveniment normal, no un torneig ni una taula de joc), toca + Repartiment de taules i tria Ludoya aparella playtesters. Les franges, les taules i l'horari es configuren després a la consola de l'esdeveniment, a Playtesting: quant dura una franja, quantes taules té la sala i quant dura la taula de cada joc (parteix de la durada del joc).
Abans del dia
- Els autors afegeixen els seus prototips des de la pàgina de l'esdeveniment, amb Duu un prototip.
- Els jugadors marquen els prototips que volen provar, a la pàgina de l'esdeveniment. La consola mostra quins són els més desitjats.
L'horari
Quan ja hi hagi els prototips, tria Generar l'horari. Ludoya reparteix tothom entre les franges, afegeix cada taula al programa de l'esdeveniment com una taula de joc normal ("Taula 3 · el joc") i envia a cada persona una sola notificació amb les seves taules. Després, la consola indica quants desitjos s'han complert i quines parelles de persones coincideixen dues vegades: una taula o una franja més li dona marge per barrejar.
Si s'hi apunta o se'n va gent, o arriben prototips nous, Actualitzar l'horari manté les taules que ja s'estan jugant i els seients que hagis fixat, i torna a asseure tots els altres. Regenerar torna a repartir totes les taules que no han començat. En tots dos casos, només reben avís les persones a qui els canvien les taules.
Desactivar l'aparellament de playtest elimina les taules que havia programat i que no han començat. Les taules ja jugades es queden.
Els meus prototips (per a autors)
Un joc que encara no està publicat també té casa. A Explorar → Jocs, a No trobes el teu joc?, tria És un prototip meu; des d'aleshores Els meus prototips és una targeta de la teva pàgina d'inici.
- Nou prototip: un nom, una descripció, nombre de jugadors, durada i edat mínima, com qualsevol joc. Deixa'l Privat mentre hi treballes, No llistat per compartir-lo per enllaç, o Públic. Un prototip privat no es pot portar a un playtest: fes-lo no llistat o públic abans.
- Versions: afegeix-ne una cada cop que el joc canviï (Nom de la nova versió), així els comentaris queden associats a la versió que la gent va jugar de veritat.
- Propietaris: Afegeix copropietari per a la resta de l'equip de disseny; cada propietari gestiona el prototip.
- Formulari de comentaris: les preguntes que responen els qui proven una versió. Després d'una taula de playtest, els jugadors hi veuen Deixa comentaris.
- Comentaris: les puntuacions i els comentaris de cada versió, i com es va moure cada pregunta Entre versions, per saber si un canvi va ajudar.
- Playtests: cada esdeveniment on s'ha portat el prototip. Duu un prototip, en un esdeveniment amb aparellament de playtest, l'hi inscriu.
L'esdeveniment en una pantalla gran (pla Business)
Posa l'esdeveniment al projector o a la tele del local. Tria Mostrar en una pantalla al menú de l'esdeveniment, o a la seva consola, i Obrir la pantalla:
- Un torneig mostra les taules de la ronda, el rellotge de la ronda i la classificació, que s'actualitzen a mesura que arriben els resultats. Amb Mostrar la classificació només al final activat, la pantalla també l'amaga.
- Un programa o un punt de joc mostra què hi ha ara i després, on, i les places que queden.
- Un codi QR a la cantonada deixa que la sala ho segueixi des del mòbil i s'hi apunti.
Una secció o un torneig d'un festival pot tenir la seva pròpia pantalla, des de la seva consola: la sala de rol mostra només les seves taules, la de tornejos només les seves rondes. Funciona amb el pla del festival.
Ningú no ha d'iniciar sessió a la pantalla: l'enllaç és la clau, així que el portàtil del projector pot ser de qualsevol. El projector és en un altre ordinador? Obre-hi el mateix enllaç i prem F per a pantalla completa. La pantalla torna a llegir l'esdeveniment cada pocs segons i ho diu a la cantonada si perd la connexió, així una pantalla vella mai no passa per una en directe. Si l'enllaç acaba on no toca, fes servir Crear un enllaç nou; l'antic deixa de funcionar.
Una gimcana per tot el festival (pla Business)
Una gimcana fa que els visitants recorrin els estands: cada estand participant té un cartell amb el seu propi QR i una pregunta ràpida. Prepara-la a la consola de l'esdeveniment, a Gimcana.
- Preparar una gimcana i després Afegir una parada per cada estand: on és i què hi fan els jugadors: Triar una resposta (marca la correcta o tria que sigui una enquesta), Escriure una resposta (posa-hi totes les respostes que dones per bones; no compten les majúscules, els accents ni la puntuació) o Només trobar-la.
- A Configuració, escriu la línia de Premi i sorteig (què es pot guanyar, i quan i on se sorteja): surt a cada parada i cartell.
- Imprimir cartells: un per parada, amb el seu QR i una adreça curta per escriure quan la càmera no el llegeix. Tria la mida: A4 per a una paret o la part davantera d'un estand, A5 (dos per full A4) per a la taula d'un estand, o A6 (quatre per full) com a targeta de taulell. S'ha mullat un cartell? Imprimir el cartell d'aquesta parada, al menú d'aquella parada, en reimprimeix només aquell. Les parades es troben en qualsevol ordre, així que els cartells no porten números. Mentre és un esborrany, només els organitzadors poden obrir les parades, així que prova-les abans.
- Obrir la gimcana quan s'obrin les portes. Abans l'esdeveniment necessita una data.
En un recinte amb mapa real (un poble, una plaça), cada parada té el seu Lloc al mapa del recinte. Una parada nova comença a El lloc amb el nom de la parada: el lloc del recinte que es diu així, o un de nou que espera a l'editor del mapa que el marquis. Seixanta aparadors? Afegeix les parades i després marca'n els llocs d'un cop; Donar un lloc a cada parada ho fa amb les parades afegides abans, i la consola diu quantes parades continuen fora del mapa, amb Marcar-los per obrir l'editor del mapa. Els jugadors obren Veure les parades en un mapa des de la pàgina de qualsevol parada: la capa Gimcana mostra cada parada com una bandera per trobar o un tic verd quan ja l'han trobada, quantes en porten de quantes, Veure-les llista les parades que el mapa encara no pot mostrar (primer les que falten per trobar), i tocar un lloc diu quines parades té, mai què pregunten. Mentre amaguis la llista de parades, el mapa també les amaga.
Els visitants juguen al navegador del mòbil, sense instal·lar cap app. La primera parada que escanegen mostra la seva pregunta i els demana un nom (o un nom d'equip: una família amb un sol mòbil juga com un equip) i un correu, i que confirmin que tenen 14 anys o més o que juguen amb el seu fill o filla. Un correu que ja té un compte de Ludoya rep un codi per correu, així ningú no pot jugar en nom d'una altra persona. Cadascuna de les altres parades va directa a la seva pregunta. Cada parada admet una resposta, i tu tries si els jugadors veuen si han encertat just després de cada resposta o només quan s'acabi la gimcana (així les respostes no circulen). Has corregit a mitja jornada una resposta correcta mal escrita? Les respostes de tothom en aquella parada es tornen a corregir. Un estand marxa a mig festival? Tancar aquesta parada: el seu QR deixa d'acceptar respostes, qui l'ha trobada conserva el punt i surt de la gimcana i dels cartells per a tots els altres.
La consola mostra quants han respost a cada parada i la Classificació: primer més respostes correctes, després més parades i després qui ha acabat abans. Els voluntaris poden buscar un jugador pel nom, i la classificació es descarrega com a full de càlcul. Per donar premis, afegeix un sorteig a l'esdeveniment i tria Jugadors de la gimcana a Qui hi entra, amb un mínim de parades trobades o de respostes correctes; marca Cada resposta correcta és una butlleta més per premiar els millors sense deixar fora la resta. Així cada parada indica als jugadors què els falta per entrar al sorteig, i quan ja hi són. Els organitzadors i voluntaris que hi han jugat també entren al sorteig: si en guanya un, anul·la el premi i torna a sortejar. Acabar la gimcana quan facis el sorteig: ja no s'accepten respostes i els jugadors veuen com els ha anat.
Als visitants que no acaben mai de crear el seu compte de Ludoya se'ls esborren les dades 30 dies després de l'esdeveniment.