
أدوات احترافية للمنظمين الذين يديرون فعاليات واسعة النطاق — التحقق من الدخول برمز QR عند الباب، ومخططات قاعة تفاعلية، ونماذج تسجيل مخصصة، وتصدير بيانات الحضور، وتحليل التوافر. نماذج التسجيل المخصصة (حتى خمسة أسئلة؛ وبلا حد مع Club) وتصدير بيانات الحضور مجانيان في كل الخطط؛ أما البقية فمتاحة في الخطتين المميزتين Club وBusiness.
التحقق من الدخول برمز QR (خطة Business)
سجّل دخول الناس عند الباب بمسح رمز QR. يؤكد Ludoya أنهم في القائمة، ونقرة واحدة على تسجيل تعلّم وصولهم — ومرافقيهم أيضًا —، فيُبنى سجل الحضور بنفسه مع وصول الناس. بلا لوح ورقي، وبلا مطابقة بعد ذلك.
وإعادة مسح الرمز نفسه لا تضر: يقول التطبيق "تم تسجيل الوصول بالفعل" بدل أن يحتسب الشخص مرتين.
أمران يُضبطان قبل فتح الأبواب:
- فعّل الحضور برمز QR للفعالية. فهو معطّل افتراضيًا — فعّل التحقق من الحضور باستخدام رمز QR في إعدادات الفعالية. والخيار متاح فقط في الفعاليات التي تستضيفها مجموعة، لا الشخصية منها.
- أي جهاز مزوّد بكاميرا يصلح عند الباب: تطبيق Ludoya أو الموقع الإلكتروني في متصفح، على هاتف أو جهاز لوحي أو حاسوب محمول. ولا يحتاج الحضور إلى التطبيق أيضًا — يظهر رمز QR الخاص بهم جيدًا في المتصفح.
تسجيل الدخول يرتبط بباب. تفعيله لمهرجان يشمل أنشطته، لكن جلسة اللعب المجدولة لا تسجّل دخول الناس بنفسها أبدًا، ولا أي شيء يضيفه ضيف إلى فعاليتك: من يجلس إلى طاولة موجود في قائمة الفعالية أيضًا، لذا يُدخله رمز الفعالية نفسها.
ومن لم يحضر يمكن وسمه لاحقًا في قائمة الحضور بـوضع علامة عدم الحضور.
كيف يعمل
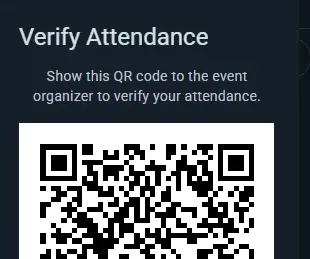
- يفتح الحضور صفحة الفعالية، في التطبيق أو على الموقع، ويضغطون على زر الرد على الدعوة
- يكشف زر الرد قائمة منسدلة فيها خيارات لتغيير ردّهم، ومغادرة الفعالية، وتعديل جدول حضورهم الخاص، وعرض رمز QR الخاص بهم حين يُطلب منهم
- يُرسَل رمز QR الفريد إليهم بالبريد الإلكتروني عند التسجيل (وإلى كل ضيف مسمّى أعطى بريدًا إلكترونيًا)، وهو موجود دائمًا تحت عرض رمز QR — لا شيء للطباعة
- امسح الرمز عند الباب — يتحقق Ludoya منه مقابل قائمة الردود ويُظهر ما إذا كان الشخص يستطيع الدخول؛ وتسجيل يسجّله
رموز QR
- رمز كل حاضر فريد لتلك الفعالية بعينها، وهو في بريده الإلكتروني وفي القائمة المنسدلة لزر الرد في صفحة الفعالية
- توجيه كاميرا هاتف إليه يفتح صفحة تسجيل الدخول الخاصة بالحاضر نفسه في Ludoya؛ أما عند الباب فامسحه بماسح Ludoya
- والمسح فوري
الفوائد
- تدقيق سريع سلس عند الباب بلا ألواح ورق ولا قوائم مطبوعة
- تحقق فوري من الرد — أيُسمح لهذا الشخص بالدخول أم لا؟
- لا شيء للطباعة: ضياع البريد الإلكتروني ليس خسارة، فالرمز موجود أيضًا في صفحة الفعالية
- يمنع من لم يردّوا على الدعوة من التسلل
أماكن مسمّاة (المنظمات)
حدّد أماكن مسمّاة داخل قاعتك، وأسنِد إليها الفعاليات وجلسات اللعب المجدولة.
المواقع والأماكن
يمكن أن تحتوي المواقع (قاعتك، أو أي مكان مادي تستخدمه المنظمة) على أماكن مسمّاة تقابل المناطق الواقعية داخلها:
- قد يكون للمقهى مكان لكل طاولة ("طاولة 1"، و"طاولة 2"، و"ركن النافذة")
- وقد تنقسم قاعة المعارض إلى غرف ("القاعة الرئيسية"، و"غرفة ألعاب الأدوار"، و"منطقة العرض")
- وقد تسمّي قاعةٌ متعددة الطوابق أماكنها بحسب الطابق ("الأعلى — طاولة أ"، و"الأسفل — الغرفة الخلفية")
إعداد الأماكن
- افتح الموقع: من وحدة تحكم النادي، المواقع (أو الإعدادات ← المواقع لمواقعك الخاصة)
- أنشئ الأماكن لذلك الموقع وسمِّها (مثل "طاولة 1"، و"الغرفة الخلفية"، و"القاعة الرئيسية")
استخدام الأماكن في الفعاليات
أي فعالية في ذلك الموقع تستطيع حجز أماكن — بل تستطيع حجز عدة أماكن دفعة واحدة لا مكانًا واحدًا. فليلة نادٍ تستولي على الغرفة الخلفية وعلى طاولتين أماميتين تختار الثلاثة جميعًا.
وهكذا تجري الأمور عادةً:
- الفعالية التي تشمل القاعة كلها (مؤتمر، أو ليلة نادٍ تأخذ المكان بأسره) كثيرًا ما تتجاوز الأماكن تمامًا وتجلس في الموقع فحسب. ولا بأس في ذلك — فالأماكن اختيارية.
- والفعاليات الفرعية تختار الغرف أو المناطق التي يشغلها مسارها ليعرف الحاضرون إلى أين يذهبون: "مسار المبتدئين ← القاعة الرئيسية"، و"المسار المتقدم ← الغرفة الخلفية".
- وجلسات اللعب المجدولة تختار الطاولة التي تُلعب عليها.
وثمة قاعدة تستحق المعرفة: متى حجزت الفعالية الأب أماكن، توقّف أبناؤها عن عرض مُنتقي المكان — فاختيار الأب يصف أصلًا أين يجري كل شيء. فاترك الأب بلا أماكن إن أردت أن تثبّت كل فعالية فرعية وكل طاولة نفسها.
وعندئذ يرى الحاضرون تحديدًا أين مسارهم أو طاولتهم، ولا يمكن لأمرين يجريان معًا أن ينتهيا إلى حجز الطاولة نفسها.
جلسة لعب واحدة لكل طاولة
المكان المحدَّد كطاولة يتّسع لجلسة لعب واحدة في كل مرة. عندما تختار طاولة لجلسة لعب، يُعلِّم المُنتقي كل طاولة تشغلها جلسة أخرى في ذلك الوقت ("محجوزة 20:00–22:00")، ولا يمكن حفظ طاولة محجوزة. الجلسات المتتالية لا مشكلة فيها، والقاعة تتّسع لعدة جلسات جنبًا إلى جنب ولا يتم التحقق منها أبدًا، وجلسة اللعب داخل فعالية حجزت الطاولة تتشاركها مع تلك الفعالية.
النادي الذي يريد أن تحدّد كل جلسة لعب في مقرّه مكان لعبها يفعّل جلسات اللعب هنا تختار طاولة ضمن القاعات والطاولات في الموقع (لوحة تحكم النادي → المواقع). بعد ذلك لا يمكن حفظ جلسة لعب جديدة هناك بدون طاولة؛ أما الجلسات المجدولة مسبقًا فتبقى كما هي.
مخططات الطوابق التفاعلية (خطة Business)
أضف طبقة خريطة مرئية فوق أماكن اللعب المسمّاة لديك. ارفع صورة لمخطط الطابق وضع كل مكان لعب عليها — يستكشف الحضور مقرك على خريطة يمكن تحريكها وتكبيرها، مع تحديد كل طاولة أو غرفة أو منطقة لعب.
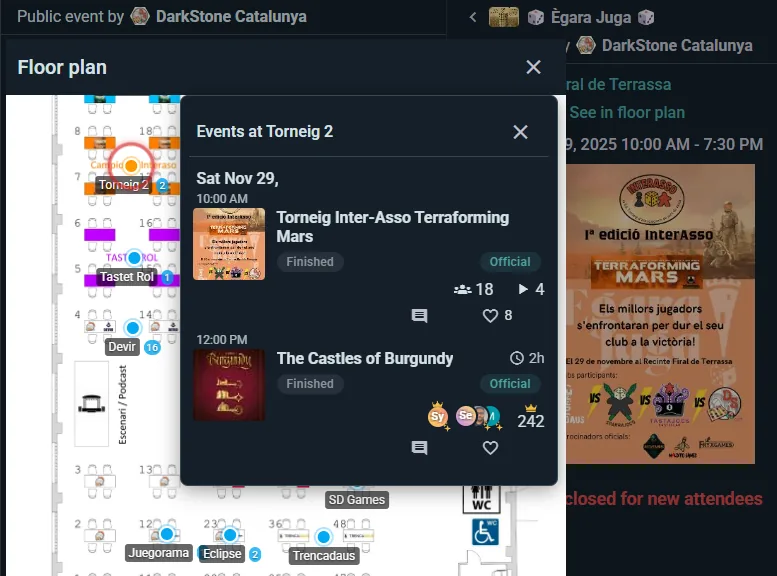
إعداد مخطط طابق
- افتح موقعًا له أماكن لعب بالفعل (المواقع في وحدة التحكم) وفعّل مخطط طابقه
- ارفع صورة لمخطط الطابق (صورة فوتوغرافية أو رسم تخطيطي أو مخطط معماري)
- انقر على مكان لعب لسحبه إلى الجزء الصحيح من الصورة
دون مخطط طابق، تظل أماكن اللعب تعمل كتسميات نصية عادية («أنت على الطاولة 3»). ويتألق مخطط الطابق المرئي في المقرات الأكبر حيث يهم الاهتداء إلى الطريق.
بلدة أو ساحة أو حديقة: خريطة حقيقية
مهرجان موزّع على بلدة، أو سوق خيام في ساحة واحدة، أو مسار عبر حديقة: لا يوجد مخطط لرسمه. تذهب أماكنها بدلًا من ذلك إلى خريطة حقيقية (Google Maps)، مثبّتة حيث تقع.
- في المواقع بلوحة التحكم، افتح المقر. البلدة المختارة من الاقتراحات (أو الحديقة أو الساحة التي تعرفها Google على أنها كذلك) مقرٌّ بخريطة من تلقاء نفسها؛ ولأي شيء آخر (أرض معارض، أو ساحة تعدّها Google شارعًا) فعّل عرضه على خريطة حقيقية. يجب أن يأتي العنوان من الاقتراحات، كي تعرف الخريطة مكانه. ويعيدك استخدام صورة بدلًا من ذلك إلى صورة مخطط الطابق.
- تثبيت الأماكن على الخريطة يفتحها. اضغط على مكان مدرج على أنه خارج الخريطة، ثم اضغط حيث يقع؛ أو اضغط على جزء فارغ من الخريطة لإضافة مكان جديد هناك (تراجع يلغي ضغطة كان المقصود بها تحريك الخريطة). اسحب دبوسًا لنقله؛ وإزالته من الخريطة تلغي تثبيته.
- يمكن أن يبقى لمكانٍ مخططٌ خاص به (قاعة بطاولاتها): أضف صورته في تفاصيل المكان، فتُرسم طاولاته على تلك الصورة كالمعتاد. ويصل إليه الزوار عبر عرض الداخل.
يرى الحضور الخريطة الحقيقية في خريطة المقر الخاصة بالفعالية: كل مكان باسمه على دبوسه، مع عدد الأنشطة الجارية فيه (تبهت الأماكن التي لا شيء فيها في الوقت المعروض)، وقائمة الأماكن للعثور على مكان باسمه، وعرض القمر الصناعي لتمييز خيمة عن التي تجاورها، وأظهر موقعي الذي لا يطلب موقع الهاتف إلا عند الضغط عليه. والضغط على مكان يُبقي الخريطة ويعرض بطاقته: ما يجري فيه، وكيف تجده بعد وصولك، وعرض الداخل لقاعة لها مخططها الخاص، والطريق؛ والنشاط في مكان مثبّت يعرض الطريق أيضًا، وتعرض صفحة الفعالية صورة صغيرة للخريطة. وصورة مخطط الطابق التي تُرفع لاحقًا تحل محل الخريطة؛ وتحتفظ الأماكن المثبّتة على الخريطة بدبابيسها إلى أن يُرسم لها شكل على الصورة.
خريطة المقر يوم الفعالية
للفعالية في مقر له مخطط طابق عرض خريطة المقر الخاص بها. تُظهر كل طاولة وغرفة ما يجري فيها: اضغط على إحداها فتُفتح أنشطتها في درج، مع الأوقات والمقاعد وطريقة للانضمام. تتقلص أسماء الطاولات لتتسع على طاولاتها في الهاتف، فتبقى الخريطة مقروءة على مسافة ذراع.
يمكن أن يكون للموقع ولكل مكان لعب فيه نص قصير خاص: أي باب، ولأي غرض الغرفة، «اطلب المفتاح من المقصف». كما تُتاح أماكن اللعب عبر الواجهة البرمجية المفتوحة، كي يعرضها موقعك الخاص.
الأنسب لـ
- المقرات الكبيرة ذات الغرف أو المناطق المتعددة
- المؤتمرات ذات عشرات الطاولات
- مقاهي الألعاب حيث يريد الروّاد الدائمون اختيار مكانهم المفضل
- أي مقر يتكرر فيه سؤال «أين لعبتي؟»
نماذج حضور مخصصة (مجانية في كل الخطط — حتى خمسة أسئلة، وبلا حد مع Club)
اطرح على الحاضرين أسئلة عند تسجيلهم — واجمع ما تحتاجه لإدارة فعالية أفضل، دون مغادرة Ludoya إلى أداة نماذج خارجية.
إنشاء أسئلة مخصصة
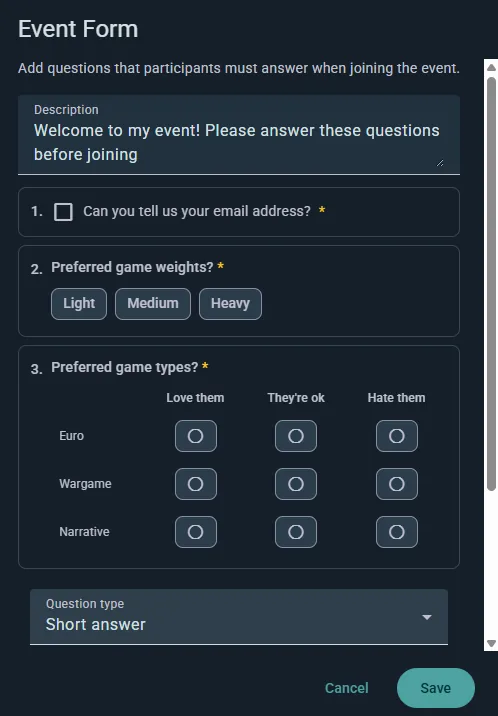
- افتح إعدادات الفعالية واختر قسم نموذج
- أضف أسئلتك واسحبها إلى الترتيب الذي تريده (أو كرّر سؤالًا أعددته من قبل)
- ضع على أي سؤال علامة مطلوب
- احفظ — فتظهر الأسئلة حين يسجّل الناس
ولاحظ أن الفعالية يجب أن تخص مجموعة، وأن إضافة نموذج تُوقف الضيوف المجهولين: فإن كنت تسأل، فلا بد أن يعرف Ludoya من يجيب.
أنواع الأسئلة
- إجابة قصيرة — سطر من النص الحر
- فقرة — إجابة مكتوبة أطول
- اختيار واحد — اختر واحدًا من قائمة
- اختيار متعدد — اختر كل ما ينطبق
- مقياس خطي — قيّم على مدى، بعنوانين عند طرفيه
- شبكة الاختيار المتعدد — عدة أسئلة تتشارك مجموعة إجابات واحدة، في صفوف وأعمدة
- معلومات شخصية — اطلب بريد إلكتروني أو رقم الهاتف أو تاريخ الميلاد أو الجنس، مُتحقَّقًا منها كما ينبغي لا مجموعةً كنص حر
أمثلة على الأسئلة:
- "هل لديك قيود غذائية؟"
- "ما مدى إلمامك بألعاب اليورو الثقيلة؟"
- "هل تحتاج توصيلة؟"
- "أهذه أول مرة تحضر فيها؟"
اسأل لكل ضيف
أي سؤال بإجابة قصيرة أو باختيار أو بمعلومات شخصية يمكن وسمه اسأل لكل ضيف. فيُجاب عنه عندئذ على حدة عن كل شخص إضافي يجلبه الحاضر — الأصدقاء المحجوزون والضيوف المسمَّون سواء — ويملؤه الحاضر نيابة عنهم، وتحجب الأسئلة المطلوبة الحجز حتى تُستكمل. وهكذا تجمع أربع مجموعات من المتطلبات الغذائية من شخص واحد يحجز طاولة لأربعة.
تجربة الحاضر
يجيب الناس وهم يسجّلون، ولا بد من ملء الأسئلة المطلوبة قبل أن يستطيعوا التأكيد. وتُحفَظ الإجابات مع تسجيلهم، وتظهر في إدارة الحاضرين، وتُصدَّر مع قائمة الحاضرين.
حالات الاستخدام
- الفعاليات ذات الضيافة — الاحتياجات الغذائية والحساسيات
- ليالي المبتدئين — قِس الخبرة لتوازن الطاولات
- فعاليات الشركات — اجمع القسم أو الفريق
- الليالي المواضيعية — تفضيلات الأزياء، وتوزيع الفرق
معرفة أي نموذج تطرحه كل فعالية
لا تحتاج إلى فتح إعدادات الفعالية لتعرف ما يطرحه التسجيل فيها:
- في وحدة تحكم النادي، يظهر في الفعاليات عمود نموذج ما إن تطرح أي فعالية أسئلة: اسم القالب الذي تتبعه، أو أسئلة خاصة.
- تذكر الاستمارات، لكل قالب، الفعاليات التي تطرحه تحت يستخدمه. افتح الإجابات لقالب ما، وستجد تحت يطرحه قائمة بها كلها، وكل منها يفتح فعاليته.
- في وحدة تحكم الفعالية، تقول بطاقة نموذج في نظرتها العامة، وفي كل جزء من البرنامج، ما يطرحه التسجيل: أسئلة قالب، أو أسئلتها الخاصة، أو أسئلة الفعالية الأم، أو لا شيء، مع قائمة الأسئلة. غيّره هناك مباشرة بالمنتقي نفسه الموجود في إعدادات الفعالية؛ وفي تاريخ من فعالية متكررة يسأل إلى أي مدى يصل التغيير. تعديل الأسئلة يغيّر أسئلتها الخاصة، وعرض كل الإجابات يفتح إجابات القالب مجمّعة من كل الفعاليات.
- في البرنامج الخاص بمهرجان، يُظهر كل نشاط يطرح نموذجًا خاصًا به اسم ذلك النموذج، ويحصر شريحة نموذج القائمة في الأنشطة التي تطرح نموذجًا واحدًا بعينه.
تغيير خيار بعد أن يجيب الناس
المحرر نفسه يُشكّل استمارة الانضمام إلى النادي وقوالب النماذج المحفوظة لديه، والقاعدة واحدة في كل مكان. لتصحيح خيار أو إعادة صياغته، عدّل نصه في مكانه: كل من اختاره يحتفظ بإجابته تحت الصياغة الجديدة، فيحتسبهم جدول الأعضاء والتصفية حسب الإجابة والتصدير فورًا. أما الفروق في الأحرف الكبيرة والصغيرة أو علامات التشكيل وحدها فتُطابَق تلقائيًا.
ولتقديم شيء مختلف بدلًا منه، احذف الخيار وأضف خيارًا جديدًا. تبقى الإجابات على الخيار المحذوف كما كانت ولا تُنقل أبدًا إلى الخيار الجديد، فلا يجد أحد نفسه وقد اختار شيئًا لم يختره.
تصحيح العناوين المكتوبة خطأً والتسجيلات المزدوجة
عنوان البريد الإلكتروني المكتوب خطأً يفشل بصمت: لا يصل التأكيد ولا رمز QR الخاص بالدخول إلى أي مكان، وغالبًا ما يسجّل الشخص مرة أخرى، فينتهي به الأمر إلى شغل مكانين. حين يحدث ذلك في أي مكان من فعاليتك، تظهر بطاقة للمراجعة فوق القائمة في الحضور في وحدة تحكم فعاليتك، ويقودك إليها سطر تحت يحتاج إلى انتباه في نظرتها العامة.
- عناوين تبدو مكتوبة خطأً تعرض كل عنوان لا يمكن أن يعمل (gmail.con، gmai.com، hotmial.com، gmail.es…) بجانب العنوان المقصود. تصحيح يفتح تعديل البريد الإلكتروني مع ذلك الاقتراح معبّأً.
- مسجَّل مرتين؟ يعرض مكانين في قائمة واحدة يبدوان للشخص نفسه: العنوان نفسه (بصرف النظر عن خطأ مطبعي أو نقاط Gmail)، أو الاسم نفسه، حين يكون أحد الاسمين هو الآخر مع كلمات إضافية بعده. ترى عنوان كل طرف، ومن سجّلهما، والمرافقين الذين يحضرونهم، ومتى سجّلوا. الإبقاء على هذا يحرّر المكان الآخر دون إبلاغ أحد، لأن الشخص لا يزال قادمًا، وينتقل المرافقون الذين أحضرهم إلى المكان الذي تُبقيه. هما شخصان مختلفان يوقف عرض الزوج.
- تعديل البريد الإلكتروني موجود أيضًا في قائمة كل صف من القائمة. يمكنك تصحيح عنوان مرافق (ما طلبه نموذجك منه) وعنوان حساب أنشأه تكاملك ولم يفعّله أحد بعد. أما عنوان مستخدم Ludoya نفسه فهو له وحده.
- أرسل تأكيده ورمز QR الخاص به إلى هذا العنوان مفعّل افتراضيًا. يرسله Ludoya، إلا إذا كنت تسجّل الناس عبر واجهة API العامة وتراسلهم بنفسك: حينها ينتظر في قائمة بريدك، لترسله من عنوانك الخاص مثل بقية بريدهم.
- إذا كان العنوان المصحّح يخص حسابًا في Ludoya، يصبح المكان لذلك الحساب، في تطبيقه. وإذا كان ذلك الحساب مسجَّلًا بالفعل، فهو الشخص نفسه مرتين، وتعرض البطاقة الإبقاء على واحد من الاثنين.
تصدير بيانات الحضور (مجاني في كل الخطط)
نزّل قوائم التسجيل وإجابات النماذج كجدول Excel أو بصيغة CSV.
ما يمكنك تصديره
صف واحد لكل حاضر، بهذه الأعمدة:
- name وusername
- أين — في فعالية ذات برنامج: النشاط الذي سجّلوا فيه، مع الأقسام التي فوقه ("السبت: طاولات مفتوحة › أزول")
- attendance — حالة تسجيله
- guests — كم ضيفًا مجهولًا يجلب معه
- عمود لكل سؤال في نماذج تسجيلك المخصصة، مع إجاباته
في فعالية ذات برنامج، تسرد الورقة الأولى الجميع، كل شخص مرة لكل مكان سجّل فيه، ولكل نشاط يقع مباشرة تحت الفعالية ورقة خاصة به تضم كل من فيه.
أمران يستحقان المعرفة إن بنيت جدول بيانات حول هذا:
- كل سؤال يطرحه أي نموذج في الفعالية ينال عمودًا، سواء أُجيب عنه أم لا، كي يتطابق تصديران للفعالية نفسها. وتُصدَّر أيضًا إجابات سؤال حذفته منذ ذلك الحين، في أعمدة بعد البقية باسم
removed-1،removed-2… - وإجابات الاختيار المتعدد تصل في خلية واحدة، يفصل بينها
|، فـ"نباتي|بلا مكسرات" حقل واحد لا عمودان.
وعلامات تسجيل الوصول وعدم الحضور ليست في التصدير — فملف CSV يعكس من سجّل وما أخبرك به، لا من عبر الباب.
حالات الاستخدام
- متابعات البريد الإلكتروني أو تتبع برنامج الولاء
- تحليلك الخاص لمن سجّل في ماذا
- التخطيط للفعاليات القادمة بناءً على بيانات الحضور السابقة
لرؤية الفعالية بالأرقام، جاهزةً لتسليمها إلى راعٍ، راجع تقرير الفعالية أدناه.
تقرير الفعالية (مجاني في كل الخطط)
بمجرد أن تبدأ فعاليتك، يعرضها التقرير في لوحة تحكمها بالأرقام، محسوبةً على كل ما فيها: كل نشاط وجناح وبطولة وسوق ومكتبة ألعاب. يستمر في الامتلاء ما دامت الفعالية جارية، ويبقى إلى الأبد بعد انتهائها. لا يراه إلا من يدير الفعالية كلها، من لوحة تحكم الفعالية نفسها؛ أما النادي الذي يتولى جناحًا واحدًا فيرى لوحة تحكم ذلك الجناح بدلًا منه.
في الأعلى
المسجّلون (كل من سجّل في الفعالية أو في أي شيء داخلها، كلٌّ محسوب مرة واحدة، والمرافقون ضمنهم: أي «من سيحضر» في «نظرة عامة»)، والأنشطة المُقامة، والمقاعد المشغولة (كم من المقاعد المعروضة شُغل)، والألعاب المستعملة المبيعة. يُحسب كل نشاط حتى عدد مقاعده فقط، فالأشخاص المحشورون على طاولة ممتلئة لا يعوّضون طاولة فارغة في مكان آخر؛ بل يظهرون على حدة، كأشخاص أُضيفوا إلى أنشطة ممتلئة بالفعل.
ما نجح، وما تراجعه في المرة القادمة
قائمتان قصيرتان تنتقيان ما تكرّره وما تغيّره، مع الرقم الذي يقف وراء كل بند: أنشطة امتلأت كل مقاعدها أو كانت لها قائمة انتظار (قدّم المزيد منها)، وأكثر ساعة ازدحامًا، والأشخاص الذين حضروا فعالياتك السابقة أيضًا، ولعبة أُعيرت كثيرًا حتى صارت تحتاج إلى نسخة ثانية، وأنشطة لم يسجّل فيها أحد أو بقيت شبه فارغة، وأشخاص كان متوقعًا تسجيل وصولهم ولم يحضروا. لا يظهر البند إلا حين تصبح الأرقام كبيرة بما يكفي لتعني شيئًا.
الرسوم البيانية والأرقام
- الأنشطة الأكثر شعبية والأقل امتلاءً، والمقاعد المشغولة حسب القسم في البرنامج (كل لعب الأدوار، كل البطولات)
- المقاعد المشغولة حسب ساعة البدء: تُحسب جلسات جناح اللعب في أوقاتها الخاصة
- الألعاب الأكثر لعبًا والألعاب الأكثر إعارة من مكتبة الألعاب
- آراء الأجنحة: نتائج كل جناح لعب عن أسئلته الخاصة بعد الجلسة: كم من لاعبيه أجاب، ومتوسط كل مقياس، ونسبة اللاعبين الذين اختاروا كل إجابة في سؤال الاختيار. في سؤال يسمح باختيار أكثر من إجابة يتجاوز مجموع النسب 100%؛ وتعرض القائمة الطويلة الإجابات الثلاث الأكثر اختيارًا. افتح الجناح من اسمه لقراءة تعليقاته
- بالأرقام: الأشخاص (المرافقون، ومن سجّل في الفعالية نفسها، ومن حضر فعالياتك السابقة أيضًا، وحسابات Ludoya الجديدة، وتسجيلات الوصول، وقوائم الانتظار)، والبرنامج (أنشطة امتلأت، والإجابات على أسئلة آراء الأجنحة)، وسوق المستعمل (ما بيع في جناح السوق وعبر إعلانات على الإنترنت للفعالية، وقيمة ما بيع)، ومكتبة الألعاب، والرسائل في محادثات الفعالية والإعلانات التي أرسلتها، ومسار الأسئلة والتذاكر حين تكون للفعالية
كل الأنشطة
كل نشاط مع قسمه، ووقت بدئه، والمقاعد المشغولة، ومدى امتلائه، قابلًا للترتيب والتنزيل كجدول بيانات. النشاط الذي لا يحجزه أحد (طاولة عرض، لعب حر) يظهر مفتوح، بلا تسجيل بدلًا من صفر. يُحسب جناح اللعب نشاطًا واحدًا بجمع جلساته؛ وتُحسب البطولة مرة واحدة، وجولاتها داخلها.
مقارنة بفعالياتك الأخرى
يضع التقرير الفعالية بجانب فعاليات ناديك السابقة التي حضرها أشخاص، من الأحدث إلى الأقدم: المسجّلون، والأنشطة، والمقاعد المشغولة، ومدى امتلائها، وجولات اللعب، والألعاب المبيعة. يُقارن المهرجان بفعالياتك الأخرى التي لها برنامج خاص بها، ولا يُقارن أبدًا بأمسية لعب أسبوعية، ولا يُقارن إلا بفعاليات تديرها أنت أيضًا.
نزّله بصيغة PDF
تنزيل PDF يحفظ التقرير كاملًا لترسله إلى راعٍ أو إلى البلدية أو إلى فريقك. مجاميع فقط: لا يُذكر فيه اسم أي شخص حضر. وتبقى التعليقات التي يتركها اللاعبون على بطاقة الآراء الخاصة بكل جناح.
حين تنتهي فعالية نادٍ بحضور 10 أشخاص أو أكثر، يجد مشرفو النادي في التقرير أيضًا اجلب ناديًا آخر: كم شخصًا جمعت الفعالية، ومشاركة لرابط دعوة النادي (راجع لوحة تحكم النادي).
خريطة حرارية للتوافر (خطة Club)
خريطة حرارية لكل فعالية تبيّن متى سيكون الحاضرون موجودين فعلًا أثناء الفعالية، ليخطط المنظّمون جلسات اللعب المجدولة حول الأوقات التي يكون فيها أكثر الناس حاضرين.
كيف يساهم الحاضرون
عند الانضمام إلى فعالية، يحدّد كل حاضر الفترات الزمنية التي سيكون فيها موجودًا ضمن جدول الفعالية نفسه. ففي مؤتمر عطلة نهاية أسبوع يمتد من مساء الجمعة إلى الأحد، قد يقول أحدهم "الجمعة 18:00–22:00 والسبت طوال اليوم"، وقد لا يستطيع آخر الحضور إلا بعد ظهر السبت. وتتيح لهم قائمة زر الحضور تحرير جدول الحضور الشخصي هذا في أي وقت.
ماذا تُظهر
- شريط كثافة بصري ممدود على جدول الفعالية نفسه (لا على الأسابيع أو الأشهر)
- قمم حيث يكون أكثر الحاضرين موجودين
- ووديان حيث يستطيع القليلون الحضور
- ويتحدث لحظيًا كلما عدّل الحاضرون توافرهم
كيف يستخدمها المنظّمون
- افتح قائمة الحاضرين في الفعالية
- انقر عرض الجداول الزمنية
- اقرأ شريط الكثافة نظرة عامة على التوافر لتعرف الفترات التي يكون فيها أكثر الناس حاضرين
- ضع أهم جلساتك المجدولة أو كلماتك أو بطولاتك في تلك القمم ليتمكن أكبر جمهور من الحضور
- وتحته تسرد جداول فردية كل حاضر بالاسم بأشرطته الخاصة فترةً فترة — وهو مفيد حين تحتاج إلى تنسيق أشخاص بعينهم، كمُعرِّف للعبة ثقيلة أو لاعبي طاولة متفق عليها سلفًا
من يرى ماذا
يظهر القسمان معًا في النافذة نفسها: الشريط المجمَّع والجداول الفردية المسمّاة. وفي فعالية تحمل مجموعتها المضيفة خطة Club، يستطيع كل من يفتح قائمة الحاضرين رؤيتهما — لا المنظّمون وحدهم.
أخبر حاضريك بذلك، فالأوقات التي يحددونها ظاهرة لبقية الفعالية بأسمائهم. وإن لم يكن هذا ما تريده في فعالية بعينها، فلا تطلب من الناس ملء جدول شخصي.
إعلانات لجميع الحاضرين في الفعالية (مجانية في كل الخطط)
أخبر جميع الحاضرين في فعاليتك بشيء دفعة واحدة: البطولة تبدأ متأخرة، نشاط ينتقل إلى قاعة أخرى، هذه خطة اليوم. افتح لوحة تحكم الفعالية واختر الإعلانات.
من يستلمه
كل من يشارك في الفعالية: ليس فقط من سجّل في الفعالية نفسها، بل أيضًا كل من:
- سجّل في أي نشاط أو لعبة أو بطولة داخلها
- يبيع في سوق المستعمل الخاص بها، أو لديه علبة محجوزة هناك
- استعار لعبة من مكتبة الألعاب الخاصة بها
يمكنك أيضًا إرساله إلى جزء واحد فقط: نشاط واحد (فقط المشاركين في لعبة البحث عن الكنز)، أو قسم كامل من البرنامج بكل أنشطته (كل طاولات لعب الأدوار دفعة واحدة). ضمّن قائمة الانتظار عندما يكون للنشاط قائمة. قبل الإرسال، تخبرك الصفحة بعدد الأشخاص الذين سيصلهم وكيف: عبر التطبيق، أو عبر البريد الإلكتروني لمن لا يملك التطبيق. يصل الإعلان إلى المرافقين الذين سجّلهم شخص ما معه عبر ذلك الشخص.
كيف يصل
- كإشعار في التطبيق، وعبر البريد الإلكتروني لمن لا يملك التطبيق: تقرر ذلك إعدادات الإشعارات لكل شخص، كما في كل شيء آخر
- يصل باسم ناديك (أو باسمك في فعالية شخصية) وبعنوان الفعالية
- استخدم أولًا أرسل لي تجربة لترى بالضبط ما سيصل إلى الناس
لوحة إعلانات الفعالية
تبقى كل رسالة ترسلها أيضًا على صفحة الفعالية، الأحدث أولًا، فيقرأ كل من يفتحها لاحقًا أو يصل في اليوم نفسه ما تم الإعلان عنه. وتعرض صفحة النشاط أيضًا الرسائل الموجهة إلى المهرجان كله وإلى قسمه. عندما تصبح رسالة قديمة، أزلها من صفحة الفعالية من ما أرسلته: من وصلته بالفعل يحتفظ بها.
الحدود
حتى 5 رسائل في اليوم لكل فعالية، بما فيها الرسائل إلى نشاط واحد أو قسم واحد، كي تُقرأ الرسائل التي ترسلها.
توزيع اللعب التجريبي (خطة Business)
ليوم يُحضر فيه المصمّمون نماذج أولية ويجرّبها اللاعبون. بدل دورة تخطّطها يدويًا، تُجلس Ludoya الجميع على الطاولات، فترةً بعد فترة.
التفعيل
في نموذج الفعالية (فعالية عادية، لا بطولة ولا طاولة لعب)، اضغط + توزيع الطاولات واختر Ludoya يوزّع مختبري الألعاب. تُضبط الفترات والطاولات والجدول بعد ذلك في لوحة تحكم الفعالية، ضمن Playtesting: مدة الفترة، وعدد طاولات القاعة، ومدة طاولة كل لعبة (انطلاقًا من مدة اللعب).
قبل اليوم
- يضيف المصمّمون نماذجهم من صفحة الفعالية عبر أحضِر نموذجًا أوليًا.
- يحدّد اللاعبون في صفحة الفعالية النماذج التي يريدون تجربتها. تُظهر لوحة التحكم الأكثر طلبًا.
الجدول
عندما تكتمل النماذج، اختر أنشئ الجدول. توزّع Ludoya الجميع على الفترات، وتضيف كل طاولة إلى برنامج الفعالية كطاولة لعب عادية («الطاولة 3 · اللعبة»)، وترسل لكل شخص إشعارًا واحدًا بطاولاته. ثم تبيّن لوحة التحكم عدد الرغبات التي تحققت، وأيّ ثنائيات من الأشخاص تلتقي مرتين: طاولة أو فترة إضافية تمنح مجالًا أكبر للمزج.
إذا انضم أشخاص أو غادروا، أو وصلت نماذج جديدة، فإن حدّث الجدول يُبقي الطاولات التي يُلعب عليها بالفعل والمقاعد التي ثبّتّها، ويعيد توزيع الباقين. أما أنشئ من جديد فيعيد خلط كل طاولة لم تبدأ. وفي الحالتين لا يُبلَّغ إلا من تتغيّر طاولاتهم.
إيقاف توزيع اللعب التجريبي يزيل الطاولات التي جدولها ولم تبدأ. أما الطاولات التي لُعبت فتبقى.
نماذجي الأولية (لمصممي الألعاب)
حتى اللعبة التي لم تُنشر بعد تجد لها مكانًا. في استكشاف ← ألعاب، تحت لا تجد لعبتك؟، اختر إنه نموذج أولي من عندي؛ ومنذ ذلك الحين تصبح نماذجي الأولية بطاقة في صفحتك الرئيسية.
- نموذج أولي جديد: اسم ووصف وعدد اللاعبين ومدة اللعب والحد الأدنى للعمر، كأي لعبة. أبقِه خاص أثناء العمل، أو غير مدرجة لمشاركته برابط، أو عام. لا يمكن إحضار نموذج أولي خاص إلى اختبار لعب: اجعله غير مدرج أو عامًا أولًا.
- الإصدارات: أضف إصدارًا كلما تغيّرت اللعبة (اسم النسخة الجديدة)، كي ترتبط الملاحظات بالإصدار الذي لعبه الناس فعلًا.
- المالكون: أضف مالكًا مشاركًا لبقية فريق التصميم؛ ويدير كل مالك النموذج الأولي.
- نموذج الملاحظات: الأسئلة التي يجيب عنها المختبرون بعد لعب إصدار. وبعد طاولة اختبار لعب يرى اللاعبون هناك أبدِ ملاحظاتك.
- الملاحظات: تقييمات كل إصدار وتعليقاته، وكيف تحرّك كل سؤال عبر النسخ، لترى إن كان التغيير قد أفاد.
- اختبارات اللعب: كل فعالية أُحضر إليها النموذج الأولي. أحضِر نموذجًا أوليًا في فعالية فيها مطابقة اختبارات اللعب يسجّله هناك.
الفعالية على شاشة كبيرة (خطة Business)
اعرض الفعالية على جهاز العرض أو التلفاز في المقر. اختر اعرضه على شاشة من قائمة الفعالية، أو من وحدة تحكمها، ثم افتح الشاشة:
- البطولة تعرض طاولات الجولة، وساعة الجولة، والترتيب الذي يُحدَّث مع وصول النتائج. ومع تفعيل إظهار الترتيب في النهاية فقط تُبقيه الشاشة مخفيًا أيضًا.
- البرنامج أو منصة اللعب يعرض ما يجري الآن وما يليه، وأين، والمقاعد المتبقية.
- رمز QR في الزاوية يتيح للجمهور المتابعة على هواتفهم والتسجيل.
يمكن لقسم من المهرجان أو لبطولة فيه أن تكون له شاشته الخاصة، من وحدة التحكم الخاصة به: تعرض قاعة لعب الأدوار طاولاتها فقط، وقاعة البطولات جولاتها فقط. ويعمل ذلك بخطة المهرجان.
لا حاجة لأن يكون أحد مسجّل الدخول على الشاشة: الرابط هو المفتاح، لذا يمكن أن يكون الحاسوب تحت جهاز العرض لأي شخص. جهاز العرض موصول بحاسوب آخر؟ افتح الرابط نفسه هناك واضغط F لملء الشاشة. تعيد الشاشة تحميل الفعالية كل بضع ثوانٍ وتنبّه في الزاوية إذا فقدت الاتصال، فلا تتظاهر شاشة قديمة أبدًا بأنها حية. وإذا وصل الرابط إلى مكان لا ينبغي، استخدم أنشئ رابطًا جديدًا؛ فيتوقف القديم عن العمل.
مسار أسئلة في أرجاء المهرجان (خطة Business)
يأخذ مسار الأسئلة الزوار في جولة بين الأجنحة: لكل جناح مشارك ملصق برمز QR خاص به وسؤال سريع واحد. أعِدّه من لوحة تحكم الفعالية، في مسار الأسئلة.
- إعداد مسار أسئلة، ثم إضافة محطة لكل جناح: أين تقع، وما يفعله اللاعبون فيها: اختيار إجابة (حدّد الصحيحة، أو اجعلها استطلاعًا)، أو كتابة إجابة (اذكر كل إجابة تقبلها صحيحة؛ لا تُحتسب الأحرف الكبيرة والتشكيل وعلامات الترقيم)، أو العثور عليها فقط.
- في الإعدادات، اكتب سطر الجائزة والسحب (ما الذي يمكن ربحه، ومتى وأين يُجرى السحب): يظهر في كل محطة وعلى كل ملصق.
- طباعة الملصقات: ملصق لكل محطة برمز QR الخاص بها وعنوان قصير يُكتب حين لا تقرؤه الكاميرا. اختر الحجم: A4 لجدار أو واجهة جناح، أو A5 (اثنان في ورقة A4) لطاولة جناح، أو A6 (أربعة في الورقة) كبطاقة لطاولة الاستقبال. تبلّل ملصق؟ طباعة ملصق هذه المحطة، في قائمة تلك المحطة، تعيد طباعة ذلك الملصق وحده. يُعثر على المحطات بأي ترتيب، لذلك لا تحمل الملصقات أرقامًا. ما دام المسار مسودة، لا يفتح المحطات إلا المنظمون، فجرّبها أولًا.
- فتح مسار الأسئلة عند فتح الأبواب. تحتاج الفعالية إلى تاريخ أولًا.
في مقر له خريطة حقيقية (بلدة، ساحة)، لكل محطة المكان على خريطة المقر. تبدأ المحطة الجديدة عند المكان الذي يحمل اسم المحطة: مكان المقر الذي يحمل ذلك الاسم، أو مكان جديد ينتظر في محرر الخريطة أن يُثبَّت. ستون واجهة متجر؟ أضف المحطات، ثم ثبّت أماكنها دفعة واحدة؛ إعطاء مكان لكل محطة يفعل ذلك للمحطات المضافة من قبل، وتخبرك لوحة التحكم بعدد المحطات التي ما زالت خارج الخريطة، مع تثبيتها لفتح محرر الخريطة. يفتح اللاعبون عرض المحطات على خريطة من صفحة أي محطة: تعرض طبقة مسار الأسئلة كل محطة علَمًا يُبحث عنه، أو علامة صح خضراء بعد العثور عليها، وكم وجدوا من أصل كم؛ وعرضها يسرد المحطات التي لا تستطيع الخريطة عرضها بعد (التي لم يُعثر عليها أولًا)؛ والضغط على مكان يذكر أسماء محطاته، لا ما تسأله أبدًا. وما دمت تخفي قائمة المحطات، تخفيها الخريطة أيضًا.
يلعب الزوار من متصفح هاتفهم، دون تثبيت أي تطبيق. تعرض أول محطة يمسحونها سؤالها وتطلب اسمًا (أو اسم فريق: العائلة التي تلعب على هاتف واحد تلعب كفريق واحد) وبريدًا إلكترونيًا، وتأكيدًا أن عمرهم 14 عامًا أو أكثر أو أنهم يلعبون مع طفلهم. البريد الإلكتروني الذي له حساب في Ludoya يتلقى رمزًا عبر البريد بدلًا من ذلك، فلا يستطيع أحد أن يلعب باسم غيره. وتنتقل كل محطة أخرى مباشرة إلى سؤالها. تقبل كل محطة إجابة واحدة، وتختار أنت إن كان اللاعبون يرون الصواب والخطأ مباشرة بعد كل إجابة أو فقط عند انتهاء مسار الأسئلة (ما يمنع تداول الإجابات). صحّحت إجابة صحيحة مكتوبة خطأً في منتصف اليوم؟ تُصحَّح إجابات الجميع في تلك المحطة من جديد. جناح يغادر في منتصف المهرجان؟ إغلاق هذه المحطة: يتوقف رمز QR الخاص بها عن قبول الإجابات، ويحتفظ من وجدها بالنقطة، وتخرج من المسار ومن الملصقات لجميع الآخرين.
تعرض لوحة التحكم عدد من أجابوا في كل محطة والترتيب: الأكثر إجابات صحيحة أولًا، ثم الأكثر محطات، ثم من أنهى أولًا. يمكن للمتطوعين البحث عن لاعب باسمه، ويمكن تنزيل الترتيب كجدول بيانات. لمنح الجوائز، أضف سحبًا إلى الفعالية واختر لاعبو مسار الأسئلة في من يشترك، مع حد أدنى من المحطات التي عُثر عليها أو الإجابات الصحيحة؛ وفعّل كل إجابة صحيحة تساوي تذكرة إضافية لمكافأة أفضل اللاعبين دون استبعاد الباقين. عندها تخبر كل محطة اللاعبين بما يُدخلهم السحب، ومتى أصبحوا فيه. المنظمون والمتطوعون الذين لعبوا مشمولون في السحب أيضًا: إن فاز أحدهم، ألغِ الفوز واسحب مجددًا. إنهاء مسار الأسئلة عند إجراء السحب: لا مزيد من الإجابات، ويرى اللاعبون نتيجتهم.
الزوار الذين لا يكملون إعداد حساب في Ludoya تُحذف بياناتهم بعد 30 يومًا من الفعالية.