
Strumenti professionali per chi organizza eventi su larga scala — verifica dell'ingresso con QR alla porta, planimetrie interattive, moduli di iscrizione personalizzati, esportazione dei dati dei partecipanti e analisi della disponibilità. I moduli di iscrizione personalizzati (fino a 5 domande; illimitate con Club) e l'esportazione dei dati dei partecipanti sono gratuiti in tutti i piani; il resto è disponibile nei piani premium Club e Business.
Verifica dell'ingresso con QR (piano Business)
Registra le persone all'ingresso scansionando un codice QR. Ludoya conferma che sono nella lista, e un tocco su Registrare le segna come presenti — accompagnatori compresi —, così il tuo registro presenze si compila da solo mentre arrivano. Niente blocco degli appunti, niente conti da far tornare dopo.
Una nuova scansione dello stesso codice è innocua: l'app dice «Già registrato» invece di contare due volte.
Due cose da configurare prima di aprire le porte:
- Attiva la presenza via QR per l'evento. È disattivata per impostazione predefinita — abilita Verifica la presenza con codice QR nelle impostazioni dell'evento. L'opzione è disponibile solo per eventi ospitati da un gruppo, non per quelli personali.
- All'ingresso va bene qualsiasi dispositivo con fotocamera: l'app Ludoya, o il sito in un browser, su telefono, tablet o portatile. Nemmeno i partecipanti hanno bisogno dell'app — il loro codice QR si vede benissimo in un browser.
La registrazione appartiene a un ingresso. Attivarla per un festival arriva alle sue attività, ma una partita programmata non registra mai le persone da sola, e nemmeno qualcosa che un ospite aggiunge al tuo evento: chi si siede a un tavolo è anche nella lista dell'evento, quindi è il codice dell'evento stesso a farlo entrare.
Chi non si è presentato può comunque essere contrassegnato in seguito con Segna come non presentato nell'elenco dei partecipanti.
Come funziona
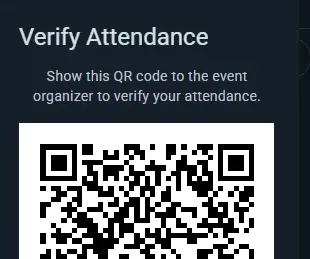
- I partecipanti aprono la pagina dell'evento, nell'app o sul sito, e toccano il pulsante di conferma
- Il pulsante RSVP mostra un menu a discesa con opzioni per modificare il proprio RSVP, lasciare l'evento, modificare il proprio orario di presenza e mostrare il proprio codice QR su richiesta
- Il codice QR univoco viene inviato loro via email all'iscrizione (e a ogni ospite con nome che ha dato un'email), ed è sempre lì sotto Mostra il codice QR — niente da stampare
- All'ingresso, scansiona il codice — Ludoya lo verifica con l'elenco degli iscritti e mostra se la persona può entrare; Registrare la annota
Codici QR
- Il codice di ciascun partecipante è univoco per lo specifico evento, ed è nella sua email e nel menu a discesa del pulsante RSVP nella pagina dell'evento
- Inquadrandolo con la fotocamera di un telefono si apre la pagina di registrazione del partecipante su Ludoya; all'ingresso, scansionalo con lo scanner di Ludoya
- La scansione è istantanea
Vantaggi
- Controlli all'ingresso rapidi e senza attriti, senza portablocchi né elenchi su carta
- Verifica immediata dell'RSVP — questa persona può entrare oppure no?
- Niente da stampare: un'email persa non è un problema, il codice è anche nella pagina dell'evento
- Impedisce a chi non ha fatto RSVP di intrufolarsi
Posti con nome (Organizzazioni)
Definisci posti con nome all'interno del tuo luogo e assegna loro eventi e partite programmate.
Luoghi e posti
Luoghi (il tuo luogo, o qualsiasi posto fisico usato dall'organizzazione) possono contenere posti con nome che corrispondono alle aree reali al loro interno:
- Un caffè potrebbe avere un posto per ogni tavolo ("Tavolo 1", "Tavolo 2", "Tavolo vicino alla finestra")
- Un centro congressi potrebbe suddividersi in sale ("Sala principale", "Sala GdR", "Area dimostrazioni")
- Una sede su più piani potrebbe etichettare i posti per piano ("Piano di sopra — Tavolo A", "Piano di sotto — Sala sul retro")
Configurare i posti
- Apri la località: dalla console del tuo club, Località (o Impostazioni → Località per i tuoi luoghi personali)
- Crea e assegna un nome ai posti per quel luogo (ad es., "Tavolo 1", "Sala sul retro", "Sala principale")
Usare i posti negli eventi
Qualsiasi evento in quel luogo può riservare posti — e può riservarne diversi alla volta, non solo uno. Una serata del club che occupa la sala sul retro e due tavoli davanti seleziona tutti e tre.
Come si svolge di solito:
- Un evento che occupa l'intero luogo (una convention, una serata del club che occupa l'intero luogo) spesso salta del tutto i posti e si associa semplicemente al luogo. Va bene — i posti sono opzionali.
- I sotto-eventi scelgono le sale o le aree che il loro percorso occupa, così i partecipanti sanno dove andare: "Percorso principianti → Sala principale", "Percorso avanzato → Sala sul retro".
- Le partite programmate scelgono il tavolo su cui si giocano.
Una regola utile: quando un evento padre ha già riservato dei posti, i suoi sotto-eventi smettono di offrire il selettore dei posti — la scelta del padre descrive già dove sta avvenendo tutto. Lascia l'evento padre senza posti se vuoi che ogni sotto-evento e ogni tavolo si posizioni da sé.
Così, i partecipanti vedono esattamente dove si trova il loro percorso o il loro tavolo e due attività che si svolgono contemporaneamente non possono finire per riservare lo stesso tavolo.
Una partita per tavolo
Uno spazio segnato come tavolo ospita una sola partita alla volta. Quando scegli un tavolo per una partita, il selettore segnala ogni tavolo che un'altra partita occupa in quell'orario ("occupato 20:00–22:00"), e un tavolo occupato non si può salvare. Le partite una dopo l'altra vanno bene, una sala ospita più partite affiancate e non viene mai controllata, e una partita dentro un evento che ha prenotato il tavolo lo condivide con quell'evento.
Un club che vuole che ogni partita nella sua sede dica dove si gioca attiva Le partite qui scelgono un tavolo in Sale e tavoli nella località (console del club → Località). Da quel momento una nuova partita lì non si può salvare senza tavolo; le partite già programmate restano come sono.
Piantine della sala interattive (piano Business)
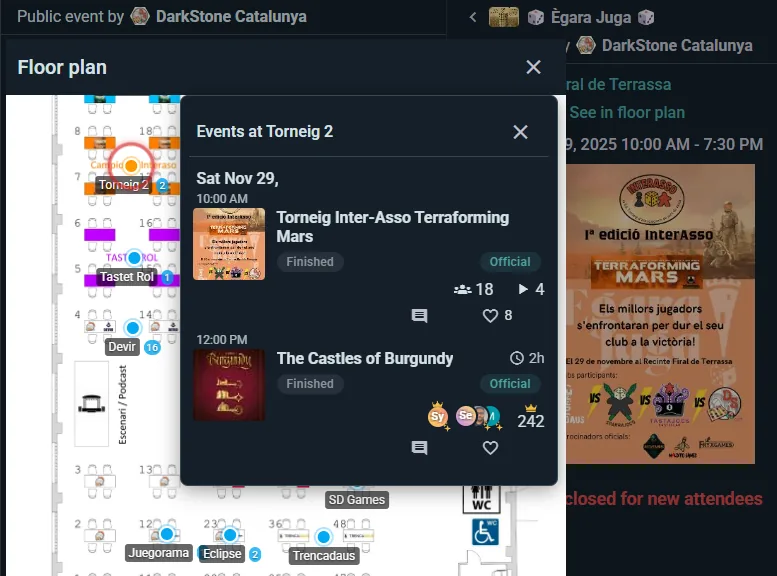
Aggiungi un livello di mappa visiva sopra i tuoi luoghi con nome. Carica un'immagine della piantina e posiziona ogni luogo — i partecipanti esplorano il tuo locale su una mappa che si può spostare e ingrandire, con ogni tavolo, sala o area di gioco segnata.
Configurare una piantina
- Apri una località che ha già dei luoghi (Località nella console) e attiva la sua piantina
- Carica un'immagine della piantina (una foto, uno schema o un disegno architettonico)
- Clicca su un luogo qualsiasi per trascinarlo nell'area giusta dell'immagine
Senza piantina, i luoghi funzionano comunque come semplici etichette di testo («sei al Tavolo 3»). La piantina visiva dà il meglio nei locali più grandi, dove orientarsi conta.
Un paese, una piazza o un parco: una mappa reale
Un festival sparso per tutto un paese, una fiera di tende in una sola piazza, un percorso in un parco: non c'è nessuna piantina da disegnare. I loro luoghi vanno invece su una mappa reale (Google Maps), segnati dove si trovano.
- In Località, nella console, apri la sede. Un paese scelto tra i suggerimenti (o un parco o una piazza che Google conosce come tale) è già da solo una sede con mappa; per tutto il resto (un quartiere fieristico, una piazza che per Google è una via) attiva Mostralo su una mappa reale. L'indirizzo deve venire dai suggerimenti, così la mappa sa dove si trova. Usa un'immagine al posto della mappa torna a un'immagine della piantina.
- Segna i luoghi sulla mappa la apre. Tocca un luogo elencato come fuori dalla mappa, poi tocca dove si trova; oppure tocca un punto vuoto della mappa per aggiungervi un luogo nuovo (Annulla ritira un tocco che doveva spostare la mappa). Trascina un segnaposto per spostarlo; Toglilo dalla mappa toglie il segnaposto.
- Un luogo può comunque avere una piantina sua (un padiglione con i suoi tavoli): aggiungi la sua immagine nei dettagli del luogo, e i suoi tavoli si disegnano su quell'immagine come sempre. I visitatori ci arrivano con Vedi dentro.
I partecipanti trovano la mappa reale nella mappa della sede dell'evento: ogni luogo ha il suo nome sul segnaposto, con quante attività ci sono (i luoghi dove non succede niente all'ora mostrata appaiono sbiaditi), un Elenco dei luoghi per trovarne uno per nome, una Vista satellite per distinguere una tenda da quella accanto, e Mostra dove sono, che chiede la posizione del telefono solo quando lo toccano. Toccare un luogo mantiene la mappa e mostra la sua scheda: cosa c'è, come trovarlo una volta lì, Vedi dentro per un padiglione con una piantina propria, e Come arrivare; anche un'attività in un luogo segnato mostra Come arrivare, e la pagina dell'evento mostra una piccola immagine della mappa. Un'immagine della piantina caricata più tardi sostituisce la mappa; i luoghi segnati sulla mappa mantengono il loro segnaposto finché non si disegna per loro una forma sull'immagine.
La mappa del locale il giorno dell'evento
Un evento in un locale con piantina ha la sua vista mappa del locale. Ogni tavolo e sala mostra cosa c'è lì: toccane uno e le sue attività si aprono in un pannello, con orari, posti e un modo per unirsi. I nomi dei tavoli si rimpiccioliscono per entrare nei loro tavoli sul telefono, così la mappa resta leggibile a un braccio di distanza.
Un locale e ciascuno dei suoi luoghi possono avere un breve testo proprio: quale porta, a cosa serve la sala, «chiedi la chiave al bar». I luoghi arrivano anche tramite l'API pubblica, così il tuo sito può mostrarli.
Ideale per
- Locali grandi con più sale o zone
- Convention con decine di tavoli
- Caffè ludici dove gli habitué vogliono scegliere il loro posto preferito
- Qualsiasi locale dove «Dov'è la mia partita?» è una domanda frequente
Moduli di presenza personalizzati (gratuiti in tutti i piani — fino a cinque domande, illimitate con Club)
Poni domande ai partecipanti quando confermano la loro partecipazione (RSVP) — raccogli le informazioni di cui hai bisogno per organizzare un evento migliore, il tutto senza uscire da Ludoya per usare un generatore di moduli esterno.
Creare domande personalizzate
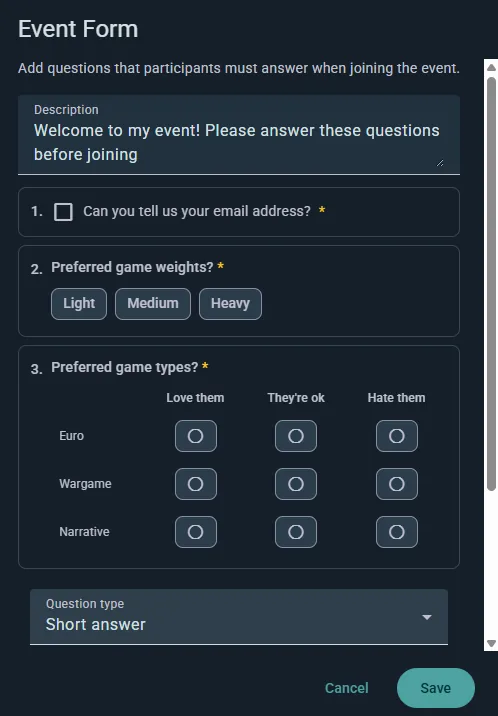
- Apri le impostazioni dell'evento e scegli la sezione Modulo
- Aggiungi le tue domande, trascinandole nell'ordine che preferisci (o duplicandone una che hai già configurato)
- Contrassegna qualsiasi domanda come obbligatoria
- Salva — le domande appariranno quando le persone si iscrivono
Nota che l'evento deve appartenere a un gruppo, e l'aggiunta di un modulo disattiva gli ospiti anonimi: se fai domande, Ludoya deve sapere chi sta rispondendo.
Tipi di domande
- Risposta breve — una riga di testo libero
- Paragrafo — una risposta scritta più lunga
- Scelta singola — scegli una da un elenco
- Scelta multipla — scegli tutte quelle che si applicano
- Scala lineare — valuta su un intervallo, con etichette a ciascuna estremità
- Griglia a scelta multipla — più domande che condividono un unico insieme di risposte, in righe e colonne
- Informazioni personali — chiedi un indirizzo email, numero di telefono, data di nascita o genere, con convalida appropriata invece di raccoglierle come testo libero
Esempi di domande:
- "Hai restrizioni alimentari?"
- "Quanto sei familiare con i giochi euro pesanti?"
- "Hai bisogno di un passaggio?"
- "È la prima volta che partecipi?"
Chiedi per ospite
Qualsiasi domanda a risposta breve, di scelta o di informazioni personali può essere contrassegnata come Chiedi per ospite. Viene quindi compilata separatamente per ogni persona aggiuntiva che un partecipante porta con sé — sia amici riservati sia ospiti nominati —, con il partecipante che la compila per loro conto; e, se obbligatorie, bloccheranno la prenotazione finché non saranno complete. È così che raccogli quattro serie di esigenze alimentari da una sola persona che prenota un tavolo per quattro.
Esperienza del partecipante
Le persone rispondono al momento dell'iscrizione, e le domande obbligatorie devono essere compilate prima di poter confermare. Le risposte vengono salvate con la loro registrazione, sono visibili nella gestione dei partecipanti e vengono esportate insieme all'elenco dei partecipanti.
Casi d'uso
- Eventi con catering — esigenze alimentari e allergie
- Serate per principianti — valutare l'esperienza per bilanciare i tavoli
- Eventi aziendali — raccogliere informazioni su reparto o team
- Serate a tema — preferenze di costume, assegnazioni alle squadre
Vedere quale modulo chiede ogni evento
Non serve aprire le impostazioni di un evento per sapere cosa chiede l'iscrizione:
- Nella console del club, Eventi ha una colonna Modulo non appena un evento fa domande: il nome del modello che segue, oppure Domande proprie.
- Moduli indica, per ogni modello, gli eventi che lo chiedono in Usato da. Apri le Risposte di un modello e Richiesto da li elenca tutti, e ognuno apre il suo evento.
- Nella console di un evento, la scheda Modulo della sua panoramica, e quella di ogni parte di un programma, dice cosa chiede l'iscrizione: le domande di un modello, le sue, quelle dell'evento principale o nessuna, con l'elenco delle domande. Cambialo lì stesso con lo stesso selettore delle impostazioni dell'evento; su una data di un evento ricorrente, chiede fin dove arriva la modifica. Modifica domande cambia le sue domande, e Vedi tutte le risposte apre le risposte di un modello raccolte da tutti gli eventi.
- Nel Programma di un festival, ogni attività che chiede un modulo proprio mostra il nome di quel modulo, e il filtro Modulo restringe l'elenco alle attività che chiedono uno stesso modulo.
Modificare un'opzione quando ci sono già risposte
Lo stesso editor dà forma al modulo d'ingresso di un club e ai suoi modelli di modulo salvati, e la regola è la stessa ovunque. Per correggere o riformulare un'opzione, modificane il testo lì dov'è: chi l'ha scelta mantiene la propria risposta con la nuova formulazione, quindi la tabella dei membri, il suo filtro per risposta e l'esportazione la contano subito. Le differenze solo di maiuscole o accenti vengono abbinate da sole.
Per offrire invece qualcosa di diverso, elimina l'opzione e aggiungine una nuova. Le risposte all'opzione eliminata restano com'erano e non passano mai a quella nuova, così nessuno si ritrova con una scelta che non ha fatto.
Correggere indirizzi scritti male e iscrizioni doppie
Un indirizzo email scritto male fallisce in silenzio: la conferma e il suo QR d'ingresso non arrivano da nessuna parte, e spesso la persona si iscrive di nuovo, finendo per occupare due posti. Quando succede in qualsiasi parte del tuo evento, una scheda Da controllare compare sopra l'elenco in Partecipanti nella console del tuo evento, e una riga sotto Richiede attenzione nella sua panoramica porta lì.
- Indirizzi che sembrano scritti male mostra ogni indirizzo che non può funzionare (gmail.con, gmai.com, hotmial.com, gmail.es…) accanto a quello che si intendeva. Correggi apre Modifica email con quel suggerimento già inserito.
- Iscritti due volte? mostra due posti della stessa lista che sembrano la stessa persona: lo Stesso indirizzo (a parte un errore di battitura o i punti di Gmail), o lo Stesso nome, quando un nome è l'altro con altre parole dopo. Vedi l'indirizzo di ciascuno, chi li ha iscritti, gli accompagnatori che portano e quando si sono iscritti. Tieni questo libera l'altro posto senza avvisare nessuno, perché la persona viene comunque, e gli accompagnatori che portava passano a quello che tieni. Sono due persone diverse smette di mostrare la coppia.
- Modifica email è anche nel menu di ogni riga dell'elenco. Puoi correggere l'indirizzo di un accompagnatore (quello che il tuo modulo gli ha chiesto) e quello di un account creato dalla tua integrazione che nessuno ha ancora attivato. L'indirizzo di un utente Ludoya appartiene solo a lui.
- Invia la conferma e il QR a questo indirizzo è attivo di default. La invia Ludoya, a meno che tu non iscriva le persone tramite l'API pubblica e scriva loro tu: allora attende nella tua coda di posta, perché tu la invii dal tuo indirizzo come il resto della loro posta.
- Se l'indirizzo corretto appartiene a un account Ludoya, il posto passa a quell'account, nella sua app. Se quell'account è già iscritto, è la stessa persona due volte, e la scheda propone di tenerne uno dei due.
Esportazione dei dati dei partecipanti (gratuita in tutti i piani)
Scarica gli elenchi degli iscritti e le risposte ai moduli come foglio di calcolo Excel o come CSV.
Cosa puoi esportare
Una riga per partecipante, con queste colonne:
- name (nome) e username (nome utente)
- dove — in un evento con un programma, l'attività a cui si sono iscritti, con le sezioni che la contengono ("Sabato: tavoli liberi › Azul")
- attendance — il suo stato di RSVP
- guests — quanti ospiti anonimi porta
- una colonna per domanda dei tuoi moduli di iscrizione personalizzati, con le relative risposte
In un evento con un programma, il primo foglio elenca tutti, ogni persona una volta per ogni posto a cui si è iscritta, e ogni attività appena sotto l'evento ha un foglio tutto suo con tutti quelli che ne fanno parte.
Due cose da sapere se ci costruisci sopra un foglio di calcolo:
- Ogni domanda posta da qualsiasi modulo dell'evento ha una colonna, con o senza risposta, così due esportazioni dello stesso evento combaciano. Le risposte a una domanda che nel frattempo hai tolto vengono comunque esportate, in colonne dopo le altre chiamate
removed-1,removed-2… - Le risposte a scelta multipla arrivano in una sola cella, separate da un
|, quindi "Vegetariano|Senza frutta secca" è un unico campo e non due colonne.
I segni di check-in e di mancata presentazione non sono nell'esportazione — il CSV racconta chi si è iscritto e cosa ti ha detto, non chi ha varcato la porta.
Casi d'uso
- Follow-up via e-mail o monitoraggio di un programma fedeltà
- La tua analisi di chi si è iscritto a cosa
- Pianificazione degli eventi futuri sulla base delle presenze passate
Per l'evento in cifre, pronto da consegnare a uno sponsor, vedi il Resoconto dell'evento più sotto.
Resoconto dell'evento (gratuito in tutti i piani)
Appena il tuo evento è iniziato, il Resoconto della sua console lo mostra in cifre, contato su tutto ciò che contiene: ogni attività, stand, torneo, mercatino e ludoteca. Continua a riempirsi mentre l'evento è in corso e resta disponibile per sempre quando finisce. Lo vede solo chi organizza l'intero evento, dalla console dell'evento stesso; un club che gestisce un solo stand vede invece la console di quello stand.
In alto
Persone iscritte (tutte quelle che si sono iscritte all'evento o a qualsiasi cosa al suo interno, ognuna contata una volta, accompagnatori compresi: il «Chi viene» della Panoramica), attività svolte, posti occupati (quanti dei posti offerti sono stati presi) e giochi usati venduti. Ogni attività conta al massimo fino ai suoi posti, così la gente stretta a un tavolo pieno non compensa un tavolo vuoto altrove; viene mostrata a parte, come persone aggiunte ad attività già piene.
Cosa ha funzionato e cosa rivedere la prossima volta
Due brevi elenchi indicano cosa ripetere e cosa cambiare, ognuno con il numero che c'è dietro: attività che hanno riempito tutti i posti o hanno avuto una lista d'attesa (offrine di più), l'ora di punta, le persone già venute ai tuoi eventi precedenti, un gioco prestato così spesso da richiedere una seconda copia, attività a cui non si è iscritto nessuno o rimaste quasi vuote, persone attese al check-in che non si sono presentate. Una riga compare solo quando i numeri sono abbastanza grandi da significare qualcosa.
Grafici e cifre
- Attività più popolari e meno piene, e posti occupati per sezione del programma (tutto il gioco di ruolo, tutti i tornei)
- Posti occupati per ora di inizio: le sessioni di una postazione di gioco contano ai loro orari
- I giochi più giocati e quelli più prestati dalla ludoteca
- Pareri delle postazioni: i risultati di ogni postazione di gioco alle sue domande di fine sessione: quanti dei suoi giocatori hanno risposto, la media di ogni scala e la quota di giocatori che ha scelto ciascuna risposta di una domanda a scelta. In una domanda che permette di sceglierne più di una, le quote sommate superano il 100%; un elenco lungo mostra le tre più scelte. Apri una postazione dal suo nome per leggerne i commenti
- In cifre: persone (accompagnatori, chi si è iscritto all'evento stesso, chi è venuto anche ai tuoi eventi precedenti, nuovi account Ludoya, check-in, liste d'attesa), il programma (attività che si sono riempite, risposte alle domande di parere degli stand), il mercatino dell'usato (venduti al banco del mercatino e con annunci online per l'evento, e il loro incasso), la ludoteca, i messaggi nelle chat dell'evento e gli annunci che hai inviato, il percorso a quiz e i biglietti quando l'evento li aveva
Tutte le attività
Ogni attività con la sua sezione, l'ora di inizio, i posti occupati e quanto era piena, ordinabile e scaricabile come foglio di calcolo. Un'attività che nessuno prenota (un tavolo dimostrativo, gioco libero) mostra Aperta, senza iscrizione invece di uno zero. Una postazione di gioco conta come un'attività, con le sue sessioni sommate; un torneo conta una volta, con i suoi turni al suo interno.
A confronto con i tuoi altri eventi
Il resoconto mette l'evento accanto agli eventi precedenti del tuo club a cui è venuta gente, dal più recente: persone iscritte, attività, posti occupati, quanto erano pieni, partite e giochi venduti. Un festival viene confrontato con i tuoi altri eventi che hanno un programma proprio, mai con una serata di gioco settimanale, e solo con eventi che organizzi anche tu.
Scaricalo in PDF
Scarica il PDF salva l'intero resoconto da inviare a uno sponsor, a un comune o alla tua squadra. Solo totali: non compare il nome di nessuno di chi è venuto. I commenti lasciati dai giocatori restano nella scheda Pareri di ogni stand.
Quando un evento di un club è finito con 10 o più persone, gli amministratori del club trovano anche Porta un altro club nel resoconto: quante persone ha riunito e Condividi per il link di invito del club (vedi la console del club).
Mappa di calore della disponibilità (piano Club)
Una mappa di calore per evento che mostra quando i partecipanti saranno effettivamente presenti durante l'evento, così gli organizzatori possono pianificare partite programmate attorno agli orari in cui è presente la maggior parte delle persone.
Come contribuiscono i partecipanti
Quando si uniscono a un evento, ogni partecipante indica in quali fasce orarie all'interno del programma dell'evento sarà presente. Per una convention del fine settimana che va dal venerdì sera alla domenica, un partecipante potrebbe dire "venerdì 18:00–22:00 e sabato tutto il giorno", un altro potrebbe riuscire a venire solo il sabato pomeriggio. Il menu a discesa del pulsante RSVP consente di modificare in qualsiasi momento questo orario personale di partecipazione.
Cosa mostra
- Una striscia di densità visiva disposta lungo il programma dell'evento (non per settimane o mesi)
- Punti di picco in cui la maggior parte dei partecipanti sarà presente
- Valli in cui pochi partecipanti riusciranno a venire
- Si aggiorna in tempo reale man mano che i partecipanti adeguano la propria disponibilità
Come lo usano gli organizzatori
- Apri la lista dei partecipanti dell'evento
- Tocca Visualizza orari
- Leggi la striscia di densità della Panoramica della disponibilità per individuare le fasce in cui ci sarà più gente
- Metti le tue partite programmate, interventi o tornei più importanti in quei picchi, così potrà partecipare il pubblico più numeroso
- Sotto, Orari individuali elenca ogni partecipante per nome con le proprie barre per fascia — utile quando devi coordinare persone specifiche, come un dimostratore per un gioco pesante o i giocatori per un tavolo preaccordato
Chi può vedere cosa
Entrambe le sezioni compaiono insieme nella stessa finestra di dialogo: la striscia aggregata e gli orari individuali con nome. In un evento il cui gruppo ospitante ha il piano Club, chiunque possa aprire la lista dei partecipanti può vederli — non solo gli organizzatori.
Dillo ai tuoi partecipanti, poiché gli orari che indicano saranno visibili al resto dell'evento con il loro nome. Se questo non è ciò che desideri per un determinato evento, non chiedere alle persone di compilare un orario personale.
Annunci a tutti all'evento (gratis in tutti i piani)
Comunica qualcosa a tutto il tuo evento in un colpo solo: il torneo inizia in ritardo, un'attività cambia sala, ecco il programma della giornata. Apri la console dell'evento e scegli Annunci.
Chi lo riceve
Tutte le persone che partecipano all'evento: non solo chi si è iscritto all'evento stesso, ma anche chiunque:
- si sia iscritto a un'attività, una partita o un torneo al suo interno
- venda al suo mercatino dell'usato, o vi abbia una scatola prenotata
- abbia preso in prestito un gioco dalla sua ludoteca
Puoi anche inviarlo a una sola parte: un'attività (solo le persone della caccia al tesoro) o un'intera sezione del programma con tutte le sue attività (tutti i tavoli di gioco di ruolo insieme). Includi la lista d'attesa quando l'attività ne ha una. Prima dell'invio, la pagina ti dice quante persone raggiunge e come: con l'app, o via email per chi non ha l'app. Gli accompagnatori iscritti da qualcuno lo ricevono tramite quella persona.
Come arriva
- Come notifica nell'app, e via email per chi non ha l'app: decidono le impostazioni di notifica di ciascuno, come per tutto il resto
- Arriva dal tuo club (o da te, per un evento personale), con il titolo dell'evento
- Usa prima Inviami una prova per vedere esattamente cosa riceveranno tutti
La bacheca dell'evento
Ogni messaggio che invii resta anche sulla pagina dell'evento, dal più recente: chiunque la apra dopo, o arrivi il giorno stesso, legge cosa è stato annunciato. La pagina di un'attività mostra anche i messaggi per tutto il festival e per la sua sezione. Quando un messaggio non è più attuale, toglilo dalla pagina dell'evento da Quello che hai inviato: chi l'ha già ricevuto lo conserva.
Limiti
Fino a 5 messaggi al giorno per evento, compresi quelli a una sola attività o sezione, così quelli che invii vengono letti.
Abbinamento di playtest (piano Business)
Per una giornata in cui gli autori portano prototipi e i giocatori li provano. Invece di una rotazione pianificata a mano, Ludoya fa sedere tutti ai tavoli, fascia oraria per fascia oraria.
Attivarlo
Nel modulo di un evento (un evento normale, non un torneo o un tavolo di gioco), tocca + Assegnazione dei tavoli e scegli Ludoya abbina i playtester. Fasce orarie, tavoli e programma si impostano poi nella console dell'evento, in Playtesting: quanto dura una fascia, quanti tavoli ha la sala e quanto dura il tavolo di ogni gioco (parte dalla durata di gioco del titolo).
Prima della giornata
- Gli autori aggiungono i loro prototipi dalla pagina dell'evento, con Porta un prototipo.
- I giocatori segnano i prototipi che vogliono provare, sulla pagina dell'evento. La console mostra quali sono i più richiesti.
Il programma
Quando i prototipi sono arrivati, scegli Genera il programma. Ludoya distribuisce tutti sulle fasce, aggiunge ogni tavolo al programma dell'evento come un normale tavolo di gioco ("Tavolo 3 · il gioco") e manda a ogni persona un'unica notifica con i suoi tavoli. La console indica poi quanti desideri sono stati esauditi e quali coppie di persone si incontrano due volte: un tavolo o una fascia in più gli lascia margine per mescolare.
Se arrivano o se ne vanno persone, o arrivano nuovi prototipi, Aggiorna il programma mantiene i tavoli già in gioco e i posti che hai fissato, e fa risedere tutti gli altri. Rigenera rimescola ogni tavolo che non è ancora iniziato. In entrambi i casi, vengono avvisate solo le persone i cui tavoli cambiano.
Disattivare l'abbinamento di playtest rimuove i tavoli che aveva programmato e che non sono iniziati. I tavoli già giocati restano.
I miei prototipi (per autori)
Anche un gioco non ancora pubblicato ha una casa. In Esplora → Giochi, sotto Non trovi il tuo gioco?, scegli È un mio prototipo; da quel momento I miei prototipi è una scheda della tua pagina iniziale.
- Nuovo prototipo: un nome, una descrizione, numero di giocatori, durata ed età minima, come qualsiasi gioco. Tienilo Privato mentre ci lavori, Non elencato per condividerlo tramite link, o Pubblico. Un prototipo privato non può essere portato a un playtest: rendilo prima non elencato o pubblico.
- Versioni: aggiungine una ogni volta che il gioco cambia (Nome della nuova versione), così i riscontri vengono associati alla versione che le persone hanno davvero giocato.
- Proprietari: Aggiungi comproprietario per il resto del team di design; ogni proprietario gestisce il prototipo.
- Modulo di riscontro: le domande a cui rispondono i tester dopo aver giocato una versione. Dopo un tavolo di playtest, i giocatori vi vedono Lascia un riscontro.
- Riscontri: i punteggi e i commenti di ogni versione, e come si è mossa ogni domanda Tra le versioni, per capire se una modifica ha aiutato.
- Playtest: ogni evento a cui è stato portato il prototipo. Porta un prototipo, in un evento con abbinamento di playtest, lo iscrive lì.
L'evento su un grande schermo (piano Business)
Metti l'evento sul proiettore o sulla TV del locale. Scegli Mostra su uno schermo nel menu dell'evento, o nella sua console, e Apri lo schermo:
- Un torneo mostra i tavoli del turno, il timer del turno e la classifica, che si aggiornano man mano che arrivano i risultati. Con Mostra la classifica solo alla fine attivo, anche lo schermo la tiene nascosta.
- Un programma o una postazione di gioco mostra cosa c'è ora e dopo, dove, e i posti rimasti.
- Un codice QR nell'angolo permette alla sala di seguire dal telefono e iscriversi.
Una sezione o un torneo di un festival può avere un proprio schermo, dalla sua console: la sala di gioco di ruolo mostra solo i suoi tavoli, la sala dei tornei solo i suoi turni. Funziona con il piano del festival.
Non serve che qualcuno abbia fatto l'accesso sullo schermo: il link è la chiave, quindi il portatile sotto il proiettore può essere di chiunque. Il proiettore è collegato a un altro computer? Apri lì lo stesso link e premi F per lo schermo intero. Lo schermo rilegge l'evento ogni pochi secondi e lo segnala nell'angolo se perde la connessione, così uno schermo vecchio non passa mai per uno dal vivo. Se il link finisce dove non dovrebbe, usa Crea un link nuovo; quello vecchio smette di funzionare.
Un percorso a quiz in tutto il festival (piano Business)
Un percorso a quiz porta i visitatori in giro per gli stand: ogni stand che partecipa ha un cartello con il suo QR e una domanda veloce. Preparalo nella console dell'evento, in Percorso a quiz.
- Prepara un percorso a quiz, poi Aggiungi una tappa per ogni stand: dov'è e cosa fanno lì i giocatori: Scegliere una risposta (segna quella giusta o scegli un sondaggio), Scrivere una risposta (elenca tutte le risposte che consideri giuste; maiuscole, accenti e punteggiatura non contano) oppure Basta trovarla.
- In Impostazioni, scrivi la riga Premio ed estrazione (cosa si può vincere, e quando e dove si estrae): compare su ogni tappa e cartello.
- Stampa i cartelli: uno per tappa, con il suo QR e un indirizzo breve da scrivere quando la fotocamera non lo legge. Scegli il formato: A4 per una parete o il fronte di uno stand, A5 (due per foglio A4) per il tavolo di uno stand, o A6 (quattro per foglio) come cartoncino da bancone. Un cartello si è bagnato? Stampa il cartello di questa tappa, nel menu della tappa, ristampa solo quello. Le tappe si trovano in qualsiasi ordine, quindi i cartelli non hanno numeri. Finché è una bozza, solo gli organizzatori possono aprire le tappe: provale prima.
- Apri il percorso a quiz quando aprono le porte. Prima l'evento ha bisogno di una data.
In una sede con mappa reale (un paese, una piazza), ogni tappa ha il suo Luogo sulla mappa della sede. Una tappa nuova parte da Il luogo con il nome della tappa: il luogo della sede che si chiama così, o uno nuovo che aspetta nell'editor della mappa di essere segnato. Sessanta vetrine? Aggiungi le tappe, poi segna i loro luoghi tutti insieme; Dai un luogo a ogni tappa lo fa per le tappe aggiunte prima, e la console dice quante tappe sono ancora fuori dalla mappa, con Mettili sulla mappa per aprire l'editor della mappa. I giocatori aprono Vedi le tappe su una mappa dalla pagina di qualsiasi tappa: il livello Percorso a quiz mostra ogni tappa come una bandierina da trovare o una spunta verde una volta trovata, quante ne hanno trovate su quante, Vedile elenca le tappe che la mappa non può ancora mostrare (prima quelle da trovare), e toccare un luogo dice quali tappe ha, mai cosa chiedono. Finché nascondi l'elenco delle tappe, anche la mappa le nasconde.
I visitatori giocano nel browser del telefono, senza installare nessuna app. La prima tappa che scansionano mostra la sua domanda e chiede un nome (o un nome di squadra: una famiglia con un solo telefono gioca come una squadra) e un'email, e di confermare di avere almeno 14 anni o di giocare con il proprio figlio o figlia. Un'email che ha già un account Ludoya riceve invece un codice via email, così nessuno può giocare al posto di un altro. Tutte le altre tappe vanno dritte alla loro domanda. Ogni tappa accetta una risposta, e scegli tu se i giocatori vedono se hanno risposto giusto subito dopo ogni risposta o solo quando il percorso a quiz finisce (così le risposte non girano). Hai corretto a metà giornata una risposta giusta scritta male? Tutte le risposte di quella tappa vengono ricorrette. Uno stand se ne va a metà festival? Chiudi questa tappa: il suo QR smette di accettare risposte, chi l'ha trovata tiene il punto, e per tutti gli altri esce dal percorso e dai cartelli.
La console mostra quanti hanno risposto in ogni tappa e la Classifica: prima chi ha più risposte giuste, poi chi ha più tappe, poi chi ha finito prima. I volontari possono cercare un giocatore per nome, e la classifica si scarica come foglio di calcolo. Per dare premi, aggiungi un sorteggio all'evento e scegli Giocatori del percorso a quiz in Chi partecipa, con un minimo di tappe trovate o di risposte giuste; spunta Ogni risposta giusta vale un biglietto in più per premiare i migliori senza lasciare fuori gli altri. Ogni tappa dice allora ai giocatori cosa serve per entrare nell'estrazione, e quando ci sono. Anche gli organizzatori e i volontari che hanno giocato sono nell'estrazione: se vince uno di loro, annulla la vincita ed estrai di nuovo. Termina il percorso a quiz quando fai l'estrazione: niente più risposte, e i giocatori vedono come è andata.
I dati dei visitatori che non completano mai il loro account Ludoya vengono cancellati 30 giorni dopo l'evento.