
大規模なイベントを運営する主催者向けのプロ仕様ツール — 入口でのQR入場確認、インタラクティブなフロアプラン、カスタム申込フォーム、参加者データの書き出し、空き状況の分析。カスタム申込フォーム(5問まで。Club なら無制限)と参加者データの書き出しは全プランで無料です。それ以外はClub と Business のプレミアムプランでご利用いただけます。
QR入場確認(Business プラン)
入口で QR コードをスキャンして参加者をチェックインします。Ludoya がリストに載っていることを確認し、チェックイン をワンタップすると、同伴者も含めて来場済みになります。人が到着するにつれて出席記録が自然にできあがります。クリップボードも、後での突き合わせも不要です。
同じコードを再スキャンしても問題ありません。二重に数えず、アプリに「既にチェックイン済み」と表示されます。
開場前に設定しておくべきことは2つあります:
- イベントでQR出席管理を有効化する。 デフォルトでオフです — イベントの設定で QRコードで出席を確認する を有効にしてください。このオプションは個人のものではなく、グループ が主催するイベントでのみ利用できます。
- 入口ではカメラ付きのどんな端末でも使えます:Ludoya アプリでも、ブラウザのウェブサイトでも、スマートフォン、タブレット、ノートパソコンのどれでも。参加者もアプリは不要で、QR コードはブラウザで問題なく表示されます。
チェックインは入口に結びついています。フェスティバルで有効にするとそのアクティビティにも及びますが、予定されたプレイが単独でチェックインを行うことはありません。ゲストがイベントに追加したものも同じです:卓に着く人はイベントのリストにも載っているので、イベント自体のコードで入場できます。
来場しなかった人は、後から参加者リストで 欠席としてマーク を使って記録することもできます。
仕組み
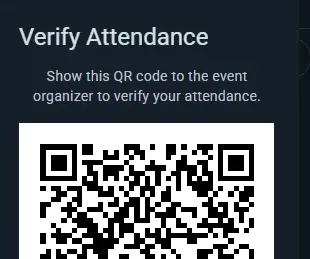
- 参加者はアプリかウェブサイトでイベントページを開き、出欠ボタン をタップします
- RSVPボタンから ドロップダウンメニュー が開き、RSVPの変更、イベントからの退出、自分の出席予定の編集、求められたときに 自分のQRコードを表示 する、といったオプションを選べます
- 固有の QR コードは 申し込み時にメールで届き(メールアドレスを伝えた名前付きのゲストそれぞれにも届きます)、いつでも QRコードを表示 から見られます。印刷するものは何もありません
- 入口でコードをスキャンします。Ludoya が出欠リストと照合し、その人が入場できるかを表示します。チェックイン で来場を記録します
QRコード
- 各参加者のコードはそのイベント専用で、メールと、イベントページのRSVPボタンのドロップダウンメニューにあります
- スマートフォンのカメラを向けると、Ludoya 上のその参加者自身のチェックインページが開きます。入口では Ludoya のスキャナーで読み取ってください
- スキャンは即時です
利点
- クリップボードや紙のリストなしで、素早くスムーズに入場確認
- 即時のRSVP確認 — この人は入場可能かどうかをその場で判定
- 印刷するものは何もありません:メールをなくしても問題なく、コードはイベントページにもあります
- RSVPしていない来場者の入場を防止
名前付きスポット(組織)
あなたの場所内に名前付きのスポットを定義し、そこにイベントや開催予定のゲームセッションを割り当てます。
場所とスポット
場所(あなたの会場、または組織が使用する任意の物理的な場所)には、その内部の実世界のエリアに対応する名前付きのスポットを含めることができます:
- カフェには各テーブルごとにスポットがあるかもしれません("テーブル1"、"テーブル2"、"窓側のボックス席")
- コンベンションホールは部屋に分割されるかもしれません("メインホール"、"RPGルーム"、"デモエリア")
- 複数階の会場では、フロアごとにスポットにラベルを付けることができます("上階 — テーブルA"、"下階 — 奥の部屋")
スポットの設定
- 拠点を開きます。クラブのコンソールの 場所(自分の場所なら 設定 → 場所)から
- その場所用にスポットを作成し、名前を付けます(例:"テーブル1"、"奥の部屋"、"メインホール")
イベントでのスポットの使用
その場所でのどんなイベントでもスポットを確保できます — しかも複数同時に確保可能で、1つだけに限りません。奥の部屋と前方のテーブル2卓を使うクラブナイトなら、3つすべてを選びます。
一般的な流れ:
- 会場全体のイベント(コンベンション、会場を丸ごと押さえるクラブナイトなど)は、しばしばスポットを完全に省略し、場所のみに紐づけます。それで問題ありません — スポットは任意です。
- サブイベントは、自分のトラックが使う部屋やエリアを選ぶので、参加者は行き先が分かります:"初心者トラック → メインホール"、"上級者トラック → 奥の部屋"。
- 開催予定のゲームセッションは、プレイするテーブルを選びます。
知っておくとよいルールが1つあります:親イベントがいったんスポットを確保すると、その子はスポットの選択機能を提供しなくなります — 親の選択でもう全体の場所が説明されているためです。各サブイベントや各テーブルが自分で位置を指定できるようにしたい場合は、親にはスポットを設定しないでください。
こうして参加者は自分のトラックやテーブルがどこにあるかを正確に確認でき、同時に走っている2つのものが同じテーブルを確保してしまうことはありません。
1テーブルにつき1ゲーム
テーブルとして設定されたスペースでは、一度に1つのゲームしか遊べません。ゲームのテーブルを選ぶとき、ピッカーはその時間に別のゲームが使っているテーブルに印を付け("使用中 20:00–22:00")、使用中のテーブルでは保存できません。連続するゲームは問題ありません。部屋は複数のゲームを並べて受け入れられ、チェックされることはありません。また、テーブルを予約したイベント内のゲームは、そのイベントとテーブルを共有します。
会場のすべてのゲームにプレイ場所を示してほしいクラブは、場所の部屋とテーブルでここのゲームはテーブルを選ぶをオンにします(クラブコンソール → 場所)。以降、そこでは新しいゲームをテーブルなしで保存できなくなります。すでに予定されているゲームはそのままです。
インタラクティブな会場マップ(Business プラン)
名前付きスポットの上に、視覚的なマップのレイヤーを追加できます。会場マップの画像をアップロードして各スポットを配置すると、参加者は、すべてのテーブル、部屋、プレイエリアが示された、パンやズームのできるマップで会場を見て回れます。
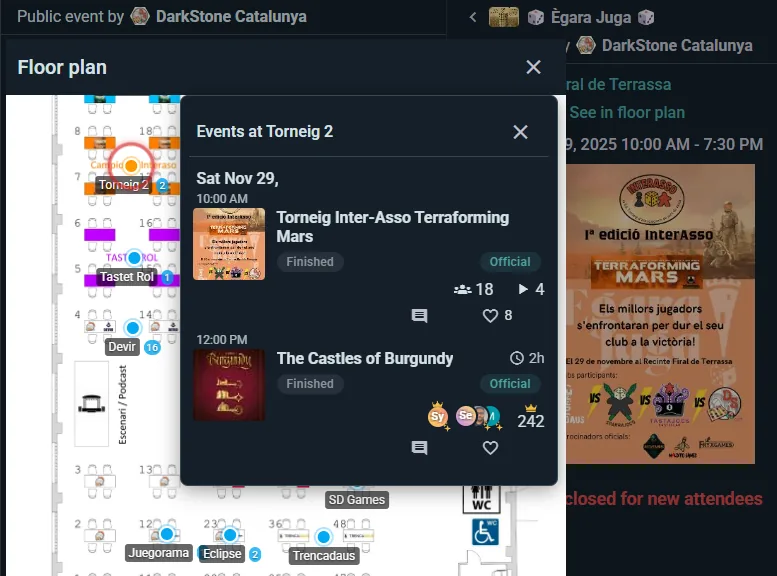
会場マップの設定
- すでにスポットがある拠点(コンソールの 場所)を開き、会場マップをオンにします
- 会場マップの画像(写真、図、建築図面)をアップロードします
- 任意のスポットをクリックして、画像上の正しい位置にドラッグします
会場マップがなくても、スポットは単純なテキストラベル(「テーブル3にいます」)として機能します。視覚的な会場マップは、道案内が重要な大きな会場で真価を発揮します。
町、広場、公園:実際の地図
町じゅうに広がるフェスティバル、1つの広場に並ぶテントの市、公園をめぐるラリー。こうした場合は描く図面がありません。スポットは代わりに実際の地図(Google Maps)の上に、それぞれの場所でピン留めします。
- コンソールの 場所 で会場を開きます。候補から選んだ町(またはGoogleが公園や広場として認識している場所)は、それだけで地図を使う会場になります。それ以外(見本市会場、Googleが通りとして扱う広場など)は 実際の地図で表示する をオンにします。地図が位置を把握できるよう、住所は候補から選ぶ必要があります。代わりに画像を使う で会場の図の画像に戻せます。
- スポットを地図にピン留め で地図が開きます。地図上にないものとして一覧にあるスポットをタップし、次にその位置をタップします。または地図の空いているところをタップすると、そこに新しいスポットを追加できます(地図を動かすつもりだったタップは 元に戻す で取り消せます)。ピンはドラッグで移動でき、地図から外す でピン留めを外せます。
- スポットには独自の図面を持たせることもできます(テーブルのあるホールなど)。スポットの詳細で画像を追加すると、いつもどおりその画像の上にテーブルが描かれます。来場者は 中を見る でそこに入れます。
参加者は、イベントの会場マップで実際の地図を見られます。各スポットのピンには名前と、そこで行われているアクティビティの数が表示されます(表示中の時間に何もないスポットは薄く表示されます)。名前で探せる スポット一覧、隣のテントと見分けるための 航空写真、タップしたときだけスマホの位置情報を求める 現在地を表示 もあります。スポットをタップすると、地図はそのままでカードが表示されます。そこで行われていること、着いてからの見つけ方、独自の図面があるホールなら 中を見る、そして 道順 です。ピン留めされたスポットで行われるアクティビティにも道順が表示され、イベントページには地図の小さな画像が表示されます。あとから会場の図の画像をアップロードすると、地図の代わりにその画像が使われます。地図にピン留めしたスポットは、画像の上に形が描かれるまでピンを保ちます。
当日の会場マップ
会場マップのある会場で開かれるイベントには、独自の 会場マップ 表示があります。各テーブルと部屋に、そこで行われていることが表示されます。1つタップすると、時間、席、参加方法とともに、その企画が引き出しパネルに開きます。スマートフォンではテーブル名がテーブルに収まるように縮むので、腕を伸ばした距離でもマップが読みやすいままです。
会場とそれぞれのスポットには、短い説明文を付けられます。どのドアか、何のための部屋か、「鍵はバーで尋ねてください」など。スポットは公開 APIからも取得できるので、自分のサイトに表示することもできます。
こんな会場に最適
- 複数の部屋やゾーンがある大きな会場
- 数十のテーブルがあるコンベンション
- 常連がお気に入りの席を選びたいボードゲームカフェ
- 「自分のゲームはどこ?」がよくある質問になっているあらゆる会場
カスタム出欠フォーム(全プランで無料 — 5問まで、Club なら無制限)
参加登録時に参加者へ質問を提示しましょう — 外部のフォーム作成ツールに移らずに、Ludoya内でより良いイベント運営に必要な情報を収集できます。
カスタム質問の作成
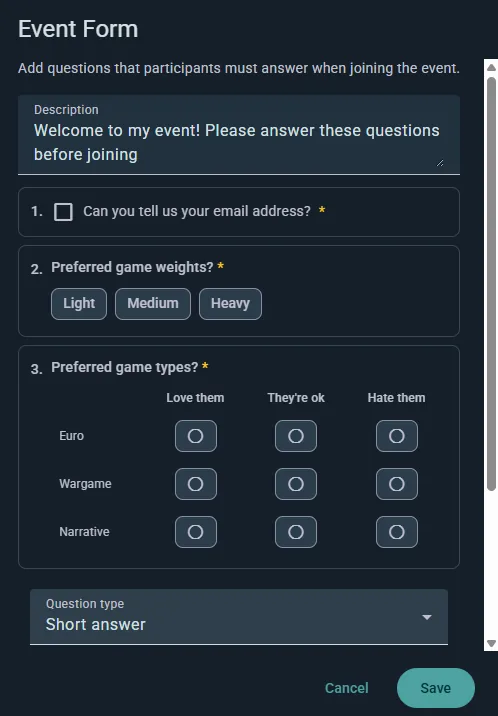
- イベントの設定を開き、フォーム セクションを選択します
- 質問を追加し、ドラッグして望む順序に並べ替えます(既に作成済みのものを複製することもできます)
- 必要に応じて各質問を必須に指定します
- 保存 — 人々が登録する際に質問が表示されます
注意: イベントはグループに属している必要があり、フォームを追加すると匿名ゲストは無効になります。質問をする場合、誰が回答しているかをLudoyaが把握する必要があるためです。
質問タイプ
- 短答 — 1行の自由記述
- 段落 — より長い記述回答
- 単一選択 — リストから1つ選ぶ
- 複数選択 — 該当するものを複数選ぶ
- 線形スケール — 両端にラベルのある範囲で評価
- 複数選択グリッド — 複数の質問が1つの回答セットを共有する、行と列のグリッド
- 個人情報 — メールアドレス、電話番号、生年月日、性別を求め、自由記述ではなく適切に検証されます
質問例:
- "食事制限はありますか?"
- "重めのユーロゲームにはどの程度慣れていますか?"
- "送迎は必要ですか?"
- "参加は初めてですか?"
ゲストごとに質問
短答・選択・個人情報のいずれの質問もゲストごとに質問として指定できます。すると、参加者が同伴する追加の各人について個別に回答します — 予約済みの友人も名前付きゲストも同様です。回答は参加者が代理で入力し、必須のものは完了するまで予約をブロックします。これにより、4人卓を1人が予約する場合でも、4人分の食事要件を1件の予約から集められます。
参加者の体験
人々は登録時に回答し、必須の質問は確定前に入力する必要があります。回答は登録情報とともに保存され、参加者管理で表示でき、参加者リストと一緒にエクスポートされます。
ユースケース
- ケータリング付きのイベント — 食事のニーズやアレルギー
- ビギナーナイト — 経験を把握して卓のバランスを取る
- 企業向けイベント — 部署やチーム情報の収集
- テーマナイト — 衣装の希望、チーム割り当て
各イベントがどのフォームを使っているかを見る
イベントの申し込みで何を質問するかを知るために、イベントの設定を開く必要はありません:
- クラブのコンソールでは、いずれかのイベントが質問をするようになると、イベント に フォーム 列が表示されます:そのイベントが従うテンプレートの名前か、独自の質問 です。
- フォーム には、テンプレートごとに、それを使っているイベントが 使用者 に表示されます。テンプレートの 回答 を開くと、質問元 にそのすべてが並び、それぞれからそのイベントを開けます。
- イベントのコンソールでは、全体にある フォーム カードと、プログラムの各パートのカードに、申し込み時に何を質問するかが表示されます:テンプレートの質問、独自の質問、親イベントの質問、またはなしのいずれかで、質問の一覧も載っています。イベントの設定と同じ選択メニューで、その場で変更できます。繰り返しイベントの日程では、変更をどこまで反映するかを尋ねられます。質問を編集 で独自の質問を変更でき、すべての回答を見る でテンプレートの回答をすべてのイベント分まとめて開けます。
- フェスティバルの プログラム では、独自のフォームを使う各アクティビティにそのフォームの名前が表示され、フォーム チップで同じフォームを使うアクティビティだけに絞り込めます。
回答が集まった後に選択肢を変更する
クラブの入会フォームと保存済みのフォームテンプレートは同じエディターで作成するため、ルールはどこでも同じです。選択肢を修正したり言い回しを変えたりするときは、その場でテキストを編集してください。選んだ人は全員、新しい表記のまま回答が保持されるので、メンバー表、回答での絞り込み、エクスポートにもすぐに反映されます。大文字・小文字やアクセント記号だけの違いは自動的に同じものとして扱われます。
別の内容を提示したい場合は、選択肢を削除して新しい選択肢を追加してください。削除した選択肢への回答はそのまま残り、新しい選択肢に移されることはありません。そのため、選んでいないものを選んだことになる人は出ません。
入力ミスのアドレスと二重申し込みを直す
メールアドレスの入力ミスは気づかれないまま失敗します:確認メールとその入場用QRはどこにも届かず、その人はたいてい申し込み直すので、結果として2つの枠を押さえることになります。イベントのどこかでそれが起きると、イベントのコンソールの 参加者 で一覧の上に 要確認 カードが表示され、全体の 対応が必要 にある1行からそこへ移動できます。
- 入力ミスと思われるアドレス には、使えないアドレス(gmail.con、gmai.com、hotmial.com、gmail.es…)が、本来意図されたアドレスと並べて表示されます。修正 を押すと、その候補が入力された状態で メールアドレスを編集 が開きます。
- 二重申し込み? には、同じリストにあって同一人物と思われる2つの枠が表示されます:同じアドレス(入力ミスやGmailのドットの違いは除く)か、同じ名前(一方の名前が、もう一方の名前の後に言葉を足したもの)です。それぞれのアドレス、誰が申し込んだか、連れてくる同伴者、申し込んだ日時が見られます。こちらを残す を押すと、その人は引き続き参加するので誰にも知らせずにもう一方の枠を空け、そちらが連れてきた同伴者は残す方に移ります。別々の人です を押すと、その組み合わせは表示されなくなります。
- メールアドレスを編集 は、一覧の各行のメニューにもあります。同伴者のアドレス(フォームで同伴者について尋ねたもの)と、連携で作成されてまだ誰も有効化していないアカウントのアドレスを修正できます。Ludoyaユーザー本人のアドレスは、本人だけが変更できます。
- 確認メールとQRをこのアドレスに送る はデフォルトでオンです。Ludoyaが送信しますが、公開APIで申し込みを行い自分でメールを送っている場合は別です:その場合はメールキューで待機し、その人へのほかのメールと同じく、あなたが自分のアドレスから送ります。
- 修正したアドレスがLudoyaアカウントのものなら、枠はそのアカウントのものになり、その人のアプリに表示されます。そのアカウントがすでに申し込んでいれば同じ人が2回申し込んでいることになり、カードで2つのうちどちらかを残すよう案内されます。
参加者データの書き出し(全プランで無料)
申込者リストとフォームの回答を、Excel スプレッドシートまたは CSV でダウンロードできます。
エクスポートできるもの
参加者 1 人につき 1 行、次の列が含まれます:
- name(氏名)と username(ユーザー名)
- どこ — プログラムのあるイベントで、申し込んだ企画と、その上にあるセクション("土曜日: 自由卓 › アズール")
- attendance — その人の RSVP 状態
- guests — 連れてくる匿名ゲストの人数
- カスタム登録フォームの設問ごとに 1 列、回答つき
プログラムのあるイベントでは、最初のシートに全員が並びます。1 人が申し込んだ場所ごとに 1 回ずつ載り、イベントの直下にある企画には、それぞれその中の全員が載った専用のシートがあります。
これを土台に表計算を組むなら、知っておきたいことが 2 つあります:
- イベント内のどのフォームで尋ねた設問にも列がつきます。回答の有無にかかわらないので、同じイベントを 2 回エクスポートしても列がそろいます。その後削除した設問への回答もエクスポートされ、ほかの列のあとに
removed-1、removed-2… という名前の列で並びます。 - 複数選択の回答は 1 つのセルにまとめて入り、
|で区切られます。つまり "ベジタリアン|ナッツ不可" は 2 列ではなく 1 つのフィールドです。
チェックインと不参加のマークはエクスポートに含まれません。CSV が映すのは、誰が申し込み何を伝えてきたかであって、誰が実際に入口をくぐったかではありません。
活用例
- メールでのフォローアップやロイヤルティプログラムの管理
- 誰が何に申し込んだかの独自分析
- 過去の参加データにもとづく次回イベントの計画
スポンサーにそのまま渡せる、数字で見るイベントは、下のイベントレポートをご覧ください。
イベントレポート(全プランで無料)
イベントが始まると、そのコンソールの レポート がイベントを数字で見せてくれます。対象はイベントの中のすべて、つまり各企画、ブース、トーナメント、マーケット、ゲームライブラリーです。開催中は更新され続け、終了後もずっと残ります。見られるのはイベント全体を運営する人だけで、イベント自身のコンソールから開きます。ブースを 1 つ担当するクラブには、代わりにそのブースのコンソールが表示されます。
一番上
申し込んだ人(イベントやその中の何かに申し込んだ全員を 1 人 1 回として数え、同伴者も含みます。全体の「来る人」と同じ数です)、開催した企画、埋まった席(用意した席のうち埋まった数)、売れた中古ゲーム。各企画は席数までしか数えないので、満席のテーブルに詰め込まれた人が、別の場所の空いたテーブルの穴埋めになることはありません。その人たちは、満席の企画に追加された人として別に表示されます。
うまくいったこと、次回見直すこと
2 つの短いリストが、くり返すことと変えることを、裏づけとなる数字とともに挙げます。満席になった、または順番待ちが出た企画(次回は枠を増やしましょう)、いちばん混んだ時間帯、以前のイベントにも来た人、2 つ目が必要なほど貸し出されたゲーム、誰も申し込まなかった、またはほとんど空いたままだった企画、チェックイン予定だったのに来なかった人。どの項目も、意味のある大きさの数字になってはじめて表示されます。
グラフと数値
- 人気の 企画と 空きが多かった 企画、そしてプログラムの セクション別の埋まった席(ロールプレイ全体、トーナメント全体など)
- 開始時間別の埋まった席:プレイブースのセッションはそれぞれの時間で数えます
- よく遊ばれた ゲームと、ゲームライブラリーで よく貸し出された ゲーム
- ブースの感想:各プレイブースがセッション後にたずねる独自の質問の結果です。プレイヤーのうち何人が回答したか、各スケールの平均、選択式の質問で各回答を選んだプレイヤーの割合。複数選べる質問では割合の合計が 100% を超えます。長いリストは、よく選ばれた上位 3 つを表示します。ブース名から開くとコメントを読めます
- 数字で見る:人(同伴者、イベント自体に申し込んだ人、以前のイベントにも来た人、新しい Ludoya アカウント、チェックイン、順番待ち)、プログラム(満席になった企画、ブースの感想の質問への回答)、中古マーケット(マーケットのブースとイベント向けのオンライン出品で売れた数、その売上金額)、ゲームライブラリー、イベントのチャットのメッセージと送ったお知らせ、そしてイベントにあればクイズラリーとチケット
すべての企画
すべての企画を、セクション、開始時刻、埋まった席、埋まり具合とともに一覧にします。並べ替えができ、スプレッドシートとしてダウンロードもできます。誰も予約しない企画(デモテーブル、自由プレイ)は、ゼロではなく 自由参加、申し込み不要 と表示されます。プレイブースはセッションを合計して 1 つの企画として、トーナメントはラウンドを含めて 1 回として数えます。
ほかのイベントとの比較
レポートは、このイベントを、人が来たクラブの以前のイベントと新しい順に並べて比べます:申し込んだ人、企画、埋まった席、埋まり具合、プレイ、売れたゲーム。フェスティバルは独自のプログラムを持つほかのイベントとだけ比べ、毎週のゲーム会とは比べません。また、あなたも運営しているイベントとしか比べません。
PDF でダウンロード
PDF をダウンロード で、レポート全体を保存して、スポンサーや市役所、自分のチームに送れます。合計のみで、来た人の名前は一切載りません。プレイヤーが残したコメントは、各ブースの 感想 カードに残ります。
クラブのイベントが 10 人以上の参加で終了すると、そのクラブの管理者にはレポートに ほかのクラブを連れてくる も表示されます。集まった人数と、クラブの招待リンクを送る 共有 です(クラブコンソール を参照)。
参加可能時間のヒートマップ(Club プラン)
イベントごとのヒートマップで、参加者が実際にイベント中のいつ在席しているかを示します。これにより、主催者は多くの人がいる時間帯に合わせて開催予定のゲームセッションを計画できます。
参加者の貢献方法
イベントに参加する際、各参加者はイベントの開催スケジュールの中で自分が居られる時間帯をマークします。金曜の夕方から日曜までの週末コンベンションなら、ある参加者は「金曜 18:00–22:00 と土曜は終日」と答え、別の人は土曜の午後だけ来られるかもしれません。RSVP ボタンのドロップダウンメニューから、いつでもこの個人の参加スケジュールを編集できます。
表示内容
- イベントの開催スケジュールそのものに沿って配置された視覚的な密度ストリップ(週や月ではありません)
- 参加者の大半が在席しているピーク
- 参加者が少ない谷間
- 参加者が自分の参加可能時間を調整するとリアルタイムに更新
主催者の使い方
- イベントの参加者リストを開く
- スケジュールを表示をタップ
- 多くの人が居る時間帯を見極めるために、参加可能状況の概要の密度ストリップを確認
- 最大の観客が参加できるよう、そのピークに重要な開催予定のゲームセッション、トーク、トーナメントを配置
- その下の個別スケジュールでは、各参加者が名前付きでスロットごとのバーで表示されます。重めのゲームのデモ担当者や、事前に手配した卓のプレイヤーなど、特定の人を揃える必要があるときに便利です
閲覧権限
両方のセクションは同じダイアログに並んで表示されます。集計ストリップと、名前付きの個別スケジュールです。ホストグループがClubプランのイベントでは、参加者リストを開ける人は誰でも—主催者だけでなく—閲覧できます。
参加者にはその旨を伝えてください。彼らがマークした時間は、名前付きでイベントの他の参加者から見えるためです。特定のイベントでそれを望まない場合は、個人スケジュールの記入を求めないでください。
イベントの全員へのお知らせ(すべてのプランで無料)
イベントの参加者全員に、一度にまとめて伝えましょう:トーナメントの開始が遅れる、アクティビティの部屋が変わる、当日の予定はこちら、など。イベントのコンソールを開き、お知らせを選んでください。
誰に届くか
イベントに参加しているすべての人:イベント自体に申し込んだ人だけでなく、次のような人にも届きます。
- イベント内のアクティビティ、ゲーム、トーナメントに申し込んだ人
- 中古マーケットで販売している人、またはそこで箱を取り置いている人
- ゲームライブラリからゲームを借りた人
一部だけに送ることもできます。1つのアクティビティ(宝探しの参加者だけなど)や、プログラムのセクション全体とその中のすべてのアクティビティ(TRPGの全卓にまとめてなど)です。アクティビティに順番待ちがあれば順番待ちの人も含めましょう。送信前に、何人にどう届くか(アプリで、またはアプリのない人にはメールで)がページに表示されます。誰かが一緒に申し込んだ同伴者には、その人を通じて届きます。
届き方
- アプリの通知として届き、アプリのない人にはメールで届きます。ほかのすべてと同じく、各自の通知設定に従います
- クラブ(個人のイベントならあなた)から、イベント名とともに届きます
- まず自分にテストを送るを使って、みんなに届く内容をそのまま確認しましょう
イベントの掲示板
送信したメッセージはイベントページにも新しい順に残るので、後から開いた人や当日来た人も、何が告知されたかを読めます。アクティビティのページには、フェスティバル全体とそのセクションへのメッセージも表示されます。メッセージが古くなったら、送信した内容でイベントページから外してください。すでに受け取った人の手元には残ります。
上限
1つのイベントにつき1日5件まで(1つのアクティビティやセクション宛ても含む)。送ったメッセージがきちんと読まれるようにするためです。
プレイテスト割り当て(Business プラン)
デザイナーがプロトタイプを持ち寄り、プレイヤーがそれを試す日のための機能です。手作業でローテーションを組む代わりに、Ludoyaが時間枠ごとに全員をテーブルに割り振ります。
有効にする
イベントのフォーム(大会やゲーム卓ではない通常のイベント)で + 卓割り をタップし、Ludoyaがプレイテスターを割り当て を選びます。時間枠、テーブル、スケジュールは、そのあとイベントのコンソールの Playtesting で設定します。1枠の長さ、会場のテーブル数、各ゲームの卓の長さ(ゲームのプレイ時間が基準)です。
当日まで
- デザイナー はイベントのページで プロトタイプを持ち込む からプロトタイプを追加します。
- プレイヤー はイベントのページで試したいプロトタイプに印を付けます。コンソールには人気の高いものが表示されます。
スケジュール
プロトタイプがそろったら スケジュールを作る を選びます。Ludoyaは全員を時間枠に振り分け、各テーブルを通常のゲーム卓(「テーブル3 · ゲーム名」)としてイベントのプログラムに加え、各自に自分のテーブルをまとめた通知を1通だけ送ります。その後コンソールに、いくつの希望がかなったか、どの2人が2回同席するかが表示されます。テーブルか時間枠を1つ増やすと、組み合わせに余裕が出ます。
参加者の増減や新しいプロトタイプがあったら、スケジュールを更新 すると、すでにプレイ中のテーブルと固定した席はそのままに、残りの人を割り振り直します。作り直す は、まだ始まっていないテーブルをすべて組み直します。どちらの場合も、通知が届くのはテーブルが変わった人だけです。
プレイテスト割り当てを無効にすると、それが組んだテーブルのうち、まだ始まっていないものが削除されます。すでに遊んだテーブルは残ります。
自分のプロトタイプ(デザイナー向け)
まだ発売されていないゲームにも居場所があります。探索 → ゲーム の ゲームが見つかりませんか? で 自分のプロトタイプです を選ぶと、それ以降 自分のプロトタイプ がホームページのカードになります。
- 新しいプロトタイプ:ほかのゲームと同じく、名前、説明、プレイ人数、プレイ時間、対象年齢を入力します。作業中は 非公開、リンクで共有するなら 限定公開、または 公開 にします。非公開のプロトタイプはプレイテストに持ち込めません。先に限定公開か公開にしてください。
- バージョン:ゲームが変わるたびに追加します(新しいバージョンの名前)。フィードバックは、実際に遊ばれたバージョンに紐づきます。
- 所有者:デザインチームのほかのメンバーには 共同所有者を追加 を。所有者は全員プロトタイプを管理できます。
- フィードバックフォーム:テスターがバージョンを遊んだあとに答える質問です。プレイテストのテーブルのあと、プレイヤーにはそこに フィードバックを書く が表示されます。
- フィードバック:各バージョンの評価とコメント、そして バージョン横断 で各質問がどう変化したか。変更が効果的だったかが分かります。
- プレイテスト:プロトタイプを持ち込んだすべてのイベント。プレイテストのマッチングがあるイベントで プロトタイプを持ち込む を使うと、そこにエントリーされます。
大画面でのイベント表示(Business プラン)
会場のプロジェクターやテレビにイベントを映しましょう。イベントのメニューまたはコンソールで 画面に映す を選び、画面を開く をタップします。
- トーナメント では、ラウンドのテーブル、ラウンドの時計、順位が表示され、結果が入るたびに更新されます。順位は最後にだけ公開する がオンなら、画面でも順位は隠されたままです。
- プログラムやプレイブース では、今と次に何があるか、どこで、残り何席かが表示されます。
- 隅の QR コードで、会場の人は スマートフォンでフォロー して申し込めます。
フェスティバルのセクションやトーナメントは、それぞれのコンソールから専用の画面を持てます。TRPGの部屋ならその卓だけ、トーナメント会場ならそのラウンドだけを表示します。フェスティバルのプランで利用できます。
画面側でログインする必要はありません。リンクそのものが鍵なので、プロジェクターにつないだノートパソコンは誰のものでもかまいません。プロジェクターが別のパソコンにつながっている?そこで同じリンクを開き、F を押して全画面にしてください。画面は数秒ごとにイベントを読み込み直し、接続が切れると隅にそう表示するので、古い画面がライブ画面と見間違われることはありません。リンクが本来とは違う場所に出回ってしまったら 新しいリンクを作る を使ってください。古いリンクは使えなくなります。
フェスティバル全体でクイズラリー(Businessプラン)
クイズラリーは、来場者にブースを巡ってもらう仕掛けです。参加する各ブースには、専用のQRと簡単な問題が載ったポスターが置かれます。イベントのコンソールのクイズラリーから設定します。
- クイズラリーを準備するを押し、ブースごとにチェックポイントを追加します。場所と、そこで参加者がすることを決めます:選択肢から選ぶ(正解に印を付けるか、アンケートにします)、答えを入力する(正解として認める答えをすべて入力します。大文字・小文字、アクセント、句読点は区別しません)、または見つけるだけ。
- 設定で賞品と抽選の欄(何が当たるか、いつどこで抽選するか)を書きます。すべてのチェックポイントとポスターに表示されます。
- ポスターを印刷:チェックポイントごとに1枚で、QRと、カメラで読み取れないときに入力する短いアドレスが載ります。サイズを選べます:壁やブースの正面にはA4、ブースのテーブルにはA5(A4用紙1枚に2つ)、カウンター用のカードにはA6(1枚に4つ)。ポスターが濡れてしまったら?そのチェックポイントのメニューにあるこのチェックポイントのポスターを印刷で、その1枚だけを印刷し直せます。チェックポイントは順不同で見つけるので、ポスターに番号はありません。下書きの間はチェックポイントを開けるのは主催者だけなので、先に試してみましょう。
- 開場したらクイズラリーを開始するを押します。その前にイベントの日付が必要です。
実際の地図がある会場(町、広場など)では、各チェックポイントに会場の地図上のスポットがあります。新しいチェックポイントは、最初はチェックポイントと同じ名前のスポットになります。会場にあるその名前のスポットか、地図エディターでピン留めを待つ新しいスポットです。ショーウィンドウが60か所?チェックポイントを追加してから、スポットをまとめてピン留めしましょう。すべてのチェックポイントにスポットを割り当てるは、それ以前に追加したチェックポイントに同じことをします。まだ地図上にないチェックポイントの数はコンソールに表示され、ピン留めするで地図エディターを開けます。参加者はどのチェックポイントのページからでもチェックポイントを地図で見るを開けます。クイズラリーのレイヤーでは、各チェックポイントが見つけるべき旗として、見つけたあとは緑のチェックマークとして表示され、全体のうちいくつ見つけたかもわかります。一覧を見るでは、地図にまだ表示できないチェックポイントが一覧になります(未発見のものが先)。スポットをタップするとそこにあるチェックポイントの名前がわかりますが、問題の内容は決して表示されません。チェックポイントの一覧を非表示にしている間は、地図でも非表示になります。
来場者はスマホのブラウザで参加でき、アプリのインストールは不要です。最初にスキャンしたチェックポイントでは問題が表示され、名前(またはチーム名:1台のスマホで参加する家族は1チームとして参加します)とメールアドレスの入力、そして14歳以上であるか子どもと一緒に参加していることの確認が求められます。すでにLudoyaアカウントがあるメールアドレスには代わりにコードがメールで届くので、他人になりすまして参加することはできません。ほかのチェックポイントではすぐに問題が表示されます。各チェックポイントで回答できるのは1回だけです。正解かどうかを回答の直後に表示するか、クイズラリーの終了時のみに表示するか(答えが広まるのを防げます)を選べます。途中で正解の入力ミスを直したら?そのチェックポイントの全員の回答が採点し直されます。フェスティバルの途中でブースが撤収したら?このチェックポイントを閉じる:QRで回答を受け付けなくなり、すでに見つけた人のポイントはそのまま残り、ほかの人にとってはクイズラリーとポスターから外れます。
コンソールには、各チェックポイントの回答数とランキングが表示されます。正解数が多い順、次にチェックポイント数が多い順、最後に早く終えた順です。ボランティアは名前で参加者を探すことができ、ランキングはスプレッドシートとしてダウンロードできます。賞品を出すには、イベントに抽選を追加し、「誰が参加するか」でクイズラリー参加者を選び、見つけたチェックポイント数か正解数の最低条件を設定します。正解1つごとに抽選券が1枚増えるにチェックを入れれば、ほかの人を除外せずに上位の参加者に報いることができます。すると各チェックポイントで、抽選に参加するための条件と、参加できたかどうかが参加者に表示されます。プレイした主催者やボランティアも抽選の対象になります。そのうちの誰かが当選した場合は、当選を取り消してもう一度抽選してください。抽選するときはクイズラリーを終了するを押します。回答の受付が終わり、参加者は自分の結果を確認できます。
Ludoyaアカウントの登録を最後まで完了しなかった来場者のデータは、イベントの30日後に削除されます。