
대규모 이벤트를 운영하는 주최자를 위한 전문 도구 — 입구에서의 QR 입장 확인, 인터랙티브 배치도, 맞춤 신청 양식, 참가자 데이터 내보내기, 가능 시간 분석. 맞춤 신청 양식(질문 다섯 개까지, Club에서는 무제한)과 참가자 데이터 내보내기는 모든 플랜에서 무료이며, 나머지는 Club 및 Business 프리미엄 플랜에서 이용할 수 있습니다.
QR 입장 확인 (Business 플랜)
QR 코드를 스캔해 입구에서 체크인하세요. Ludoya가 명단에 있는지 확인하고, 체크인 을 한 번 누르면 동반자까지 포함해 도착한 것으로 표시되어, 사람들이 도착하는 대로 출석 기록이 저절로 쌓입니다. 클립보드도, 나중에 맞춰 볼 일도 없습니다.
같은 코드를 다시 스캔해도 문제없습니다: 앱은 중복 집계하지 않고 "이미 체크인했습니다"라고 표시합니다.
입장을 시작하기 전에 설정할 두 가지:
- 이벤트에 QR 출석을 켜세요. 기본적으로 꺼져 있습니다 — 이벤트 설정에서 QR 코드로 참석 확인 을 활성화하세요. 이 옵션은 개인이 아닌 그룹 이 주최하는 이벤트에서만 사용할 수 있습니다.
- 입구에서는 카메라가 있는 어떤 기기든 됩니다: Ludoya 앱이든, 브라우저의 웹사이트든, 휴대폰, 태블릿, 노트북 어디서든. 참가자에게도 앱은 필요 없습니다. QR 코드는 브라우저에서도 잘 표시됩니다.
체크인은 입구에 속합니다. 페스티벌에서 켜면 그 활동에도 적용되지만, 예정된 플레이는 절대 따로 체크인을 받지 않으며, 게스트가 이벤트에 추가한 것도 마찬가지입니다: 테이블에 앉는 사람은 이벤트 명단에도 있으므로 이벤트 자체의 코드로 입장합니다.
오지 않은 사람은 나중에 참석자 목록에서 불참으로 표시 로 표시할 수 있습니다.
작동 방식
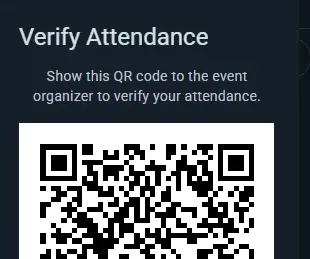
- 참가자는 앱이나 웹사이트에서 이벤트 페이지를 열고 참석 응답 버튼 을 누릅니다
- RSVP 버튼을 누르면 RSVP 변경, 이벤트 나가기, 자신의 참석 일정 편집, 요청 시 QR 코드 표시 등의 옵션이 있는 드롭다운 메뉴 가 나타납니다
- 고유한 QR 코드는 신청할 때 이메일로 전달되며 (이메일을 알려 준 이름 있는 게스트 각자에게도), 언제든 QR 코드 표시 에서 볼 수 있습니다 — 인쇄할 것은 없습니다
- 입구에서 코드를 스캔합니다. Ludoya가 참석 명단과 대조해 입장 가능 여부를 보여 주고, 체크인 으로 기록합니다
QR 코드
- 각 참가자의 코드는 특정 이벤트에 고유하며, 이메일과 이벤트 페이지의 RSVP 버튼 드롭다운 메뉴에 있습니다
- 휴대폰 카메라를 대면 Ludoya에서 참가자 본인의 체크인 페이지가 열립니다. 입구에서는 Ludoya의 스캐너로 스캔하세요
- 스캔은 즉시 이뤄집니다
이점
- 클립보드나 종이 목록 없이 빠르고 매끄러운 입장 확인
- 즉시 RSVP 확인 — 이 사람이 입장 가능한지 아닌지 바로 판단
- 인쇄할 것이 없음: 이메일을 잃어버려도 문제없고, 코드는 이벤트 페이지에도 있습니다
- RSVP하지 않은 방문자의 무단 입장을 방지
이름이 지정된 자리(조직)
귀하의 장소 내에 이름이 지정된 자리를 정의하고, 해당 자리에 이벤트와 예정된 게임 세션을 할당하세요.
장소와 자리
장소(귀하의 장소이거나 조직이 사용하는 모든 물리적 공간)에는 내부의 실제 구역에 대응하는 이름이 지정된 자리를 포함할 수 있습니다:
- 카페라면 각 테이블마다 자리를 둘 수 있습니다 ("테이블 1", "테이블 2", "창가 부스")
- 컨벤션 홀이라면 방으로 나눌 수 있습니다 ("메인 홀", "RPG 룸", "데모 구역")
- 여러 층으로 이루어진 장소라면 층별로 자리를 표시할 수 있습니다 ("위층 — 테이블 A", "아래층 — 뒷방")
자리 설정하기
- 위치를 엽니다. 클럽 콘솔의 위치(내 장소라면 설정 → 위치)에서
- 해당 장소에서 사용할 자리를 생성하고 이름을 지정하세요(예: "테이블 1", "뒷방", "메인 홀")
이벤트에서 자리 사용하기
해당 장소의 모든 이벤트는 자리를 지정할 수 있으며 — 한 개뿐 아니라 여러 개를 동시에 지정할 수 있습니다. 예를 들어, 클럽 나이트가 뒷방과 앞쪽 테이블 두 개를 사용한다면 세 자리 모두를 선택합니다.
일반적인 동작 방식:
- 장소 전체를 사용하는 이벤트(컨벤션, 장소 전체를 차지하는 클럽 나이트 등)는 대개 자리를 전혀 지정하지 않고 장소만 지정합니다. 괜찮습니다 — 자리는 선택 사항입니다.
- 하위 이벤트는 해당 트랙이 사용하는 방이나 구역을 선택하여 참가자가 어디로 가야 하는지 알 수 있게 합니다: "초급 트랙 → 메인 홀", "고급 트랙 → 뒷방".
- 예정된 게임 세션은 플레이할 테이블을 선택합니다.
알아둘 만한 규칙 한 가지: 상위 이벤트가 자리를 지정하면, 하위 항목에서는 자리 선택기가 표시되지 않습니다 — 상위 이벤트의 선택이 이미 모든 진행 위치를 설명하기 때문입니다. 각 하위 이벤트와 테이블이 스스로 자리를 지정하도록 하려면 상위 이벤트에는 자리를 지정하지 마세요.
그렇게 하면 참가자는 자신의 트랙이나 테이블 위치를 정확히 확인할 수 있고, 동시에 진행되는 두 항목이 동일한 테이블을 중복 지정하는 일도 방지됩니다.
테이블당 게임 하나
테이블로 지정된 자리에서는 한 번에 하나의 게임만 진행됩니다. 게임에 테이블을 고를 때, 선택기는 그 시간에 다른 게임이 차지한 테이블을 모두 표시하며("사용 중 20:00–22:00"), 사용 중인 테이블로는 저장할 수 없습니다. 연달아 이어지는 게임은 문제없고, 방에는 여러 게임이 나란히 들어갈 수 있어 확인하지 않으며, 테이블을 예약한 이벤트 안의 게임은 그 이벤트와 테이블을 함께 씁니다.
자기 장소에서 열리는 모든 게임에 플레이 위치가 표시되길 원하는 클럽은 위치의 방과 테이블에서 이곳의 게임은 테이블을 선택을 켭니다(클럽 콘솔 → 위치). 그 후로 그곳의 새 게임은 테이블 없이 저장할 수 없으며, 이미 예정된 게임은 그대로 유지됩니다.
인터랙티브 평면도(Business 플랜)
이름 있는 자리 위에 시각적인 지도 레이어를 더하세요. 평면도 이미지를 올리고 각 자리를 배치하면, 참가자는 모든 테이블, 방, 플레이 구역이 표시된, 이동하고 확대할 수 있는 지도에서 매장을 둘러봅니다.
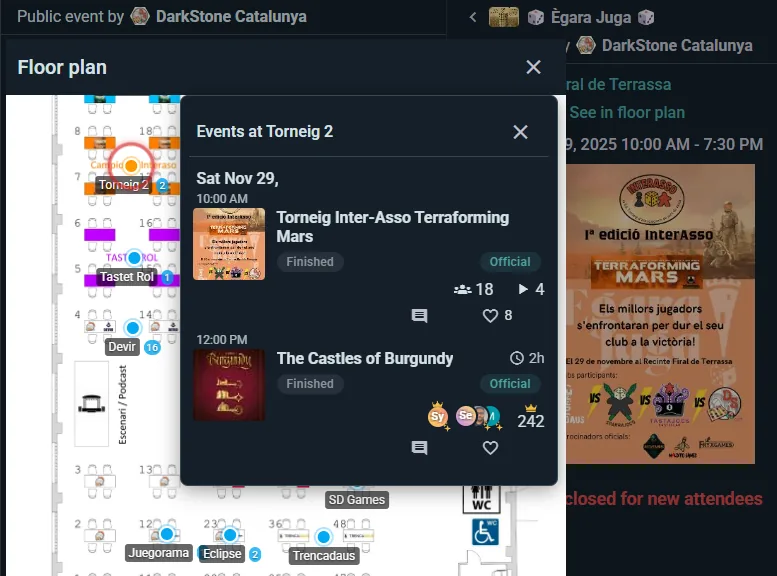
평면도 설정
- 이미 자리가 있는 위치(콘솔의 위치)를 열고 평면도를 켭니다
- 평면도 이미지(사진, 도면, 건축 설계도)를 올립니다
- 자리를 클릭해 이미지의 알맞은 곳으로 끌어다 놓습니다
평면도가 없어도 자리는 단순한 텍스트 라벨("테이블 3에 앉아 있어요")로 작동합니다. 시각적인 평면도는 길 찾기가 중요한 큰 매장에서 빛을 발합니다.
마을, 광장, 공원: 실제 지도
마을 곳곳에 펼쳐진 축제, 광장 하나에 천막이 늘어선 장터, 공원을 도는 랠리에는 그릴 도면이 없습니다. 이런 곳의 장소는 대신 실제 지도(Google Maps)에, 실제로 있는 자리에 핀으로 표시합니다.
- 콘솔의 위치에서 행사장을 엽니다. 추천 목록에서 고른 마을(또는 Google이 공원이나 광장으로 아는 곳)은 그 자체로 지도를 쓰는 행사장이 됩니다. 그 밖의 곳(박람회장, Google이 거리로 보는 광장 등)은 실제 지도에 표시하기를 켭니다. 지도가 위치를 알 수 있도록 주소는 추천 목록에서 골라야 합니다. 대신 이미지 사용을 누르면 평면도 이미지로 돌아갑니다.
- 장소를 지도에 핀으로 표시하기를 누르면 지도가 열립니다. 지도에 없다고 나온 장소를 누른 다음 그 장소가 있는 곳을 누르거나, 지도의 빈 곳을 눌러 그곳에 새 장소를 추가합니다(지도를 움직이려다 누른 것은 실행 취소로 되돌립니다). 핀을 끌어 옮기고, 지도에서 빼기로 핀을 없앱니다.
- 장소에도 자체 도면을 둘 수 있습니다(테이블이 있는 홀 등). 장소 세부 정보에서 이미지를 추가하면, 평소처럼 그 이미지 위에 테이블이 그려집니다. 방문객은 내부 보기로 들어갑니다.
참가자는 이벤트의 행사장 지도에서 실제 지도를 봅니다. 장소마다 핀에 이름과 그곳에서 진행되는 활동 수가 표시되고(표시된 시간에 아무것도 없는 장소는 흐리게 보입니다), 이름으로 장소를 찾는 장소 목록, 옆 천막과 구별하기 위한 위성 보기, 누를 때만 휴대폰 위치를 묻는 내 위치 보기가 있습니다. 장소를 누르면 지도는 그대로 두고 카드가 열립니다. 그곳에서 진행되는 것, 도착한 뒤 찾는 방법, 자체 도면이 있는 홀이라면 내부 보기, 그리고 길찾기입니다. 핀으로 표시된 장소의 활동에도 길찾기가 나오고, 이벤트 페이지에는 지도의 작은 이미지가 표시됩니다. 나중에 평면도 이미지를 올리면 지도 대신 그 이미지가 쓰이며, 지도에 핀으로 표시된 장소는 이미지 위에 모양이 그려질 때까지 핀을 유지합니다.
당일의 매장 지도
평면도가 있는 매장에서 열리는 이벤트에는 자체 매장 지도 보기가 있습니다. 테이블과 방마다 그곳에서 진행되는 것이 표시됩니다. 하나를 누르면 시간, 자리, 참가 방법과 함께 활동이 서랍 패널에 열립니다. 휴대폰에서는 테이블 이름이 테이블에 맞게 작아져, 팔 길이 거리에서도 지도를 읽을 수 있습니다.
매장과 각 자리에는 짧은 설명을 붙일 수 있습니다. 어느 문인지, 방의 용도가 무엇인지, "열쇠는 바에서 받으세요" 같은 것들입니다. 자리는 공개 API로도 제공되어, 내 사이트에도 보여줄 수 있습니다.
이런 곳에 적합
- 여러 방이나 구역이 있는 큰 매장
- 테이블이 수십 개인 컨벤션
- 단골이 좋아하는 자리를 고르고 싶어 하는 보드게임 카페
- "내 게임은 어디죠?"가 자주 나오는 모든 매장
맞춤 참석 양식 (모든 플랜에서 무료 — 질문 다섯 개까지, Club에서는 무제한)
참가자가 RSVP할 때 질문하세요 — 더 나은 이벤트 운영에 필요한 정보를 수집하면서, 외부 폼 빌더로 나가지 않고 Ludoya 안에서 모두 처리할 수 있습니다.
맞춤 질문 만들기
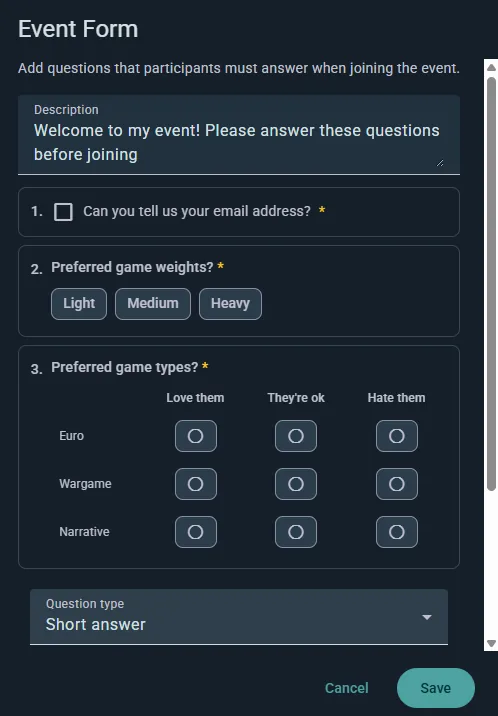
- 이벤트의 설정을 열고 양식 섹션을 선택하세요
- 질문을 추가하고 원하는 순서로 드래그해 배치하세요(이미 설정해 둔 질문을 복제할 수도 있습니다)
- 필요한 질문을 필수로 표시하세요
- 저장 — 사람들이 신청할 때 질문이 표시됩니다
참고: 이벤트는 반드시 그룹에 속해야 하며, 양식을 추가하면 익명 게스트가 비활성화됩니다. 질문을 하는 경우, 누가 답변하는지 Ludoya가 알아야 하기 때문입니다.
질문 유형
- 단답형 — 한 줄의 자유 입력 텍스트
- 장문형 — 더 긴 서술형 답변
- 단일 선택 — 목록에서 하나 선택
- 복수 선택 — 해당되는 만큼 모두 선택
- 선형 척도 — 양 끝에 라벨이 있는 범위로 평가
- 복수 선택 그리드 — 여러 질문이 하나의 답변 집합을 공유하며, 행과 열로 구성
- 개인 정보 — 자유 텍스트 대신 올바르게 검증된 이메일, 전화번호, 생년월일, 성별을 요청
예시 질문:
- "식이 제한이 있으신가요?"
- "헤비 유로 보드게임에 얼마나 익숙하신가요?"
- "차편이 필요하신가요?"
- "처음 참석하시나요?"
게스트별로 질문
단답형, 선택형 또는 개인 정보 질문은 게스트별로 질문으로 표시할 수 있습니다. 그러면 참가자가 데려오는 추가 인원마다(예약해 둔 친구와 이름이 지정된 게스트 모두) 개별로 답변하게 되며, 참가자가 대신 작성합니다. 또한 필수 항목인 경우, 모두 완료될 때까지 예약이 차단됩니다. 이렇게 하면 4인 테이블을 예약하는 한 사람으로부터 4명분의 식단 요구사항을 수집할 수 있습니다.
참가자 경험
사람들은 신청하면서 답변하며, 필수 질문은 확인 전에 모두 작성해야 합니다. 답변은 등록 정보와 함께 저장되고, 참가자 관리에서 볼 수 있으며, 참가자 목록과 함께 내보낼 수 있습니다.
활용 사례
- 케이터링 이벤트 — 식단 요구 및 알레르기
- 초보자 모임 — 테이블 균형을 맞추기 위한 경험 수준 파악
- 기업 이벤트 — 부서 또는 팀 정보 수집
- 테마 모임 — 의상 선호도, 팀 배정
각 이벤트가 어떤 양식을 묻는지 보기
이벤트에 신청할 때 무엇을 묻는지 알기 위해 이벤트 설정을 열 필요는 없습니다:
- 클럽 콘솔에서는 어떤 이벤트든 질문을 하기 시작하면 이벤트 에 양식 열이 생깁니다: 그 이벤트가 따르는 템플릿의 이름, 또는 자체 질문 입니다.
- 양식 에서는 템플릿마다 그 템플릿을 묻는 이벤트가 사용 중인 곳 에 표시됩니다. 템플릿의 답변 을 열면 질문하는 곳 에 그 이벤트가 모두 나열되고, 각각을 눌러 해당 이벤트를 열 수 있습니다.
- 이벤트 콘솔에서는 전체 보기의 양식 카드와 프로그램의 각 부분에 있는 카드가 신청할 때 무엇을 묻는지 알려 줍니다: 템플릿의 질문, 자체 질문, 상위 이벤트의 질문, 또는 없음이며, 질문 목록도 함께 보여 줍니다. 이벤트 설정과 같은 선택기로 그 자리에서 바꿀 수 있고, 반복 이벤트의 날짜에서는 변경을 어디까지 적용할지 묻습니다. 질문 편집 으로 자체 질문을 바꾸고, 모든 답변 보기 로 모든 이벤트에서 모은 템플릿의 답변을 엽니다.
- 페스티벌의 프로그램 에서는 자체 양식을 묻는 각 활동에 그 양식의 이름이 표시되고, 양식 칩으로 같은 양식을 묻는 활동만 추려 볼 수 있습니다.
답변이 들어온 뒤 선택지 변경하기
클럽의 가입 양식과 저장된 양식 템플릿은 같은 편집기로 만들기 때문에 규칙은 어디서나 같습니다. 선택지를 고치거나 표현을 바꾸려면 그 자리에서 텍스트를 수정하세요. 그 선택지를 고른 사람은 모두 새 문구로 답변이 유지되므로, 회원 표, 그 표의 답변으로 필터 기능, 내보내기에 바로 반영됩니다. 대소문자나 악센트만 다른 경우는 자동으로 같은 선택지로 맞춰집니다.
대신 다른 것을 제시하려면 선택지를 삭제하고 새 선택지를 추가하세요. 삭제한 선택지에 대한 답변은 그대로 남고 새 선택지로 옮겨지지 않으므로, 아무도 고르지 않은 것을 고른 것으로 처리되지 않습니다.
잘못 입력된 주소와 중복 신청 바로잡기
잘못 입력된 이메일 주소는 조용히 실패합니다: 확인 메일과 입장용 QR이 어디에도 도착하지 않고, 그 사람은 대개 다시 신청하기 때문에 결국 자리를 두 개 잡게 됩니다. 이벤트 어디에서든 이런 일이 생기면 이벤트 콘솔의 참석자 에서 목록 위에 확인 필요 카드가 나타나고, 전체 보기의 확인이 필요함 아래에 있는 한 줄이 그 카드로 안내합니다.
- 잘못 입력된 것 같은 주소 는 작동할 수 없는 주소(gmail.con, gmai.com, hotmial.com, gmail.es…)를 원래 의도한 주소와 나란히 보여 줍니다. 수정 을 누르면 그 제안이 채워진 채로 이메일 수정 이 열립니다.
- 두 번 신청했나요? 는 같은 명단에서 같은 사람으로 보이는 두 자리를 보여 줍니다: 같은 주소(오타나 Gmail의 점은 무시), 또는 같은 이름(한 이름이 다른 이름 뒤에 단어가 더 붙은 경우)입니다. 각각의 주소, 누가 신청했는지, 데려오는 동반자, 신청한 때를 볼 수 있습니다. 이쪽 남기기 를 누르면 그 사람은 여전히 오기 때문에 아무에게도 알리지 않고 다른 자리를 비우며, 그쪽이 데려온 동반자는 남기는 쪽으로 옮겨집니다. 서로 다른 사람이에요 를 누르면 그 쌍은 더 이상 표시되지 않습니다.
- 이메일 수정 은 목록의 각 행 메뉴에도 있습니다. 동반자의 주소(양식에서 동반자에게 물은 것)와, 연동으로 만들어졌지만 아직 아무도 활성화하지 않은 계정의 주소를 고칠 수 있습니다. Ludoya 사용자의 주소는 본인만의 것입니다.
- 확인 메일과 QR을 이 주소로 보내기 는 기본으로 켜져 있습니다. Ludoya가 보내지만, 공개 API로 신청을 넣고 메일을 직접 보내는 경우는 예외입니다: 그때는 메일 대기열에서 기다리며, 그 사람에게 가는 다른 메일처럼 직접 자체 주소에서 보내면 됩니다.
- 고친 주소가 Ludoya 계정의 것이면 그 자리는 그 계정의 것이 되어 그 사람의 앱에 나타납니다. 그 계정이 이미 신청했다면 같은 사람이 두 번 신청한 것이므로, 카드에서 둘 중 하나를 남기도록 제안합니다.
참가자 데이터 내보내기 (모든 플랜에서 무료)
신청자 명단과 신청서 응답을 Excel 스프레드시트나 CSV로 내려받으세요.
내보낼 수 있는 것
참석자당 한 행이며, 열은 다음과 같습니다.
- name(이름)과 username(사용자 이름)
- 어디 — 프로그램이 있는 행사에서, 신청한 활동과 그 위의 섹션("토요일: 자유 테이블 › 아줄")
- attendance — 참석 응답 상태
- guests — 데려오는 익명 게스트 수
- 맞춤 등록 폼들의 질문당 한 열과 그 답변
프로그램이 있는 행사에서는 첫 번째 시트에 모든 사람이 나옵니다. 한 사람이 신청한 곳마다 한 번씩 나오며, 행사 바로 아래에 있는 각 활동에는 그 안의 모든 사람이 담긴 전용 시트가 있습니다.
이걸 바탕으로 스프레드시트를 만든다면 알아 둘 점이 두 가지 있습니다.
- 행사의 어떤 폼에서든 물어본 질문에는 모두 열이 생깁니다. 답변 여부와 상관없으므로, 같은 행사를 두 번 내보내도 열이 맞아떨어집니다. 이후에 삭제한 질문의 답변도 다른 열 뒤에
removed-1,removed-2… 라는 이름의 열로 내보내집니다. - 복수 선택 답변은 한 셀에 담겨
|로 구분되므로, "채식|견과류 제외"는 두 개의 열이 아니라 하나의 필드입니다.
체크인과 미참석 표시는 내보내기에 들어가지 않습니다 — CSV는 누가 신청했고 무엇을 답했는지를 담을 뿐, 실제로 문을 통과한 사람을 담지는 않습니다.
활용 사례
- 이메일 후속 연락이나 로열티 프로그램 추적
- 누가 무엇에 신청했는지에 대한 자체 분석
- 과거 참석 데이터를 바탕으로 한 향후 행사 기획
후원사에 바로 건넬 수 있게 행사를 숫자로 정리한 내용은 아래의 행사 보고서를 확인하세요.
행사 보고서 (모든 플랜에서 무료)
행사가 시작되면 콘솔의 보고서가 행사를 숫자로 보여 줍니다. 그 안의 모든 것, 즉 모든 활동, 부스, 토너먼트, 마켓, 게임 라이브러리를 집계합니다. 행사가 진행되는 동안 계속 채워지고, 끝난 뒤에도 그대로 남습니다. 행사 전체를 운영하는 사람만 행사 자체의 콘솔에서 볼 수 있으며, 부스 하나를 맡은 클럽에게는 대신 그 부스의 콘솔이 보입니다.
맨 위
신청한 사람(행사나 그 안의 무엇이든 신청한 모든 사람을 한 명당 한 번씩 집계하며 동반인도 포함합니다. 전체 보기의 오는 사람과 같습니다), 진행한 활동, 찬 자리(마련한 자리 중 찬 자리 수), 판매된 중고 게임. 각 활동은 자리 수까지만 집계하므로, 꽉 찬 테이블에 끼어 앉은 사람이 다른 곳의 빈 테이블을 메워 주지는 않습니다. 이들은 이미 꽉 찬 활동에 추가된 사람으로 따로 표시됩니다.
잘된 점, 다음에 살펴볼 점
두 개의 짧은 목록이 반복할 것과 바꿀 것을 근거가 되는 숫자와 함께 짚어 줍니다. 모든 자리가 찼거나 대기 명단이 생긴 활동(다음에는 더 많이 마련하세요), 가장 붐빈 시간, 이전 행사에도 온 사람, 한 부가 더 필요할 만큼 자주 대여된 게임, 아무도 신청하지 않았거나 거의 빈 채로 남은 활동, 체크인 예정이었지만 오지 않은 사람. 각 항목은 숫자가 의미 있을 만큼 커졌을 때만 나타납니다.
차트와 수치
- 인기 활동과 가장 덜 찬 활동, 그리고 프로그램의 섹션별 찬 자리(롤플레잉 전체, 토너먼트 전체)
- 시작 시간별 찬 자리: 플레이 부스의 세션은 각자의 시간에 집계됩니다
- 가장 많이 플레이한 게임과 게임 라이브러리에서 가장 많이 대여된 게임
- 부스 소감: 각 플레이 부스가 세션 후에 묻는 자체 질문의 결과: 플레이어 중 몇 명이 응답했는지, 각 척도의 평균, 선택형 질문에서 각 답변을 고른 플레이어의 비율. 여러 개를 고를 수 있는 질문에서는 비율의 합이 100%를 넘습니다. 긴 목록은 가장 많이 선택된 세 개를 보여 줍니다. 부스 이름을 눌러 열면 코멘트를 읽을 수 있습니다
- 숫자로 보기: 사람(동반인, 행사 자체에 신청한 사람, 이전 행사에도 온 사람, 새 Ludoya 계정, 체크인, 대기 명단), 프로그램(자리가 다 찬 활동, 부스 소감 질문에 대한 답변), 중고 마켓(마켓 부스와 행사용 온라인 판매 글로 판매된 수와 판매 금액), 게임 라이브러리, 행사 채팅의 메시지와 보낸 공지, 그리고 행사에 있었다면 퀴즈 랠리와 티켓
모든 활동
모든 활동을 섹션, 시작 시간, 찬 자리, 얼마나 찼는지와 함께 보여 주며, 정렬할 수 있고 스프레드시트로 내려받을 수 있습니다. 아무도 예약하지 않는 활동(데모 테이블, 자유 플레이)은 0 대신 자유 참여, 신청 없음으로 표시됩니다. 플레이 부스는 세션을 합쳐 하나의 활동으로, 토너먼트는 라운드를 포함해 한 번으로 집계됩니다.
다른 행사와 비교
보고서는 이 행사를 사람들이 온 클럽의 이전 행사와 최신순으로 나란히 놓습니다: 신청한 사람, 활동, 찬 자리, 찬 비율, 플레이, 판매된 게임. 페스티벌은 자체 프로그램이 있는 다른 행사와만 비교하고 매주 열리는 게임의 밤과는 절대 비교하지 않으며, 여러분도 운영하는 행사와만 비교합니다.
PDF로 내려받기
PDF 다운로드를 누르면 보고서 전체를 저장해 후원사, 시청, 또는 여러분의 팀에 보낼 수 있습니다. 합계만 담기며 온 사람 중 누구의 이름도 나오지 않습니다. 플레이어가 남긴 코멘트는 각 부스의 소감 카드에 남습니다.
클럽의 행사가 10명 이상이 모인 채로 끝나면, 그 클럽의 관리자는 보고서에서 다른 클럽 데려오기도 볼 수 있습니다. 모인 인원과 클럽 초대 링크를 보내는 공유 버튼이 담겨 있습니다(클럽 콘솔 참고).
참석 가능 시간 히트맵 (Club 플랜)
이벤트별 히트맵으로, 참석자들이 실제로 이벤트 동안 언제 현장에 있을지를 보여 주어, 주최자가 대부분의 사람들이 있는 시간대를 중심으로 예정된 게임 세션을 계획할 수 있게 합니다.
참석자가 기여하는 방법
이벤트에 참여할 때, 각 참석자는 이벤트 자체 일정 내에서 자신이 참석할 시간대를 표시합니다. 금요일 저녁부터 일요일까지 진행되는 주말 컨벤션이라면, 어떤 참석자는 "금요일 18:00–22:00 및 토요일 종일"이라고 표시할 수 있고, 다른 사람은 토요일 오후에만 올 수 있을지도 모릅니다. RSVP 버튼의 드롭다운 메뉴에서 이 개인 참석 일정을 언제든지 수정할 수 있습니다.
표시 내용
- 주나 월 단위가 아닌, 이벤트 자체 일정을 따라 배치된 시각적 밀도 막대
- 대부분의 참석자가 있을 시간대의 피크
- 참석자가 적은 시간대의 저점
- 참석자들이 자신의 가능 시간을 조정하면 실시간으로 업데이트
주최자가 활용하는 방법
- 이벤트의 참석자 목록을 엽니다
- 일정 보기를 탭합니다
- 가장 많은 사람이 있을 시간대를 파악하기 위해 참석 가능 개요 밀도 막대를 확인합니다
- 가장 큰 관객이 참석할 수 있도록, 가장 중요한 예정된 게임 세션, 강연 또는 토너먼트를 그 피크 시간대에 배치하세요
- 그 아래의 개별 일정에서는 각 참석자를 이름과 함께 슬롯별 막대로 보여 줍니다 — 무거운 보드게임의 시연자나 사전에 조율된 테이블의 플레이어처럼 특정 인원을 맞춰야 할 때 유용합니다
열람 권한
두 섹션은 동일한 대화 상자에 함께 표시됩니다: 집계 밀도 막대와 이름이 표시된 개별 일정입니다. 호스트 그룹이 Club 플랜을 사용하는 이벤트에서는, 참석자 목록을 열 수 있는 사람이라면 누구나 이를 볼 수 있습니다 — 주최자만이 아닙니다.
참석자들이 표시한 시간이 이름과 함께 다른 참석자들에게 보인다는 점을 미리 알려 주세요. 특정 이벤트에서 이것이 원치 않는 경우, 개인 일정을 작성하도록 요청하지 마세요.
이벤트의 모든 사람에게 공지 (모든 요금제에서 무료)
이벤트에 오는 모든 사람에게 한 번에 알리세요: 토너먼트가 늦게 시작한다, 활동이 다른 방으로 옮긴다, 오늘의 일정은 이렇다. 이벤트 콘솔을 열고 공지를 고르세요.
누가 받나요
이벤트에 참여하는 모든 사람: 이벤트 자체에 신청한 사람뿐 아니라 다음과 같은 사람 모두입니다.
- 이벤트 안의 활동, 게임, 토너먼트에 신청한 사람
- 중고 마켓에서 판매하거나 그곳에 상자를 맡겨 둔 사람
- 게임 라이브러리에서 게임을 빌린 사람
일부에게만 보낼 수도 있습니다. 한 활동(보물찾기 참가자에게만)이나, 그 안의 모든 활동을 포함한 프로그램 섹션 전체(모든 TRPG 테이블에 한 번에)에 보낼 수 있습니다. 활동에 대기 명단이 있으면 대기 명단도 포함하세요. 보내기 전에 몇 명에게 어떻게 닿는지(앱으로, 또는 앱이 없는 사람에게는 이메일로) 페이지에서 보여 줍니다. 누군가가 함께 신청한 동반자는 그 사람을 통해 받습니다.
어떻게 도착하나요
- 앱 알림으로 오고, 앱이 없는 사람에게는 이메일로 갑니다. 다른 모든 것과 마찬가지로 각자의 알림 설정에 따릅니다
- 클럽(개인 이벤트라면 본인) 이름으로, 이벤트 제목과 함께 도착합니다
- 먼저 내게 테스트 보내기로 사람들이 받을 내용을 그대로 확인하세요
이벤트 게시판
보낸 메시지는 모두 이벤트 페이지에도 최신순으로 남으므로, 나중에 페이지를 열거나 당일에 도착한 사람도 무엇이 공지되었는지 읽을 수 있습니다. 활동 페이지에는 페스티벌 전체와 그 섹션에 보낸 메시지도 표시됩니다. 메시지가 더는 맞지 않으면 보낸 내용에서 이벤트 페이지에서 내리세요. 이미 받은 사람에게는 남아 있습니다.
제한
이벤트당 하루 최대 5개(한 활동이나 섹션에 보내는 메시지 포함)로, 보낸 메시지가 잘 읽히도록 합니다.
플레이테스트 배정 (Business 플랜)
디자이너가 프로토타입을 가져오고 플레이어가 테스트하는 날을 위한 기능이에요. 손으로 짜는 순환 대신, Ludoya가 시간대별로 모두를 테이블에 앉혀요.
켜기
이벤트 양식(토너먼트나 게임 테이블이 아닌 일반 이벤트)에서 + 테이블 배정을 탭하고 Ludoya가 플레이테스터 배정을 고르세요. 시간대, 테이블, 일정은 그다음 이벤트 콘솔의 Playtesting에서 정해요. 한 시간대의 길이, 행사장의 테이블 수, 각 게임 테이블의 길이(게임의 플레이 시간 기준)예요.
당일 전에
- 디자이너는 이벤트 페이지에서 프로토타입 가져오기로 프로토타입을 추가해요.
- 플레이어는 이벤트 페이지에서 해 보고 싶은 프로토타입에 표시해요. 콘솔에서 가장 인기 있는 프로토타입을 볼 수 있어요.
일정
프로토타입이 모이면 일정 만들기를 고르세요. Ludoya가 모두를 시간대에 배정하고, 각 테이블을 일반 게임 테이블("테이블 3 · 게임 이름")로 이벤트 프로그램에 추가하고, 각자에게 자기 테이블이 담긴 알림을 한 번만 보내요. 그다음 콘솔에서 희망이 몇 개나 이뤄졌는지, 어떤 두 사람이 두 번 만나는지 보여 줘요. 테이블이나 시간대를 하나 더 늘리면 섞을 여유가 생겨요.
사람이 늘거나 줄거나 새 프로토타입이 오면, 일정 갱신은 이미 플레이 중인 테이블과 고정한 자리를 그대로 두고 나머지를 다시 배정해요. 다시 만들기는 시작하지 않은 테이블을 모두 다시 섞어요. 어느 쪽이든 테이블이 바뀐 사람에게만 알림이 가요.
플레이테스트 배정을 끄면, 이 기능이 짠 테이블 중 아직 시작하지 않은 테이블이 삭제돼요. 이미 플레이한 테이블은 남아요.
내 프로토타입(디자이너용)
아직 출시되지 않은 게임에도 자리가 있습니다. 탐색 → 보드게임 의 보드게임을 찾을 수 없나요? 에서 제 프로토타입입니다 를 선택하면, 그때부터 내 프로토타입 이 홈 페이지의 카드가 됩니다.
- 새 프로토타입: 다른 게임처럼 이름, 설명, 인원, 플레이 시간, 최소 연령을 입력합니다. 작업하는 동안은 비공개, 링크로 공유하려면 목록 비공개, 아니면 공개 로 두세요. 비공개 프로토타입은 플레이테스트에 가져갈 수 없으니, 먼저 목록 비공개나 공개로 바꾸세요.
- 버전: 게임이 바뀔 때마다 하나씩 추가합니다(새 버전 이름). 그러면 피드백이 사람들이 실제로 플레이한 버전에 연결됩니다.
- 소유자: 나머지 디자인 팀원에게는 공동 소유자 추가 를. 소유자는 모두 프로토타입을 관리합니다.
- 피드백 양식: 테스터가 버전을 플레이한 뒤 답하는 질문입니다. 플레이테스트 테이블이 끝나면 플레이어에게 그곳에 피드백 남기기 가 보입니다.
- 피드백: 버전별 점수와 의견, 그리고 버전 전체 에 걸쳐 각 질문이 어떻게 변했는지. 변경이 도움이 됐는지 알 수 있습니다.
- 플레이테스트: 프로토타입을 가져간 모든 이벤트. 플레이테스트 매칭이 있는 이벤트에서 프로토타입 가져오기 를 하면 그곳에 등록됩니다.
큰 화면에 띄우는 이벤트(Business 플랜)
매장의 프로젝터나 TV에 이벤트를 띄우세요. 이벤트 메뉴나 콘솔에서 화면에 띄우기 를 선택하고 화면 열기 를 누릅니다.
- 토너먼트 는 라운드의 테이블, 라운드 시계, 순위를 보여주며, 결과가 들어오는 대로 업데이트됩니다. 순위를 마지막에만 공개 가 켜져 있으면 화면에서도 순위가 숨겨집니다.
- 프로그램이나 플레이 부스 는 지금과 다음에 무엇이 어디서 열리는지, 남은 자리가 몇인지 보여줍니다.
- 구석의 QR 코드로 현장 사람들이 휴대폰으로 따라보고 신청할 수 있습니다.
페스티벌의 섹션이나 토너먼트는 각자의 콘솔에서 자기만의 화면을 가질 수 있습니다. TRPG 방은 그 테이블만, 토너먼트 홀은 그 라운드만 보여 줍니다. 페스티벌의 요금제로 이용합니다.
화면에서 누가 로그인할 필요는 없습니다. 링크가 곧 열쇠라서, 프로젝터 아래 노트북은 누구의 것이어도 됩니다. 프로젝터가 다른 컴퓨터에 연결되어 있나요? 그 컴퓨터에서 같은 링크를 열고 F 를 눌러 전체 화면으로 만드세요. 화면은 몇 초마다 이벤트를 다시 읽고, 연결이 끊기면 구석에 그렇게 표시하므로 오래된 화면이 실시간 화면으로 오해받는 일이 없습니다. 링크가 엉뚱한 곳에 퍼졌다면 새 링크 만들기 를 사용하세요. 예전 링크는 더 이상 작동하지 않습니다.
축제 전체를 도는 퀴즈 랠리 (Business 플랜)
퀴즈 랠리는 방문객이 부스를 돌아다니게 만들어요. 참여하는 부스마다 전용 QR과 간단한 문제 하나가 담긴 포스터가 있어요. 행사 콘솔의 퀴즈 랠리에서 설정하세요.
- 퀴즈 랠리 준비하기를 누른 다음 부스마다 체크포인트 추가를 하세요. 위치와 참가자가 할 일을 정해요: 답 고르기(정답을 표시하거나 설문으로 만들어요), 답 입력하기(정답으로 인정할 답을 모두 적어요. 대소문자, 악센트, 문장 부호는 구분하지 않아요) 또는 찾기만 하기.
- 설정에서 상품과 추첨 안내(무엇을 받을 수 있는지, 언제 어디서 추첨하는지)를 적으세요. 모든 체크포인트와 포스터에 표시돼요.
- 포스터 인쇄: 체크포인트마다 한 장씩, QR과 카메라가 읽지 못할 때 입력할 짧은 주소가 들어가요. 크기를 고르세요: 벽이나 부스 정면에는 A4, 부스 테이블에는 A5(A4 한 장에 두 개), 카운터 카드에는 A6(한 장에 네 개). 포스터가 젖었나요? 그 체크포인트 메뉴의 이 체크포인트 포스터 인쇄로 그 한 장만 다시 인쇄할 수 있어요. 체크포인트는 순서 없이 찾기 때문에 포스터에는 번호가 없어요. 초안 상태에서는 주최자만 체크포인트를 열 수 있으니 먼저 직접 해 보세요.
- 문이 열리면 퀴즈 랠리 시작하기를 누르세요. 그 전에 행사 날짜가 있어야 해요.
실제 지도가 있는 행사장(마을, 광장)에서는 체크포인트마다 행사장 지도의 장소가 있어요. 새 체크포인트는 체크포인트 이름을 딴 장소에서 시작해요. 행사장에 있는 같은 이름의 장소이거나, 지도 편집기에서 핀으로 표시되기를 기다리는 새 장소예요. 쇼윈도가 60곳인가요? 체크포인트를 추가한 다음 장소를 한 번에 핀으로 표시하세요. 모든 체크포인트에 장소 지정하기는 그 전에 추가한 체크포인트에 같은 일을 해 주고, 콘솔은 아직 지도에 없는 체크포인트 수를 알려 주며 핀으로 표시하기로 지도 편집기를 열 수 있어요. 참가자는 어느 체크포인트 페이지에서든 지도에서 체크포인트 보기를 열 수 있어요. 퀴즈 랠리 레이어는 각 체크포인트를 찾아야 할 깃발로, 찾은 뒤에는 초록색 체크 표시로 보여 주고, 전체 중 몇 개를 찾았는지도 알려 줘요. 목록 보기는 지도에 아직 나타낼 수 없는 체크포인트를 보여 주고(찾아야 할 것부터), 장소를 누르면 그곳의 체크포인트 이름을 알려 주지만 문제 내용은 절대 보여 주지 않아요. 체크포인트 목록을 숨기는 동안에는 지도에서도 숨겨져요.
방문객은 앱 설치 없이 휴대폰 브라우저로 참여해요. 처음 스캔한 체크포인트는 문제를 보여 주고 이름(또는 팀 이름: 휴대폰 한 대로 참여하는 가족은 한 팀으로 참여해요)과 이메일을 물은 뒤, 14세 이상이거나 자녀와 함께 참여하는지 확인해요. 이미 Ludoya 계정이 있는 이메일은 대신 이메일로 코드를 받기 때문에, 아무도 다른 사람인 척 참여할 수 없어요. 나머지 체크포인트는 바로 문제로 넘어가요. 체크포인트마다 답은 하나만 받고, 참가자에게 정답 여부를 답할 때마다 바로 보여 줄지 퀴즈 랠리가 끝날 때만 보여 줄지(정답이 퍼지는 것을 막아요) 고를 수 있어요. 하루 중간에 잘못 입력한 정답을 고쳤나요? 그 체크포인트의 모든 답이 다시 채점돼요. 축제 중간에 부스가 철수하나요? 이 체크포인트 닫기: QR이 더 이상 답을 받지 않고, 이미 찾은 사람은 점수를 유지하며, 나머지 사람에게는 퀴즈 랠리와 포스터에서 빠져요.
콘솔에는 체크포인트별로 답한 사람 수와 순위가 표시돼요. 정답이 많은 순, 그다음 체크포인트가 많은 순, 마지막으로 먼저 끝낸 순이에요. 자원봉사자는 이름으로 참가자를 찾을 수 있고, 순위는 스프레드시트로 내려받을 수 있어요. 상품을 주려면 행사에 추첨을 추가하고 '누가 참가하나요'에서 퀴즈 랠리 참가자를 고른 뒤, 찾은 체크포인트 수나 정답 수의 최소 조건을 정하세요. 정답 하나마다 추첨권 한 장 추가를 선택하면 나머지 사람을 빼지 않고도 잘한 참가자에게 보상할 수 있어요. 그러면 체크포인트마다 추첨에 들어가는 조건과 이미 들어갔는지가 참가자에게 표시돼요. 참여한 주최자와 자원봉사자도 추첨 대상이에요. 그중 한 명이 당첨되면 당첨을 취소하고 다시 추첨하세요. 추첨할 때 퀴즈 랠리 종료하기를 누르세요. 더 이상 답을 받지 않고, 참가자는 자신의 결과를 볼 수 있어요.
Ludoya 계정 가입을 끝내지 않은 방문객의 정보는 행사 30일 후에 삭제돼요.