
Herramientas profesionales para organizadores que gestionan eventos a gran escala — verificación de entrada con QR en la puerta, planos del recinto interactivos, formularios de registro personalizados, exportación de datos de asistentes y análisis de disponibilidad. Los formularios de registro personalizados (hasta cinco preguntas; ilimitadas en Club) y la exportación de datos de asistentes son gratis en todos los planes; el resto está disponible en los planes premium Club y Business.
Verificación de entrada con QR (plan Business)
Registra a la gente en la puerta escaneando un código QR. Ludoya confirma que está en la lista, y un toque en Registrar marca que se ha presentado —con sus acompañantes—, así tu registro de asistencia se construye solo mientras la gente llega. Sin libreta y sin cuadrar nada después.
Volver a escanear el mismo código es inofensivo: la app dice "Ya registrado" en lugar de contar dos veces.
Dos cosas que configurar antes de abrir las puertas:
- Activa la asistencia por QR para el evento. Está desactivada de forma predeterminada — habilita Verificar asistencia con código QR en la configuración del evento. La opción solo está disponible en eventos organizados por un grupo, no en los personales.
- En la puerta sirve cualquier dispositivo con cámara: la app de Ludoya, o la web en un navegador, en un móvil, una tableta o un portátil. Los asistentes tampoco necesitan la app: su código QR se ve bien en un navegador.
El registro de entrada va con una puerta. Activarlo para un festival llega a sus actividades, pero una partida programada nunca registra la entrada por su cuenta, ni tampoco nada que un invitado añada a tu evento: quien se sienta a una mesa también está en la lista del evento, así que el propio código del evento le deja pasar.
Quien no haya asistido todavía puede marcarse después con Marcar como ausente en la lista de asistentes.
Cómo funciona
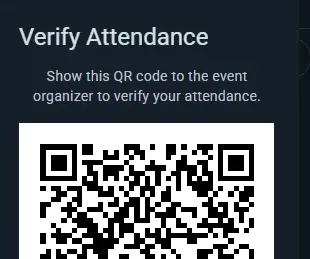
- Los asistentes abren la página del evento, en la app o en la web, y tocan el botón de confirmar asistencia
- El botón RSVP muestra un menú desplegable con opciones para cambiar su RSVP, salir del evento, editar su propio horario de asistencia y mostrar su código QR cuando se les pida
- El código QR único se les envía por correo al inscribirse (y a cada invitado con nombre que dio un correo), y siempre está en Mostrar el código QR: nada que imprimir
- En la puerta, escanea el código: Ludoya lo comprueba contra la lista de inscritos y muestra si la persona puede pasar; Registrar la apunta
Códigos QR
- El código de cada asistente es único para el evento concreto, y está en su correo y en el menú desplegable del botón RSVP de la página del evento
- Si se apunta la cámara de un móvil hacia él, se abre la página de registro de entrada del propio asistente en Ludoya; en la puerta, escanéalo con el escáner de Ludoya
- El escaneo es instantáneo
Beneficios
- Controles en la puerta rápidos y sin fricciones, sin portapapeles ni listas en papel
- Verificación instantánea del RSVP — ¿esta persona puede entrar o no?
- Nada que imprimir: perder el correo no es ningún problema, el código también está en la página del evento
- Evita que personas sin RSVP se cuelen
Sitios con nombre (Organizaciones)
Define sitios con nombre dentro de tu ubicación y asígnales eventos y partidas programadas.
Ubicaciones y sitios
Ubicaciones (tu ubicación o cualquier lugar físico que use la organización) pueden contener sitios con nombre que corresponden a las áreas reales dentro de ellas:
- Un café podría tener un sitio para cada mesa ("Mesa 1", "Mesa 2", "Mesa junto a la ventana")
- Un centro de convenciones podría dividirse en salas ("Sala principal", "Sala de rol", "Zona de demostraciones")
- Un recinto de varios pisos podría etiquetar los sitios por planta ("Arriba — Mesa A", "Abajo — Sala del fondo")
Configurar sitios
- Abre la ubicación: desde la consola de tu club, Ubicaciones (o Configuración → Ubicaciones para tus propios sitios)
- Crea y nombra los sitios para esa ubicación (p. ej., "Mesa 1", "Sala del fondo", "Sala principal")
Usar sitios en eventos
Cualquier evento en esa ubicación puede reservar sitios — y puede reservar varios a la vez, no solo uno. Una noche de club que ocupa la sala del fondo y dos mesas de la parte delantera elige los tres.
Cómo suele funcionar:
- Un evento que ocupa toda la ubicación (una convención, una noche de club que toma todo el lugar) a menudo omite los sitios por completo y simplemente se asigna únicamente a la ubicación. Eso está bien — los sitios son opcionales.
- Subeventos eligen las salas o áreas que ocupa su itinerario, para que los asistentes sepan adónde ir: "Itinerario para principiantes → Sala principal", "Itinerario avanzado → Sala del fondo".
- Partidas programadas eligen la mesa en la que se juegan.
Una regla útil: cuando un evento padre ya ha reservado sitios, sus hijos dejan de ofrecer el selector de sitios — la elección del padre ya describe dónde sucede todo. Deja al padre sin sitios si quieres que cada subevento y cada mesa fije su propio sitio.
Así, los asistentes ven exactamente dónde está su itinerario o su mesa, y dos cosas que ocurren a la vez no pueden terminar reservando la misma mesa.
Una partida por mesa
Un sitio marcado como mesa acoge una sola partida a la vez. Cuando eliges mesa para una partida, el selector marca cualquier mesa que otra partida tenga a esa hora ("ocupada 20:00–22:00"), y una mesa ocupada no se puede guardar. Las partidas seguidas no chocan, una sala acoge varias partidas a la vez y nunca se comprueba, y una partida dentro de un evento que reservó la mesa la comparte con ese evento.
Un club que quiere que cada partida en su local diga dónde se juega activa Las partidas aquí eligen mesa en Salas y mesas de la ubicación (consola del club → Ubicaciones). A partir de ahí, una partida nueva no se puede guardar sin mesa; las partidas ya programadas se quedan como están.
Planos interactivos del recinto (plan Business)
Añade una capa de mapa visual sobre tus sitios con nombre. Sube una imagen del plano y coloca cada sitio en él: las personas asistentes explorarán tu recinto en un mapa desplazable y con zoom, con cada mesa, sala o zona de juego marcada.
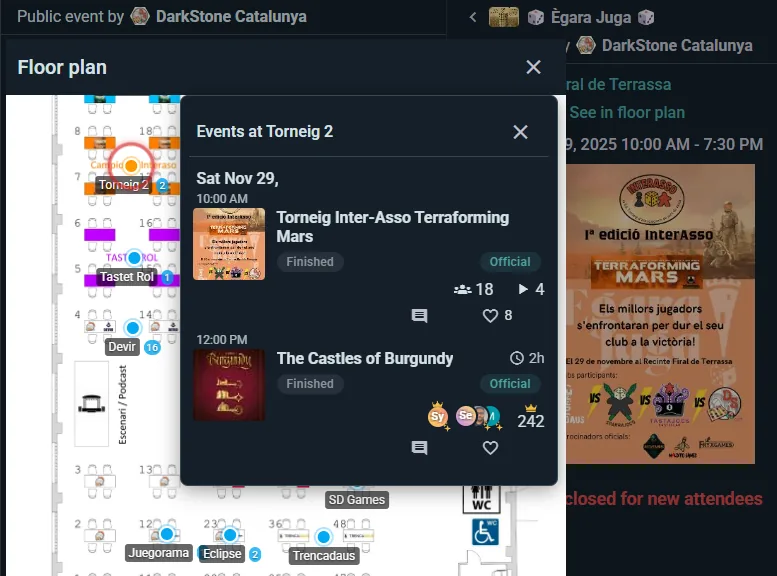
Configurar un plano
- Abre una ubicación que ya tenga lugares (Ubicaciones, en la consola) y activa su plano
- Sube una imagen del plano (una foto, diagrama o plano arquitectónico)
- Haz clic en cualquier sitio para arrastrarlo a la zona correcta de la imagen
Sin un plano, los sitios siguen funcionando como etiquetas de texto simples ("estás en la mesa 3"). El plano visual destaca en recintos grandes donde la navegación importa.
Un pueblo, una plaza o un parque: un mapa real
Un festival repartido por un pueblo, una feria de carpas en una sola plaza, una gimcana por un parque: no hay plano que dibujar. Sus lugares van en un mapa real (Google Maps), marcados donde están.
- En Ubicaciones, en la consola, abre el recinto. Un pueblo elegido entre las sugerencias (o un parque o una plaza que Google conoce como tal) ya es un recinto con mapa; para cualquier otro (un recinto ferial, una plaza que Google trata como una calle) activa Mostrarlo en un mapa real. La dirección tiene que salir de las sugerencias para que el mapa sepa dónde está. Usar una imagen en vez del mapa vuelve a una imagen del plano.
- Marcar lugares en el mapa lo abre. Toca un lugar de los que están fuera del mapa y luego toca dónde está; o toca un trozo vacío del mapa para añadir ahí un lugar nuevo (Deshacer anula un toque que era para mover el mapa). Arrastra un marcador para moverlo; Quitarlo del mapa lo desmarca.
- Un lugar puede seguir teniendo un plano propio (un pabellón con sus mesas): añade su imagen en los detalles del lugar, y sus mesas se dibujan sobre esa imagen como siempre. Los visitantes llegan a él con Ver dentro.
Las personas asistentes tienen el mapa real en el mapa del recinto del evento: cada lugar con su nombre en su marcador y cuántas actividades hay allí (los lugares sin nada a la hora mostrada se atenúan), una Lista de lugares para encontrar uno por su nombre, una Vista de satélite para distinguir una carpa de la de al lado, y Mostrar dónde estoy, que pide la ubicación del móvil solo cuando lo tocan. Tocar un lugar mantiene el mapa y muestra su ficha: qué hay allí, cómo encontrarlo una vez allí, Ver dentro para un pabellón con plano propio, y Cómo llegar; una actividad en un lugar marcado también muestra Cómo llegar, y la página del evento muestra una imagen pequeña del mapa. Una imagen del plano subida más tarde sustituye al mapa; los lugares marcados en el mapa conservan su marcador hasta que se les dibuja una forma en la imagen.
El mapa del recinto el día del evento
Un evento que se celebra en un local con plano tiene su propia vista de mapa del recinto. Cada mesa y cada sala muestran qué hay allí: toca una y sus actividades se abren en un panel, con horarios, plazas y una forma de apuntarse. Los nombres de las mesas se encogen para caber en su mesa en el móvil, así que el mapa se sigue leyendo con el brazo estirado.
Un local y cada uno de sus sitios pueden llevar un texto corto propio: por qué puerta se entra, para qué es la sala, "pide la llave en la barra". Los sitios también salen por la API pública, así que tu propia web puede mostrarlos.
Ideal para
- Recintos grandes con varias salas o zonas
- Convenciones con docenas de mesas
- Cafés de juegos de mesa donde los habituales quieren elegir su sitio favorito
- Cualquier recinto donde "¿Dónde está mi juego?" sea una pregunta habitual
Formularios de asistencia personalizados (gratis en todos los planes — hasta cinco preguntas, ilimitadas en Club)
Haz preguntas a los asistentes cuando confirmen su asistencia (RSVP) — recopila la información que necesitas para organizar un mejor evento, todo sin salir de Ludoya para usar un creador de formularios externo.
Crear preguntas personalizadas
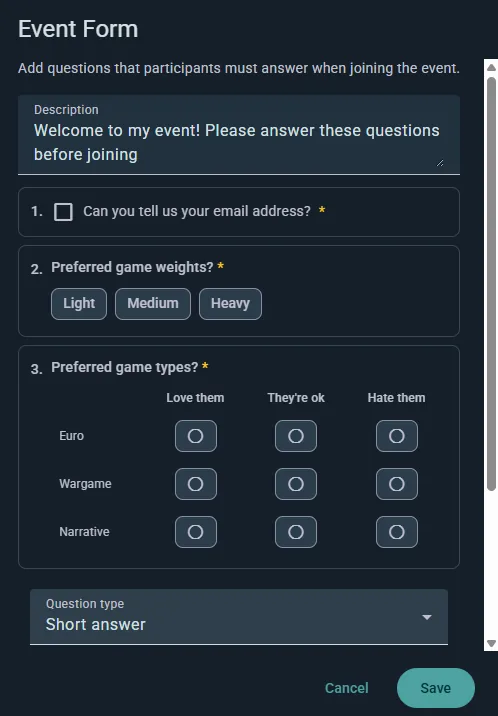
- Abre la configuración del evento y elige la sección Formulario
- Añade tus preguntas, arrastrándolas al orden que quieras (o duplicando una que ya hayas configurado)
- Marca cualquier pregunta como obligatoria
- Guarda — las preguntas aparecerán cuando la gente se inscriba
Ten en cuenta que el evento debe pertenecer a un grupo, y que añadir un formulario desactiva a los invitados anónimos: si haces preguntas, Ludoya necesita saber quién está respondiendo.
Tipos de preguntas
- Respuesta corta — una línea de texto libre
- Párrafo — una respuesta escrita más larga
- Opción única — elige una de una lista
- Selección múltiple — elige todas las que apliquen
- Escala lineal — valora en un rango, con etiquetas en cada extremo
- Cuadrícula de selección múltiple — varias preguntas que comparten un mismo conjunto de respuestas, en filas y columnas
- Información personal — solicita un correo electrónico, número de teléfono, fecha de nacimiento o género, validados correctamente en lugar de recopilarlos como texto libre
Ejemplos de preguntas:
- "¿Tienes alguna restricción alimentaria?"
- "¿Hasta qué punto conoces los juegos euro pesados?"
- "¿Necesitas transporte?"
- "¿Asistes por primera vez?"
Preguntar por invitado
Cualquier pregunta de respuesta corta, de elección o de información personal puede marcarse como Preguntar por invitado. Luego se responde por separado para cada persona adicional que un asistente traiga — tanto amigos reservados como invitados con nombre —, siendo el propio asistente quien la complete en su nombre; y, si son obligatorias, bloquearán la reserva hasta que estén completas. Así es como recoges cuatro conjuntos de requisitos dietéticos de una sola persona que reserva una mesa para cuatro.
Experiencia del asistente
Las personas responden al inscribirse, y las preguntas obligatorias deben completarse antes de poder confirmar. Las respuestas se guardan con su inscripción, son visibles en la gestión de asistentes y se exportan junto con la lista de asistentes.
Casos de uso
- Eventos con catering — necesidades dietéticas y alergias
- Noches para principiantes — medir la experiencia para equilibrar mesas
- Eventos corporativos — recopilar información de departamento o equipo
- Noches temáticas — preferencias de vestuario, asignación de equipos
Ver qué formulario pide cada evento
No hace falta abrir la configuración de un evento para saber qué pide al inscribirse:
- En la consola del club, Eventos tiene una columna Formulario en cuanto algún evento hace preguntas: el nombre de la plantilla que sigue, o Preguntas propias.
- Formularios indica, para cada plantilla, los eventos que la piden en Usado por. Abre las Respuestas de una plantilla y Preguntado por los lista todos, y cada uno abre su evento.
- En la consola de un evento, la tarjeta Formulario de su resumen, y la de cada parte de un programa, dice qué se pide al inscribirse: las preguntas de una plantilla, las suyas propias, las del evento principal o ninguna, con las preguntas listadas. Cámbialo allí mismo con el mismo selector que en la configuración del evento; en una fecha de un evento que se repite, pregunta hasta dónde llega el cambio. Editar preguntas cambia sus propias preguntas, y Ver todas las respuestas abre las respuestas de una plantilla reunidas de todos los eventos.
- En el Programa de un festival, cada actividad que pide un formulario propio muestra el nombre de ese formulario, y el chip Formulario reduce la lista a las actividades que piden un mismo formulario.
Cambiar una opción cuando ya hay respuestas
El mismo editor da forma al formulario de inscripción de un club y a sus plantillas de formulario guardadas, y la regla es la misma en todas partes. Para corregir o reformular una opción, edita su texto donde está: todas las personas que la eligieron conservan su respuesta con la nueva redacción, así que la tabla de miembros, su filtro por respuesta y la exportación las cuentan al momento. Las diferencias solo de mayúsculas o tildes se emparejan solas.
Para ofrecer algo distinto, borra la opción y añade una nueva. Las respuestas a la opción borrada se quedan como estaban y nunca pasan a la nueva, así que nadie acaba habiendo elegido algo que no eligió.
Corregir direcciones mal escritas e inscripciones dobles
Una dirección de correo mal escrita falla sin hacer ruido: la confirmación y su QR de entrada no llegan a ninguna parte, y a menudo la persona se vuelve a inscribir, así que acaba ocupando dos plazas. Cuando eso pasa en cualquier parte de tu evento, aparece una tarjeta Por revisar encima de la lista en los Asistentes de la consola del evento, y una línea en Requiere atención de su resumen lleva hasta ella.
- Direcciones que parecen mal escritas muestra cada dirección que no puede funcionar (gmail.con, gmai.com, hotmial.com, gmail.es…) junto a la que se quería escribir. Corregir abre Editar correo con esa sugerencia ya puesta.
- ¿Inscritos dos veces? muestra dos plazas de una misma lista que parecen la misma persona: la Misma dirección (sin contar una errata ni los puntos de Gmail), o el Mismo nombre, cuando un nombre es el otro con más palabras detrás. Ves la dirección de cada lado, quién los inscribió, los acompañantes que traen y cuándo se inscribieron. Conservar esta libera la otra plaza sin avisar a nadie, ya que la persona sigue viniendo, y los acompañantes que traía pasan a la que conservas. Son dos personas distintas deja de mostrar la pareja.
- Editar correo también está en el menú de cada fila de la lista. Puedes corregir la dirección de un acompañante (lo que tu formulario le pidió) y la de una cuenta que creó tu integración y que nadie ha activado todavía. La dirección de un usuario de Ludoya es solo suya.
- Enviar su confirmación y su QR a esta dirección está activado por defecto. Lo envía Ludoya, a menos que inscribas a la gente a través de la API pública y les escribas tú: entonces espera en tu cola de correo para que lo envíes desde tu propia dirección, como el resto de su correo.
- Si la dirección corregida pertenece a una cuenta de Ludoya, la plaza pasa a ser de esa cuenta, en su app. Si esa cuenta ya está inscrita, es la misma persona dos veces, y la tarjeta te ofrece conservar una de las dos.
Exportación de datos de asistentes (gratis en todos los planes)
Descarga las listas de inscritos y las respuestas de los formularios como hoja de cálculo de Excel o como CSV.
Qué puedes exportar
Una fila por asistente, con estas columnas:
- name (nombre) y username (nombre de usuario)
- where (dónde): en un evento con programa, la actividad a la que se apuntaron, con las secciones que tiene por encima ("Sábado: mesas libres › Azul")
- attendance — su estado de RSVP
- guests — cuántos invitados anónimos traen
- una columna por pregunta de tus formularios de registro personalizados, con sus respuestas
En un evento con programa, la primera hoja lista a todo el mundo, cada persona una vez por cada sitio al que se apuntó, y cada actividad que cuelga directamente del evento tiene su propia hoja con todos los que están dentro.
Dos cosas que conviene saber si vas a construir una hoja de cálculo en torno a esto:
- Cada pregunta de cualquier formulario del evento tiene su columna, se haya respondido o no, para que dos exportaciones del mismo evento cuadren. Las respuestas a una pregunta que ya has quitado se siguen exportando, en columnas detrás de las demás llamadas
removed-1,removed-2… - Las respuestas de opción múltiple llegan en una sola celda, separadas por
|, así que "Vegetariano|Sin nueces" es un único campo en lugar de dos columnas.
Las marcas de registro y de no presentación no se incluyen en la exportación — el CSV refleja quién se inscribió y qué te dijo, no quién cruzó la puerta.
Casos de uso
- Seguimientos por correo electrónico o seguimiento de programas de fidelidad
- Tu propio análisis de quién se apuntó a qué
- Planificación de eventos futuros basada en datos de asistencia pasados
Para el evento en cifras, listo para dárselo a un patrocinador, consulta el Informe del evento más abajo.
Informe del evento (gratis en todos los planes)
En cuanto empieza tu evento, el Informe de su consola lo muestra en cifras, contado sobre todo lo que contiene: cada actividad, puesto, torneo, mercadillo y ludoteca. Se sigue rellenando mientras el evento está en marcha y se queda para siempre cuando termina. Solo lo ve quien organiza el evento entero, desde la consola del propio evento; un club que lleva un puesto ve la consola de ese puesto.
Arriba del todo
Personas apuntadas (todas las que se apuntaron al evento o a cualquier cosa dentro de él, cada una contada una vez, acompañantes incluidos: lo que el Resumen llama Gente que viene), actividades celebradas, plazas ocupadas (cuántas de las plazas ofrecidas se ocuparon) y juegos de segunda mano vendidos. Cada actividad cuenta hasta sus plazas, así que la gente apretujada en una mesa llena no compensa una mesa vacía en otro sitio; se muestra aparte, como personas añadidas a actividades ya llenas.
Qué funcionó y qué revisar la próxima vez
Dos listas cortas señalan qué repetir y qué cambiar, cada una con su número: actividades que llenaron todas las plazas o tuvieron lista de espera (ofrece más), la hora de más actividad, la gente que ya había venido a tus eventos anteriores, un juego que se prestó tanto que necesita un segundo ejemplar, actividades a las que nadie se apuntó o que se quedaron casi vacías, personas esperadas en el registro que no se presentaron. Una línea solo aparece cuando los números son lo bastante grandes como para significar algo.
Gráficos y cifras
- Actividades más populares y menos ocupadas, y plazas ocupadas por sección del programa (todo el rol, todos los torneos)
- Plazas ocupadas por hora de inicio: las sesiones de un puesto de juego cuentan a su propia hora
- Los juegos más jugados y los más prestados de la ludoteca
- Opiniones de los puestos: los resultados de cada puesto de juego a sus propias preguntas de después de la sesión: cuántos de sus jugadores respondieron, la media de cada escala y el porcentaje de jugadores que eligió cada respuesta de una pregunta de opciones. En una pregunta que deja elegir varias, los porcentajes suman más del 100 %; una lista larga muestra sus tres más elegidas. Abre un puesto desde su nombre para leer sus comentarios
- En cifras: personas (acompañantes, quién se apuntó al propio evento, quién vino también a tus eventos anteriores, cuentas nuevas de Ludoya, registros en la entrada, listas de espera), el programa (actividades que se llenaron, respuestas a las preguntas de opinión de los puestos), el mercadillo de segunda mano (vendidos en el puesto del mercadillo y con anuncios en línea para el evento, y por cuánto), la ludoteca, los mensajes en los chats del evento y los anuncios que enviaste, la gimcana y las entradas cuando el evento las tuvo
Todas las actividades
Cada actividad con su sección, hora de inicio, plazas ocupadas y lo llena que estuvo, ordenable y descargable como hoja de cálculo. Una actividad que nadie reserva (una mesa de demostración, juego libre) muestra Abierta, sin inscripción en lugar de un cero. Un puesto de juego cuenta como una actividad, con sus sesiones sumadas; un torneo cuenta una vez, con sus rondas dentro.
Comparado con tus otros eventos
El informe pone el evento al lado de los eventos anteriores de tu club a los que vino gente, del más reciente al más antiguo: personas apuntadas, actividades, plazas ocupadas, lo llenos que estuvieron, partidas y juegos vendidos. Un festival se compara con tus otros eventos que tienen programa propio, nunca con una noche de juegos semanal, y solo con eventos que también organizas tú.
Descárgalo en PDF
Descargar PDF guarda el informe entero para enviarlo a un patrocinador, a un ayuntamiento o a tu propio equipo. Solo totales: no aparece el nombre de nadie que vino. Los comentarios que dejan los jugadores se quedan en la tarjeta Opiniones de cada puesto.
Cuando un evento de un club termina con 10 personas o más, sus administradores también encuentran Trae otro club en el informe: cuánta gente reunió y Compartir para el enlace de invitación del club (consulta la consola del club).
Mapa de calor de disponibilidad (plan Club)
Un mapa de calor por evento que muestra cuándo los asistentes estarán realmente presentes durante el evento, para que los organizadores puedan planificar partidas programadas en torno a las horas en que haya más gente.
Cómo contribuyen los asistentes
Al unirse a un evento, cada asistente marca en qué franjas horarias dentro del propio horario del evento estará. En una convención de fin de semana que va del viernes por la tarde al domingo, un asistente podría decir "viernes 18:00–22:00 y sábado todo el día", otro quizá solo pueda venir el sábado por la tarde. El menú desplegable del botón RSVP les permite editar este horario personal de asistencia en cualquier momento.
Qué muestra
- Una franja de densidad visual dispuesta a lo largo del propio horario del evento (no por semanas ni meses)
- Picos donde la mayoría de los asistentes estarán presentes
- Valles donde pocos asistentes podrán acudir
- Se actualiza en vivo a medida que los asistentes ajustan su disponibilidad
Cómo lo usan los organizadores
- Abre la lista de asistentes del evento
- Toca Ver horarios
- Lee la franja de densidad del Resumen de disponibilidad para identificar las franjas en las que habrá más gente
- Coloca tus partidas programadas, charlas o torneos más importantes en esos picos para que pueda asistir el mayor público posible
- Debajo, Horarios individuales enumera a cada asistente por su nombre con sus propias barras por franja; útil cuando necesitas coordinar a personas concretas, como un demostrador para un juego duro o los jugadores para una mesa preacordada
Quién puede ver qué
Ambas secciones aparecen juntas en el mismo cuadro de diálogo: la franja agregada y los horarios individuales con nombre. En un evento cuyo grupo anfitrión tenga el plan Club, cualquiera que pueda abrir la lista de asistentes puede verlos — no solo los organizadores.
Díselo a tus asistentes, ya que los horarios que marquen serán visibles para el resto de los asistentes al evento con su nombre. Si eso no es lo que quieres para un evento en particular, no pidas a la gente que complete un horario personal.
Anuncios a todo el mundo en el evento (gratis en todos los planes)
Cuenta algo a todas las personas de tu evento de una sola vez: el torneo empieza tarde, una actividad cambia de sala, este es el plan del día. Abre la consola del evento y elige Anuncios.
Quién lo recibe
Todas las personas que participan en el evento: no solo quienes se inscribieron al evento en sí, sino también todo el mundo que:
- se inscribió a cualquier actividad, partida o torneo dentro del evento
- vende en su mercadillo de segunda mano, o tiene una caja reservada allí
- tomó prestado un juego de su ludoteca
También puedes enviarlo a una sola parte: una actividad (solo la gente de la gincana) o una sección entera del programa con todas sus actividades (todas las mesas de rol a la vez). Incluye la lista de espera cuando la actividad tenga una. Antes de enviarlo, la página te dice a cuántas personas llega y cómo: con la app, o por correo para quien no tiene la app. Los acompañantes que alguien inscribió con él lo reciben a través de esa persona.
Cómo llega
- Como notificación en la app, y por correo para quien no tiene la app: decide la configuración de notificaciones de cada persona, como para todo lo demás
- Llega de parte de tu club (o de ti, en un evento personal), con el título del evento
- Usa Enviarme una prueba primero para ver exactamente lo que recibirá la gente
El tablón del evento
Cada mensaje que envías también queda en la página del evento, del más reciente al más antiguo, así que cualquiera que la abra más tarde, o que llegue el mismo día, lee lo que se anunció. La página de una actividad también muestra los mensajes de todo el festival y los de su sección. Cuando un mensaje se quede desfasado, quítalo de la página del evento desde Lo que has enviado: quien ya lo recibió lo conserva.
Límites
Hasta 5 mensajes al día por evento, incluidos los que van a una sola actividad o sección, para que los que envíes se lean.
Emparejamiento de playtest (plan Business)
Para un día en que los autores traen prototipos y los jugadores los prueban. En lugar de una rotación planificada a mano, Ludoya sienta a todo el mundo en mesas, franja a franja.
Activarlo
En el formulario de un evento (un evento normal, no un torneo ni una mesa de juego), toca + Reparto de mesas y elige Ludoya empareja playtesters. Las franjas, las mesas y el horario se configuran después en la consola del evento, en Playtesting: cuánto dura una franja, cuántas mesas tiene la sala y cuánto dura la mesa de cada juego (parte de la duración del juego).
Antes del día
- Los autores añaden sus prototipos desde la página del evento, con Traer un prototipo.
- Los jugadores marcan los prototipos que quieren probar, en la página del evento. La consola muestra cuáles son los más deseados.
El horario
Cuando ya estén los prototipos, elige Generar el horario. Ludoya reparte a todo el mundo entre las franjas, añade cada mesa al programa del evento como una mesa de juego normal ("Mesa 3 · el juego") y envía a cada persona una sola notificación con sus mesas. Después, la consola indica cuántos deseos se han cumplido y qué parejas de personas coinciden dos veces: una mesa o una franja más le da margen para mezclar.
Si se apunta o se va gente, o llegan prototipos nuevos, Actualizar el horario mantiene las mesas que ya se están jugando y los asientos que hayas fijado, y vuelve a sentar a todos los demás. Regenerar vuelve a repartir todas las mesas que no han empezado. En ambos casos, solo reciben aviso las personas cuyas mesas cambian.
Desactivar el emparejamiento de playtest elimina las mesas que había programado y que no han empezado. Las mesas ya jugadas se quedan.
Mis prototipos (para autores)
Un juego que aún no está publicado también tiene casa. En Explorar → Juegos, en ¿No encuentras tu juego?, elige Es un prototipo mío; desde entonces Mis prototipos es una tarjeta de tu página de inicio.
- Nuevo prototipo: un nombre, una descripción, número de jugadores, duración y edad mínima, como cualquier juego. Déjalo Privado mientras trabajas, No listado para compartirlo por enlace, o Público. Un prototipo privado no se puede llevar a un playtest: hazlo no listado o público antes.
- Versiones: añade una cada vez que el juego cambie (Nombre de la nueva versión), así los comentarios quedan asociados a la versión que la gente jugó de verdad.
- Propietarios: Añadir copropietario para el resto del equipo de diseño; cada propietario gestiona el prototipo.
- Formulario de comentarios: las preguntas que responden quienes prueban una versión. Tras una mesa de playtest, los jugadores ven Dejar comentarios en ella.
- Comentarios: las puntuaciones y comentarios de cada versión, y cómo se movió cada pregunta Entre versiones, para saber si un cambio ayudó.
- Playtests: cada evento al que se ha llevado el prototipo. Traer un prototipo, en un evento con emparejamiento de playtest, lo inscribe allí.
El evento en una pantalla grande (plan Business)
Pon el evento en el proyector o la tele del local. Elige Mostrar en una pantalla en el menú del evento, o en su consola, y Abrir la pantalla:
- Un torneo muestra las mesas de la ronda, el reloj de la ronda y la clasificación, que se actualizan según llegan los resultados. Con Mostrar la clasificación solo al final activado, la pantalla también la oculta.
- Un programa o un puesto de juego muestra qué hay ahora y después, dónde, y las plazas que quedan.
- Un código QR en la esquina deja que la sala lo siga desde el móvil y se apunte.
Una sección o un torneo de un festival puede tener su propia pantalla, desde su consola: la sala de rol muestra solo sus mesas, la de torneos solo sus rondas. Funciona con el plan del festival.
Nadie tiene que iniciar sesión en la pantalla: el enlace es la llave, así que el portátil del proyector puede ser de cualquiera. ¿El proyector está en otro ordenador? Abre allí el mismo enlace y pulsa F para pantalla completa. La pantalla vuelve a leer el evento cada pocos segundos y lo dice en la esquina si pierde la conexión, así una pantalla vieja nunca pasa por una en directo. Si el enlace acaba donde no debe, usa Crear un enlace nuevo; el antiguo deja de funcionar.
Una gimcana por todo el festival (plan Business)
Una gimcana hace que los visitantes recorran los estands: cada estand participante tiene un cartel con su propio QR y una pregunta rápida. Prepárala en la consola del evento, en Gimcana.
- Preparar una gimcana y luego Añadir una parada por cada estand: dónde está y qué hacen allí los jugadores: Elegir una respuesta (marca la correcta o elige que sea una encuesta), Escribir una respuesta (pon todas las respuestas que das por buenas; no cuentan las mayúsculas, los acentos ni la puntuación) o Solo encontrarla.
- En Configuración, escribe la línea de Premio y sorteo (qué se puede ganar, y cuándo y dónde se sortea): aparece en cada parada y cartel.
- Imprimir carteles: uno por parada, con su QR y una dirección corta para escribir cuando la cámara no lo lee. Elige el tamaño: A4 para una pared o la parte frontal de un estand, A5 (dos por hoja A4) para la mesa de un estand, o A6 (cuatro por hoja) como tarjeta de mostrador. ¿Se ha mojado un cartel? Imprimir el cartel de esta parada, en el menú de esa parada, reimprime solo ese. Las paradas se encuentran en cualquier orden, así que los carteles no llevan números. Mientras es un borrador, solo los organizadores pueden abrir las paradas, así que pruébalas antes.
- Abrir la gimcana cuando se abran las puertas. Antes el evento necesita una fecha.
En un recinto con mapa real (un pueblo, una plaza), cada parada tiene su Lugar en el mapa del recinto. Una parada nueva empieza en El lugar con el nombre de la parada: el lugar del recinto que se llama así, o uno nuevo que espera en el editor del mapa a que lo marques. ¿Sesenta escaparates? Añade las paradas y luego marca sus lugares de una vez; Dar un lugar a cada parada lo hace con las paradas añadidas antes, y la consola dice cuántas paradas siguen fuera del mapa, con Marcarlos para abrir el editor del mapa. Los jugadores abren Ver las paradas en un mapa desde la página de cualquier parada: la capa Gimcana muestra cada parada como una bandera por encontrar o un tic verde cuando ya la han encontrado, cuántas llevan de cuántas, Verlas lista las paradas que el mapa aún no puede mostrar (primero las que faltan por encontrar), y tocar un lugar dice qué paradas tiene, nunca lo que preguntan. Mientras ocultes la lista de paradas, el mapa también las oculta.
Los visitantes juegan en el navegador del móvil, sin instalar ninguna app. La primera parada que escanean muestra su pregunta y les pide un nombre (o un nombre de equipo: una familia con un solo móvil juega como un equipo) y un correo, y que confirmen que tienen 14 años o más o que juegan con su hijo o hija. Un correo que ya tiene una cuenta de Ludoya recibe un código por correo, así nadie puede jugar en nombre de otra persona. Cada una de las demás paradas va directa a su pregunta. Cada parada admite una respuesta, y tú eliges si los jugadores ven si han acertado justo después de cada respuesta o solo cuando termine la gimcana (así las respuestas no circulan). ¿Has corregido a media jornada una respuesta correcta mal escrita? Las respuestas de todos en esa parada se vuelven a corregir. ¿Un estand se va a mitad del festival? Cerrar esta parada: su QR deja de aceptar respuestas, quien la encontró conserva el punto y sale de la gimcana y de los carteles para todos los demás.
La consola muestra cuántos han respondido en cada parada y la Clasificación: primero más respuestas correctas, luego más paradas y luego quien terminó antes. Los voluntarios pueden buscar a un jugador por su nombre, y la clasificación se descarga como hoja de cálculo. Para dar premios, añade un sorteo al evento y elige Jugadores de la gimcana en Quién entra, con un mínimo de paradas encontradas o de respuestas correctas; marca Cada respuesta correcta es una papeleta más para premiar a los mejores sin dejar fuera al resto. Así cada parada indica a los jugadores qué les falta para entrar en el sorteo, y cuándo ya están dentro. Los organizadores y voluntarios que han jugado también entran en el sorteo: si gana uno de ellos, anula el premio y vuelve a sortear. Terminar la gimcana cuando hagas el sorteo: ya no se aceptan respuestas y los jugadores ven cómo les ha ido.
A los visitantes que nunca terminan de crear su cuenta de Ludoya se les borran los datos 30 días después del evento.