
面向大规模办活动的主办方的专业工具 — 门口的二维码入场核验、交互式场地平面图、自定义报名表单、参与者数据导出以及可用时间分析。自定义报名表单(最多五个问题;Club 不限)与参与者数据导出在所有方案中都免费;其余功能可在Club 与 Business 高级方案中使用。
二维码入场核验(Business 方案)
扫描二维码,在门口为大家签到。Ludoya 会确认他们在名单上,点一下 签到 就会标记他们已到场——同行的人也一并计入——出勤记录会在大家陆续到达时自动生成。不用纸质登记表,事后也不用核对。
重复扫描同一个二维码不会有问题:应用会显示“已签到”,而不是重复计数。
开门前需要完成两项设置:
- 为该活动开启二维码签到。 默认关闭——在该活动的设置中启用 使用二维码验证出席。该选项仅适用于由 群组 举办的活动,个人活动不可用。
- 门口用任何带摄像头的设备都可以:Ludoya 应用或浏览器中的网站,在手机、平板或笔记本电脑上都行。参与者也不需要应用——他们的二维码在浏览器中就能正常显示。
签到属于入口。为节庆活动开启后会覆盖其中的环节,但 预定的对局从不单独签到,来宾添加到你活动中的任何内容也一样:坐在桌边的人同样在活动名单上,所以活动本身的二维码就能让他们入场。
未到场的人事后仍可在参与者名单中用 标记为未到场 进行标记。
工作原理
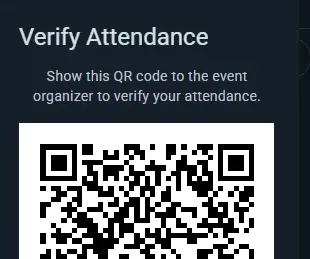
- 参与者在应用或网站上打开活动页面,点击 报名按钮
- RSVP 按钮会展开一个 下拉菜单,提供更改其 RSVP、退出该活动、编辑自己的出席安排,以及在需要时 显示其二维码 等选项
- 唯一的二维码会 在报名时通过邮件发给他们(也会发给每位留了邮箱的具名来宾),并且一直可以在 显示二维码 下找到——无需打印
- 在门口扫描二维码——Ludoya 会将其与报名名单核对,并显示此人能否入场;签到 会记录他已到场
二维码
- 每位参与者的二维码都是该特定活动专属,在其邮件中,也在活动页面 RSVP 按钮的下拉菜单中
- 用手机摄像头对准它,会在 Ludoya 上打开参与者本人的签到页面;在门口请用 Ludoya 的扫码器扫描
- 扫描即时完成
优势
- 快速、无摩擦的门口查验,无需写字板或纸质名单
- 即时核验 RSVP——此人能否入场?
- 无需打印:邮件丢了也没关系,二维码在活动页面上也有
- 防止未 RSVP 的人员混入
命名位置(组织)
在你的场地内定义命名的位置,并将活动和预定的游戏局分配给它们。
地点与位置
地点(你的场地,或该组织使用的任何实体空间)可以包含具名的位置,它们对应其中的现实区域:
- 一家咖啡馆可能为每张桌子设一个位置("1号桌"、"2号桌"、"靠窗卡座")
- 会展大厅可能细分为房间("主会场"、"RPG房"、"演示区")
- 多层场地可能按楼层给位置贴标签("楼上 — A桌"、"楼下 — 后厅")
设置位置
- 打开地点:在俱乐部控制台中进入 位置(你自己的地点则在 设置 → 位置)
- 为该地点创建并命名位置(例如,"1号桌"、"后厅"、"主会场")
在活动中使用位置
该地点上的任何活动都可以占用位置——而且可以一次占用多个,不止一个。比如俱乐部之夜同时占用了后厅和前面两张桌子,就应选择这三个。
通常的做法:
- 整个场地的活动(如展会、包场的俱乐部之夜)往往完全跳过位置,只分配在该地点即可。没问题——位置是可选的。
- 子活动会选择其议程轨道所占用的房间或区域,以便参与者知道去哪里:"新手轨道 → 主会场"、"进阶轨道 → 后厅"。
- 预定的游戏局会选择它们进行时所用的桌子。
有一条值得了解的规则:一旦父活动已经占用了位置,其子活动将不再提供位置选择器——父活动的选择已经描述了所有事情发生的地点。如果你希望每个子活动和每张桌子各自指定位置,就让父活动不占用位置。
这样,参与者就能准确看到自己的轨道或桌子在哪里,同时并行进行的两件事也不会最终占用同一张桌子。
每张桌子一场对局
标记为桌子的空间一次只能进行一场对局。为对局选择桌子时,选择器会标出该时段已被其他对局占用的桌子("已占用 20:00–22:00"),已占用的桌子无法保存。前后衔接的对局没有问题;一个房间可以同时容纳多场对局,从不检查;而在已预订该桌子的活动中进行的对局,会与该活动共用这张桌子。
希望场地内每场对局都注明在哪里进行的俱乐部,可以在该位置的 房间与桌次 中打开 此处的对局需选择桌子(俱乐部控制台 → 位置)。此后,那里的新对局没有桌子就无法保存;已安排的对局保持不变。
交互式平面图(Business 方案)
在你带名称的游戏位之上叠加一层可视化地图。上传一张平面图并把每个游戏位摆放到上面——参与者可以在一张能平移和缩放的地图上浏览你的场馆,每张桌子、每个房间或游戏区都标注其上。
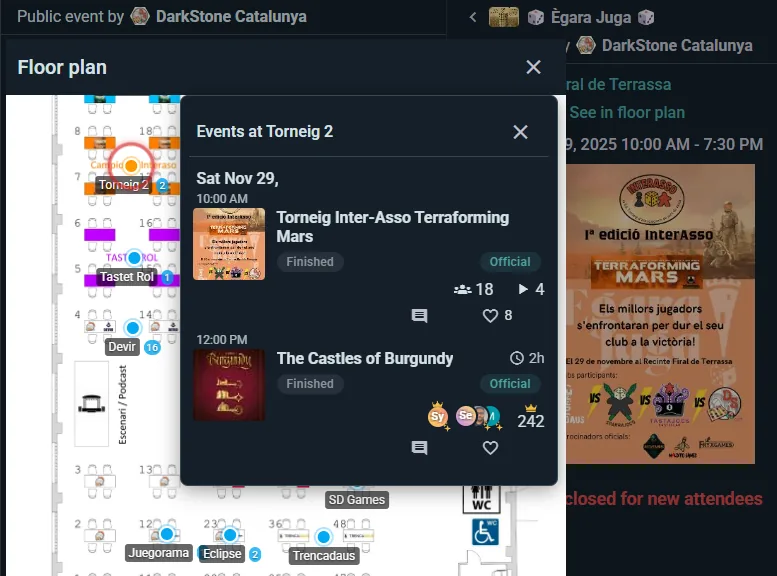
设置平面图
- 打开一个已有游戏位的地点(控制台中的 位置),开启它的平面图
- 上传一张平面图(照片、草图或建筑图纸)
- 点击某个游戏位,把它拖到图片上的正确位置
没有平面图时,游戏位仍然作为普通文字标签使用(“你坐在 3 号桌”)。可视化平面图在找路很重要的大型场馆里最能发挥作用。
城镇、广场或公园:真实地图
分散在整个城镇的节庆、一个广场上的帐篷集市、穿过公园的路线:这些都没有平面图可画。它们的地点改为放在真实地图(Google Maps)上,标在实际所在的位置。
- 在控制台的 位置 中打开场地。从建议中选出的城镇(或 Google 认作公园或广场的地方)本身就是使用地图的场地;其他情况(展会场地、被 Google 当作街道的广场)请开启 在真实地图上显示。地址必须来自建议,地图才能知道它在哪里。改用图片 会切换回平面图图片。
- 在地图上标注地点 会打开地图。点击列为不在地图上的地点,再点击它所在的位置;或者点击地图上的空白处,在那里添加新地点(本想拖动地图却误点了,可以用 撤销 取消)。拖动标记可以移动它;从地图上移除 会取消标注。
- 地点仍然可以有自己的平面图(比如带桌子的展厅):在地点详情中添加它的图片,桌子照常画在那张图片上。参观者通过 查看内部 进入。
参与者在活动的场馆地图中看到真实地图:每个地点的标记上写着名称,以及那里有多少项活动(在所显示时间没有安排的地点会变淡);地点列表 可按名称查找地点,卫星视图 方便区分相邻的帐篷,显示我的位置 只在点击时才请求手机定位。点击一个地点时地图保持不动,并显示它的卡片:那里有什么、到了之后怎么找到它、带自有平面图的展厅会有 查看内部,还有 路线;位于已标注地点的活动也会显示路线,活动页面会显示一张地图小图。之后上传的平面图图片会替换地图;已标在地图上的地点会保留标记,直到在图片上为它们画出形状。
活动当天的场馆地图
在有平面图的场馆举办的活动有自己的 场馆地图 视图。每张桌子和每个房间都会显示那里正在进行什么:点击其中一个,它的活动就会在抽屉中打开,附带时间、位置和加入方式。在手机上,桌名会缩小以适合各自的桌子,让地图在一臂距离外仍清晰可读。
地点和它的每个游戏位都可以有自己的一段简短文字:走哪扇门、房间做什么用、“钥匙请向吧台索取”。游戏位也会通过开放 API 提供,方便你自己的网站展示它们。
最适合
- 有多个房间或区域的大型场馆
- 有几十张桌子的展会
- 常客想挑自己最爱座位的桌游咖啡馆
- 任何经常有人问“我的游戏在哪?”的场馆
自定义出席表单(所有方案均免费 — 最多五个问题,Club 不限)
在参与者 RSVP 时向他们提问——收集你开展更好活动所需的信息,无需离开 Ludoya 去使用外部表单制作工具。
创建自定义问题
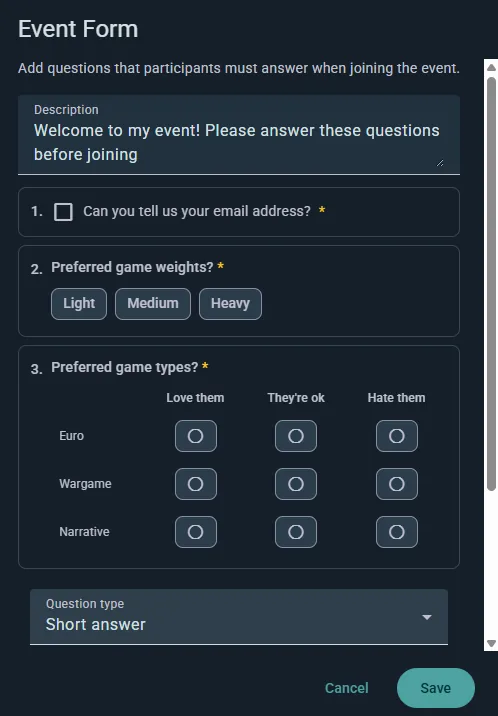
- 打开活动的设置并进入 表单 部分
- 添加你的问题,将它们拖拽到你想要的顺序(或复制你已经设置好的问题)
- 将任意问题标记为必填
- 保存——当人们报名时,这些问题会显示
请注意,该活动必须属于一个群组,并且添加表单会关闭匿名来宾:既然要提问,Ludoya 需要知道是谁在作答。
问题类型
- 简短回答——一行自由文本
- 段落——更长的书面回答
- 单选——从列表中选择一个
- 多选——选择所有适用项
- 线性刻度——在一个范围内评分,两端带有标签
- 多选网格——多道问题共享同一组答案,按行与列排列
- 个人信息——请求电子邮件、电话号码、出生日期或性别,会进行规范校验,而不是作为自由文本收集
示例问题:
- "你有任何饮食禁忌或限制吗?"
- "你对重度欧式桌游有多熟悉?"
- "需要搭车吗?"
- "第一次参加吗?"
按每位来宾提问
任何简短回答、选择类或个人信息的问题都可以标记为按每位来宾提问。随后,针对参与者携带的每一位额外同行来宾——无论是已预留的好友还是具名来宾——都会分别作答,由该参与者代为填写;若为必填项,未完成前将阻止预订。这样,你就能在一人预订四人桌时收集到四份饮食需求。
参与者体验
人们会在报名时作答,且必须先完成必填问题才能确认。答案会随其报名记录一同保存,可在参与者管理中查看,并与参与者名单一并导出。
使用场景
- 提供餐饮的活动——饮食需求与过敏信息
- 新手之夜——评估经验以平衡桌次
- 企业活动——收集部门或团队信息
- 主题之夜——服装偏好、队伍分配
查看每个活动使用哪份表单
不必打开活动的设置,就能知道报名时会问什么:
- 在俱乐部控制台中,只要有任何活动提问,活动 就会出现 表单 一栏:显示它所使用模板的名称,或 自有问题。
- 表单 会为每个模板在 使用者 下列出使用它的活动。打开某个模板的 回答,提问来源 会列出所有这些活动,点击即可打开对应活动。
- 在活动控制台中,总览上的 表单 卡片,以及节目中每个部分的卡片,会说明报名时要问什么:模板的问题、自有问题、上级活动的问题,或者没有问题,并列出这些问题。可以直接在那里用与活动设置相同的选择器更改;在重复活动的某个日期上,它会询问更改要应用到多大范围。编辑问题 用来修改自有问题,查看所有回答 会打开某个模板在所有活动中汇总的回答。
- 在节庆活动的 节目 中,每个使用自有表单的环节都会显示该表单的名称,表单 筛选标签可把列表缩小到使用同一份表单的环节。
有人作答后修改选项
俱乐部的入会表单和已保存的表单模板使用同一个编辑器,规则处处相同。要修正或改写某个选项,直接在原处编辑它的文字:所有选过它的人都会以新的措辞保留自己的答案,因此成员表格、按答案筛选和导出会立即把他们计算在内。仅在大小写或重音符号上有差异的内容会自动匹配。
如果想改为提供别的内容,请删除该选项并添加一个新选项。已删除选项的答案保持原样,绝不会被移到新选项上,因此不会有人被算作选了自己没选的内容。
修正输错的地址和重复报名
输错的邮箱地址会悄无声息地失效:确认邮件和入场二维码都发不出去,而这个人往往会再报名一次,结果占了两个名额。只要活动中任何地方出现这种情况,活动控制台的 参与者 中,名单上方就会出现一张 待核对 卡片,总览的 需要处理 下也会有一行带你过去。
- 疑似输错的地址 会把每个无法使用的地址(gmail.con、gmai.com、hotmial.com、gmail.es…)和原本想填的地址并排显示。修正 会打开 编辑邮箱,并已填好该建议。
- 重复报名? 会显示同一份名单上看起来是同一个人的两个名额:同一地址(不计输入错误和 Gmail 地址中的点),或 同名,即一个名字是另一个名字后面多了几个词。你能看到双方的地址、是谁帮他们报的名、带来的同伴以及报名时间。保留这个 会释放另一个名额且不通知任何人,因为此人仍会到场;其带来的同伴会转到你保留的那个名额下。是两个不同的人 会让这一对不再显示。
- 编辑邮箱 也在名单每一行的菜单中。你可以修正同伴的地址(你的表单向他们询问的那个),以及由你的集成创建、尚无人激活的账号的地址。Ludoya 用户本人的地址只归其本人管理。
- 把确认邮件和二维码发送到这个地址 默认开启。由 Ludoya 发送,除非你通过公开 API 为人报名并自己给他们发邮件:那样它会在你的邮件队列中等待,由你像发给他们的其他邮件一样,从你自己的地址发出。
- 如果修正后的地址属于某个 Ludoya 账号,这个名额就归该账号所有,显示在其应用中。如果该账号已经报名,那就是同一个人报了两次,卡片会提议保留两者之一。
参与者数据导出(所有方案均免费)
将报名名单和表单回答下载为 Excel 表格或 CSV。
可以导出什么
每位参加者一行,包含这些列:
- name(姓名)与 username(用户名)
- 在哪里 — 对于有节目的活动:他们报名的项目,以及其上方的板块("周六:自由桌 › 花砖物语")
- attendance — 其 RSVP 状态
- guests — 携带的匿名客人人数
- 自定义报名表单上每个问题一列,附上他们的回答
对于有节目的活动,第一张工作表列出所有人,每人按其报名的每个地方各出现一次;直接位于活动之下的每个项目都有自己的工作表,列出其中的所有人。
若要围绕它搭建表格,有两点值得知道:
- 活动中任何表单提出的每个问题都会有一列,无论是否有人回答,因此同一活动的两次导出可以对齐。你后来删除的问题的回答仍会导出,放在其他列之后,列名为
removed-1、removed-2…… - 多选题的回答会放进同一个单元格,以
|分隔,所以"素食|不吃坚果"是一个字段,而不是两列。
签到与未到的标记不在导出之内 —— CSV 反映的是谁报了名、告诉了你什么,而不是谁真的走进了门。
使用场景
- 邮件跟进或会员忠诚计划的追踪
- 你自己对谁报名了什么的分析
- 依据过往出席数据规划今后的活动
如需用数字呈现活动、可直接交给赞助商的内容,请看下方的活动报告。
活动报告(所有方案均免费)
活动一开始,其控制台中的报告就会用数字呈现它,统计其中的一切:每个项目、摊位、锦标赛、市场和借阅处。活动进行期间会持续更新,结束后也会一直保留。只有运营整场活动的人才能看到它,从活动自己的控制台进入;负责一个摊位的俱乐部看到的则是该摊位的控制台。
最上方
报名人数(报名活动或其中任何内容的所有人,每人只计一次,包括同伴:即总览中的谁会来)、举办的项目、已坐满座位(提供的座位中有多少被占)以及售出的二手游戏。每个项目最多只计到其座位数,所以挤进满座桌的人不能抵消别处的空桌;他们会单独显示为被加入已满项目的人。
做得好的,以及下次要留意的
两份简短的列表挑出该重复和该改变的事,每一条都附上背后的数字:坐满所有座位或出现候补名单的项目(下次多安排一些)、最忙的时段、也来过你之前活动的人、借出次数多到需要第二套的游戏、无人报名或几乎空着的项目、预计签到却没有到场的人。只有当数字大到有意义时,相应的条目才会出现。
图表与数据
- 最受欢迎和上座最少的项目,以及节目中按板块的已坐满座位(所有角色扮演、所有锦标赛)
- 按开始时段的已占座位:游戏摊位的各场次按各自的时间计算
- 玩得最多的游戏,以及借阅处借出最多的游戏
- 摊位反馈:每个游戏摊位自己的场后问题的结果:有多少玩家回答、每个评分项的平均分,以及选择题中选择每个答案的玩家比例。在可多选的问题中,比例之和会超过 100%;较长的列表显示被选最多的三个。从摊位名称打开即可查看其评论
- 数据一览:人(同伴、报名活动本身的人、也来过你之前活动的人、新的 Ludoya 账号、签到、候补名单)、节目(坐满的项目、摊位反馈问题的回答)、二手市场(在市场摊位和通过本活动的线上挂售售出的数量,以及售出金额)、桌游借阅处、活动聊天中的消息和你发出的公告,以及活动有的话,答题闯关和门票
全部项目
列出每个项目及其板块、开始时间、已占座位和上座情况,可排序,也可下载为表格。没有人预订的项目(试玩桌、自由游玩)显示开放参与,无需报名,而不是零。一个游戏摊位算作一个项目,其场次相加;一场锦标赛只算一次,各轮包含在内。
与你的其他活动对比
报告会把这场活动与你俱乐部之前有人参加的活动并列,从新到旧:报名人数、项目、已占座位、上座率、对局和售出的游戏。节庆活动只会与你其他有自己节目的活动比较,绝不会与每周的桌游夜比较,而且只与你也参与运营的活动比较。
下载为 PDF
下载 PDF 会保存整份报告,方便发给赞助商、市政府或你自己的团队。只有总数:不会出现任何到场者的名字。玩家留下的评论保留在各摊位的反馈卡片上。
俱乐部的活动结束时若有 10 人或以上参加,其管理员还会在报告中看到再带一个俱乐部:这场活动吸引了多少人,以及用来分享俱乐部邀请链接的分享(参见俱乐部控制台)。
可用性热力图(Club 方案)
按活动生成的热力图,显示参与者在活动期间实际会在场的时间,方便组织者围绕大多数人都在的时段规划预定的游戏局。
参与者如何贡献
加入活动时,每位参与者会标记他们将在该活动的自身日程中的哪些时间段在场。对于一个从周五傍晚到周日的周末展会,一位参与者可能会说:"周五 18:00–22:00,以及周六一整天",另一个人可能只能在周六下午到场。RSVP 按钮的下拉菜单允许他们随时编辑这份个人出席日程。
它会显示什么
- 一条沿着活动的自身日程展开的可视化密度条(不是按周或月)
- 大多数参与者会在场的峰值时段
- 只有少数参与者能到场的低谷时段
- 当参与者调整其可用时间时实时更新
组织者如何使用
- 打开活动的参与者列表
- 点按查看日程
- 阅读可用性概览的密度条,找出大多数人会在场的时间段
- 将你最重要的预定的游戏局、演讲或锦标赛安排在这些峰值时段,以便尽可能多的受众能够参加
- 在其下方,个人日程会按姓名列出每位参与者,并显示其逐时段的条形图——当你需要协调特定人员时很有用,比如一位重度桌游的演示者,或为一张预先安排的桌位召集玩家
谁能看到什么
这两个部分会在同一个对话框中一并出现:聚合密度条和带姓名的个人日程。对于其主办群组使用Club计划的活动,任何能打开参与者列表的人都可以看到它们——不仅仅是组织者。
请告知你的参与者,因为他们标记的时间将以姓名对活动的其他人可见。如果这不是你对某个特定活动的期望,就不要要求大家填写个人日程。
给活动所有人的公告(所有方案均免费)
一次性告诉活动里的所有人:比赛推迟开始、某个项目换到别的房间、这是当天的安排。打开活动的控制台,选择公告。
谁会收到
参与活动的所有人:不只是报名了活动本身的人,还包括所有:
- 报名了活动中任何项目、游戏或比赛的人
- 在活动的二手市场出售、或在那里有预留盒子的人
- 从活动的游戏图书室借过游戏的人
你也可以只发给其中一部分:某一个项目(比如只发给寻宝游戏的参与者),或者节目单中的一整个板块及其中的所有项目(比如一次发给所有跑团桌)。如果项目有等候名单,可以把等候名单也包括进来。发送前,页面会告诉你能送达多少人、以什么方式:通过应用,或者对没有应用的人通过邮件。别人一起报名的同伴会通过那个人收到。
如何送达
- 以应用通知的形式送达,没有应用的人会收到邮件:和其他所有内容一样,由每个人自己的通知设置决定
- 以你的俱乐部(个人活动则以你)的名义发出,标题为活动名称
- 先用给我发送测试,看看大家收到的具体内容
活动公告栏
你发出的每条消息也会按从新到旧的顺序保留在活动页面上,所以之后打开页面的人、或当天到场的人,都能读到发布过的内容。项目的页面上也会显示发给整个节庆活动和它所在板块的消息。消息过时后,在你发送过的内容里把它从活动页面撤下:已经收到的人仍会保留。
限制
每个活动每天最多 5 条(发给单个项目或板块的也算在内),这样你发出的消息才会被认真阅读。
试玩分桌(Business 方案)
适用于设计师带来原型、玩家进行试玩的一天。不用手工排轮换,Ludoya 会按时段把所有人安排到各桌。
开启
在活动表单(普通活动,而不是比赛或游戏桌)中,点按 + 分桌 并选择 Ludoya 分配试玩者。之后在活动控制台的 Playtesting 中设置时段、桌子和安排:一个时段多长、场地有几张桌子,以及每个游戏的桌子持续多久(以游戏时长为起点)。
活动当天之前
- 设计师 在活动页面用 带一个原型来 添加自己的原型。
- 玩家 在活动页面标记想试玩的原型。控制台会显示哪些最受欢迎。
安排
原型都到齐后,选择 生成安排。Ludoya 会把所有人分配到各个时段,把每张桌子作为普通游戏桌(“3 号桌 · 游戏名”)加入活动的节目单,并给每个人发送一条包含其桌子的通知。随后控制台会显示满足了多少心愿,以及哪些两人组合会碰面两次:多加一张桌子或一个时段,就有更多余地打散组合。
如果有人加入或离开,或有新的原型到来,更新安排 会保留已经在玩的桌子和你固定的座位,并重新安排其他人。重新生成 会把所有尚未开始的桌子重新洗牌。无论哪种方式,只有桌子发生变化的人才会收到通知。
关闭试玩分桌会删除它安排的、尚未开始的桌子。已经玩过的桌子会保留。
我的原型(面向游戏设计师)
还没出版的游戏也能有个家。在 探索 → 桌游 中,找不到你的桌游吗? 下方选择 这是我的原型;之后 我的原型 就会成为你主页上的一张卡片。
- 新原型:名称、描述、玩家人数、游戏时长和最低年龄,和任何游戏一样。制作期间设为 私密,想用链接分享时设为 不公开列出,或者设为 公开。私密原型不能带去试玩:先把它改为不公开列出或公开。
- 版本:每次游戏有改动就添加一个版本(新版本的名称),这样反馈就会对应到大家实际玩过的那个版本。
- 拥有者:为设计团队的其他成员 添加共同拥有者;每位拥有者都能管理这个原型。
- 反馈表单:测试者玩完某个版本后回答的问题。试玩桌结束后,玩家会在那里看到 给出反馈。
- 反馈:每个版本的评分和评论,以及每个问题 跨版本 的变化,让你看出某次改动是否有帮助。
- 试玩:这个原型被带去过的每场活动。在设有试玩匹配的活动中,带一个原型来 会把它登记到那里。
在大屏幕上展示活动(Business 方案)
把活动投到场馆的投影仪或电视上。在活动菜单或其控制台中选择 投到屏幕上,然后 打开屏幕:
- 锦标赛 会显示本轮的桌次、本轮计时和排名,排名会随着成绩录入实时更新。开启 只在最后公布排名 后,屏幕也会把排名隐藏起来。
- 日程或游戏展台 会显示现在和接下来在进行什么、在哪里,以及剩余的位置。
- 角落里的二维码让观众可以 在手机上关注 并报名。
节庆活动的某个板块或比赛也可以在自己的控制台里拥有专属屏幕:跑团区只显示它的桌子,比赛大厅只显示它的轮次。使用的是节庆活动的方案。
屏幕上不需要任何人登录:链接就是钥匙,所以投影仪下的电脑可以是任何人的。投影仪接在另一台电脑上?在那台电脑上打开同一个链接,按 F 进入全屏。屏幕每隔几秒重新加载一次活动,断线时会在角落里提示,因此过时的屏幕绝不会冒充实时画面。如果链接流传到了不该去的地方,使用 生成新链接;旧链接会失效。
贯穿整个展会的答题闯关(Business 方案)
答题闯关让参观者在各个展位之间穿梭:每个参与的展位都有一张海报,上面有专属二维码和一道小题。在活动控制台的 答题闯关 中设置。
- 点击 创建答题闯关,然后为每个展位 添加站点:填写位置,以及玩家在那里做什么:选择答案(标出正确答案,或设为投票)、输入答案(列出所有你认可的正确答案;不区分大小写、重音符号和标点)或 找到即可。
- 在 设置 中填写 奖品和抽奖 说明(可以赢得什么,以及何时何地抽奖):它会显示在每个站点和海报上。
- 打印海报:每个站点一张,带有二维码和一个简短地址,供相机无法识别时手动输入。选择尺寸:A4 适合墙面或展位正面,A5(一张 A4 纸印两个)适合展位桌面,A6(一张纸印四个)适合做柜台卡片。海报被弄湿了?在该站点的菜单中点击 打印这个站点的海报,只重印那一张。站点可以按任意顺序找到,所以海报上没有编号。在草稿状态下,只有主办方能打开站点,所以先试一试。
- 开门时点击 开启答题闯关。活动需要先设置日期。
在有真实地图的场地(城镇、广场)上,每个站点都有 场地地图上的地点。新站点一开始是 以站点命名的地点:场地中同名的地点,或者在地图编辑器里等你标注的新地点。六十个橱窗?先添加站点,再一次性标注它们的地点;给每个站点一个地点 会为之前添加的站点完成这一步,控制台会显示还有多少站点不在地图上,并通过 去标注 打开地图编辑器。玩家可以从任何站点的页面打开 在地图上查看站点:答题闯关 图层把每个站点显示为一面待寻找的旗子,找到后变成绿色对勾,还会显示一共几个、已找到几个;查看它们 会列出地图暂时无法显示的站点(待寻找的排在前面);点击一个地点会显示它有哪些站点,但绝不会显示题目内容。在你隐藏站点列表期间,地图也会隐藏它们。
参观者用手机浏览器就能玩,无需安装 App。他们扫描的第一个站点会显示题目,并请他们填写名字(或队名:一家人用一部手机就作为一个队伍参加)和邮箱,并确认自己已年满 14 岁或正在和孩子一起玩。已有 Ludoya 账号的邮箱会改为通过邮件收到验证码,所以谁也无法冒充别人。之后的每个站点都直接显示题目。每个站点只接受一次作答,你可以选择让玩家 每次作答后立即显示 对错,还是 仅在答题闯关结束时 显示(避免答案被传开)。中途修正了输错的正确答案?该站点所有人的答案都会重新判定。有展位在展会中途离开?关闭这个站点:它的二维码不再接受作答,已经找到它的人保留分数,对其他人来说,它会从闯关和海报中移除。
控制台会显示每个站点的作答人数和 排行榜:答对最多的排在前面,其次是站点最多的,再次是最先完成的。志愿者可以按名字查找玩家,排行榜也可以下载为电子表格。要发奖品,请在活动中添加一个抽奖,在“谁参加”中选择 答题闯关玩家,并设定找到的站点数或答对题数的最低要求;勾选 每答对一题多一张抽奖券,就能奖励表现最好的玩家,又不会把其他人排除在外。之后每个站点都会告诉玩家进入抽奖还需要什么,以及何时已经进入。参与游戏的主办方和志愿者也在抽奖名单中:如果其中有人中奖,请作废并重新抽取。抽奖时点击 结束答题闯关:不再接受作答,玩家可以看到自己的成绩。
从未完成 Ludoya 账号注册的参观者,其信息会在活动结束 30 天后删除。